Introduction
The configuration process consists of the following tasks:
- Select the events you wish to track from those supported by Brightcove Player.
- Select the custom dimensions you wish to use from those supported by the Google Analytics plugin.
- In Google Analytics, create the selected custom dimensions.
- In Video Cloud Studio, add configuration information for the Google Analytics plugin. You will do this using the player's JSON editor.
Select events
In the JSON configuration you will list the events you wish to track. Decide which of the following you will track:
- player_load
- video_engagement
- video_impression
- play_request
- ad_start
- ad_end
- error
The following events need to be added in the JSON Editor as they are unavailable in the Studio UI.
- video_view
- video_complete
Select custom dimensions
There are eight custom dimensions from which you can choose to use in your Google Analytics data. Decide which of the following to use:
- bcvideo_account
- bcvideo_platform_version
- bcvideo_player
- bcvideo_range
- bcvideo_session
- bcvideo_tags
- bcvideo_video_duration
- bcvideo_video_seconds_viewed
Create custom dimensions
You must create each of the custom dimensions you are using. The steps in this document from Google lead you through the process: Create and edit custom dimensions and metrics.
During the creation of each custom dimension, you will be asked to select a Scope. For these custom dimensions use the value Hit. Also, when you create each custom dimension an index, or sequence, number will be associated with it, as shown in this screenshot:
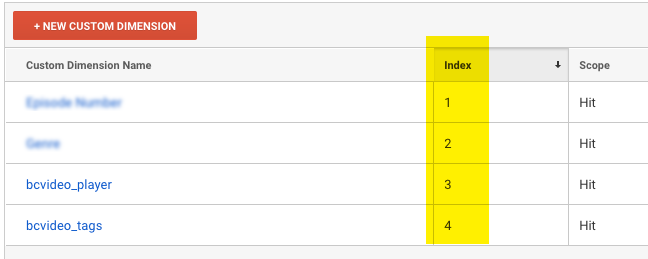
You will need to have available the table of created custom dimensions as the index number is needed in the configuration JSON.
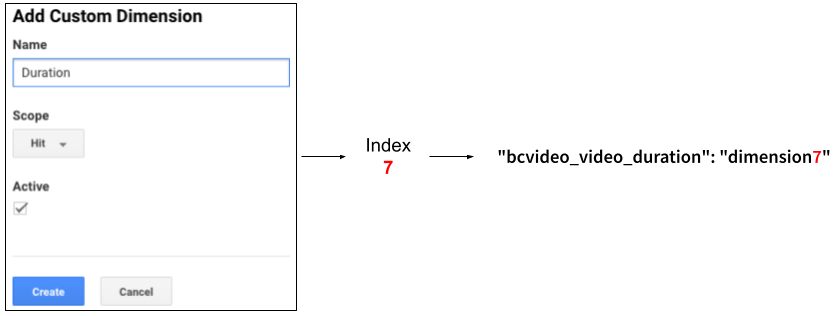
When creating the dimensions you can choose a more friendly name. For instance, consider the following:
- When creating the custom dimension for
bcvideo_video_durationyou name it simply Duration because you want the friendlier name used in your reports. - When created, the index associated with Duration is
7. - In your configuration JSON, you use the following assignment:
The index number associates the friendly name with the plugin's internal name."bcvideo_video_duration": "dimension7"
Add JSON configuration to player
You've made the decisions about what events to use, and what custom dimensions to use, and created the latter. You are now ready to build the JSON that you will include in the player configuration.
An example is shown below with a table explaining each logical group of code. You can follow this guide to build your own JSON.
| Lines | Details |
|---|---|
| 1,19 | JSON boundary for all the info on the plugin configuration |
| 2-3 | Defines the plugin and version |
| 4,18 | JSON boundary for options definitions for the plugin |
| 5,11 | JSON boundary for the custom definitions |
| 6-10 | Define the custom dimensions you have created; you use the name of the dimension, a colon, then the string dimension followed immediately by the index number as assigned when creating the custom definitions |
| 12,16 | JSON boundary for the events you chose to track |
| 13-15 | All events you chose to track, from the Select events section above |
| 17 | The tracker ID assigned to you by Google Analytics |
{
  "registry_id": "@brightcove/videojs-bc-ga",
  "version": "1.x",
  "options": {
    "paramsToTrack": {
      "bcvideo_video_seconds_viewed": "dimension1",
      "bcvideo_range": "dimension2",
      "bcvideo_video_duration": "dimension3",
      "bcvideo_player": "dimension4",
      "bcvideo_session": "dimension5"
    },
    "eventsToTrack": {
      "video_impression": "Video Impression",
      "play_request": "Play Request",
      "video_engagement": "Video Engagement"
    },
    "tracker": "UA-123456-1"
  }
}
Once the configuration JSON is complete, you would paste it into your Brightcove Player's configuration following these steps:
- Log in to Video Cloud Studio.
- Navigate to the PLAYERS module and click on the player to which you will add the new configuration.
- From the left navigation, click JSON Editor.
- If already you have plugin(s) configured for the player you can paste the code into that section. Otherwise, you will need to add some JSON for plugins. In either case, the result should be similar to the following, but of course using your player information and JSON (the JSON configuration for the plugin is highlighted in yellow):
{ "compatibility": true, "video_cloud": { "policy_key": "BCpkADawqM2w1K7269Ic17hjK0O2-ibj221pVcELpF1l5nZuiL-123456789123456789" }, "player": { "template": { "name": "single-video-template", "version": "6.48.5" } }, "plugins": [ { "registry_id": "@brightcove/videojs-bc-ga", "version": "1.x", "options": { "paramsToTrack": { "bcvideo_video_seconds_viewed": "dimension1", "bcvideo_range": "dimension2", "bcvideo_video_duration": "dimension3", "bcvideo_player": "dimension4", "bcvideo_session": "dimension5" }, "eventsToTrack": { "video_impression": "Video Impression", "play_request": "Play Request", "video_engagement": "Video Engagement" }, "tracker": "UA-123456-1" } } ] } - Save your changes and publish the player and your Google Analytics plugin will be ready to go.