Using GAM Premium with Brightcove Player
Disclaimer
GAM Premium has hundreds of options that lead to a nearly infinite amount of possible configurations. This document shows one way to create an ad rule that gets used by a Brightcove Player. This document is not an exhaustive treatment of GAM Premium configuration and implementation. It is meant to be a starter exercise to introduce Brightcove customers to GAM Premium/Brightcove Player integration. This document in no way is meant to replace any of Google's GAM expansive documentation.
Overview
The chances of you needing the exact GAM Premium configuration detailed in this document is almost nil. That being said, this document will introduce you to the terms, concepts and configuration steps needed to start you on your path to successfully integrating GAM and Brightcove Player.
You need to build some kind of a knowledge foundation so that the detailed steps that follow in this document can be used in reference to a bigger picture. This overview section of the document will help you familiarize yourself with terms, high-level concepts and broad steps you need to understand before getting "into the weeds" of implementation.
Terminology
The following terms are used extensively in this document. Gaining knowledge of them will assist in successful implementation and understanding of the integration process detailed in the steps below. The definitions have a video advertising slant reflected in this document, and may not be applicable to all GAM uses.
- Inventory: The video ad slots available to sell.
- Advertiser: A company purchasing your video ad slots.
- Ad unit: A container to organize your inventory and detail how your inventory is defined.
- Order: An agreement between the inventory owner and a buyer that specifies the details of an advertising campaign.
- Line item: Specifies when/where an advertiser's ads will appear. Also specifies the actual videos ads and companion ad images.
- Creative/creative set: The video(s) and/or image(s) that are the actual ads and/or companion ads. With video advertising the combination of a video and companion ad is a creative set. Creatives are associated with line items.
- Video content source: In this case, Brightcove Video Cloud.
- Ad rule: Define how ads display with your video content. For instance, as a pre-roll and a mid-roll every 5 minutes.
- Ad tag: A URL that points to the definition of how ads should be used when playing back a video. The ad tag is used when configuring IMA advertising with Brightcove Player.
Process overview
The following illustrates the entities created and their relationships.
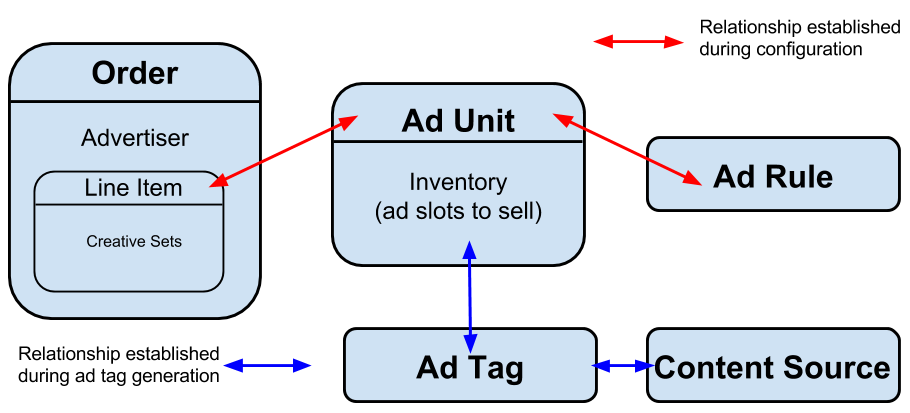
The following provides the next level of detail of the process.
- Create an advertiser. In GAM speak, this is a company of type Advertiser. This is required as when an order is created it must be associated with an advertiser.
- Create an ad unit. This is an organizer for your inventory and you will specify the size of video ads and companion ads you want from the advertiser.
- Create an order. The order will detail who the advertiser is. Although it can be done later, the GAM interface also allows the line items to be created as part of the order, which will be the process followed in these steps.
- Create a line item as part of the order. The line item will detail you want to use Video VAST ads, the size of the ad videos, when they should start and stop.
- Target (link) the particular line item to an ad unit. The order, through a line item, matches the advertiser's ads to your inventory.
- Create creative sets. Before this step you have line items which contain no actual video ads. In this exercise you will supply both video ads and corresponding companion ad images (if you wish to display them).
- Associate creative sets with a particular line item.
- Create an ad rule. This defines when and how the ads should play. As part of the ad rule creation you associate it with an ad unit. This means that if inventory from an ad unit is used, the definitions of the ad rule will be used to specify ad playback times.
- Generate an ad tag. This is the URL that is used when configuring the IMA3 plugin. Note the original ad tag will not function correctly. Three query string parameters must be added for proper configuration.
- Connect to Video Cloud. This is done to retrieve a value needed for one of the aforementioned query string parameters.
- Use Google's Video Suite Inspector to be sure the ad tag is functioning correctly.
- Lastly (and finally) use the ad tag with Brightcove Player.
Create an advertiser
If you will be using an advertiser that already exists, you do not need to complete this section.
- Follow the numbered steps and click New company.

- From the dropdown select Advertiser
- Supply an advertiser name.
- Click Save.
Create an ad unit
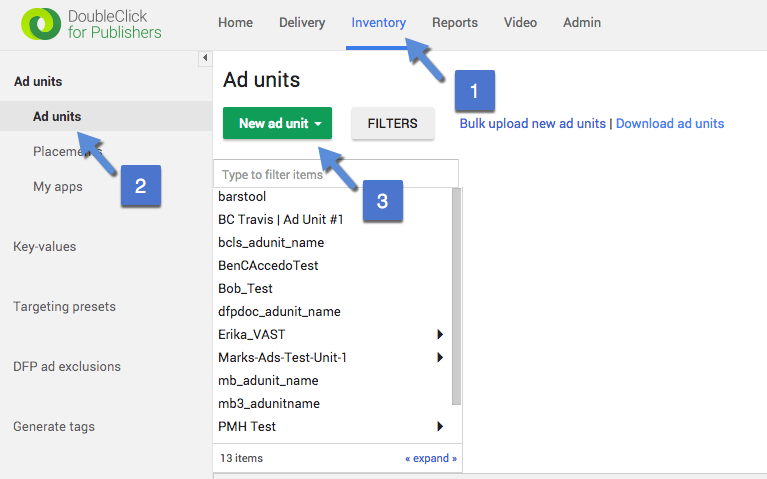
- Follow the numbered steps and click New ad unit.
- From the selections that appear, select Current level.
- Supply appropriate values for the Code, Name and Description.
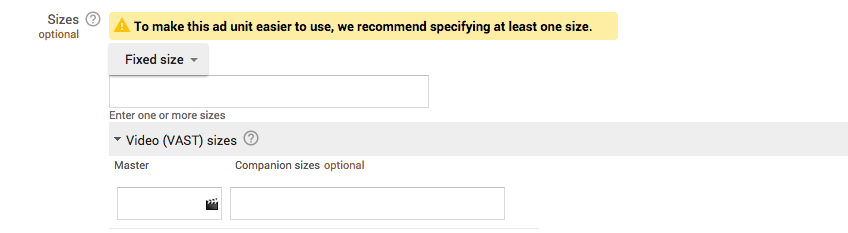
- Select the Video (VAST) sizes.
- Based on your videos and companion ads, enter the sizes. In this example the videos are 1280x720 and the companion ads 728x90. You can either select the size if they have been previously used, or enter new sizes.
- No further information need be entered, so scroll down and click Save.
Create an order
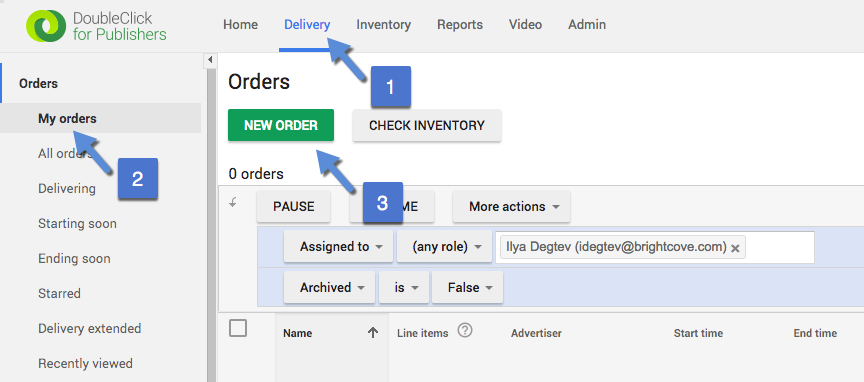
- Follow the numbered steps and click New order.
- Enter a Name for the order.
- Click in the Advertiser box. Select an existing advertiser, either the one created earlier in this document, or one that existed previously.
- The Trafficker entry will be pre-populated with your name and email address.
Create a line item
A line item can either be created at the same time as a new order, or created later then associated with the order. In this exercise, you will create the line item as you are creating the order.
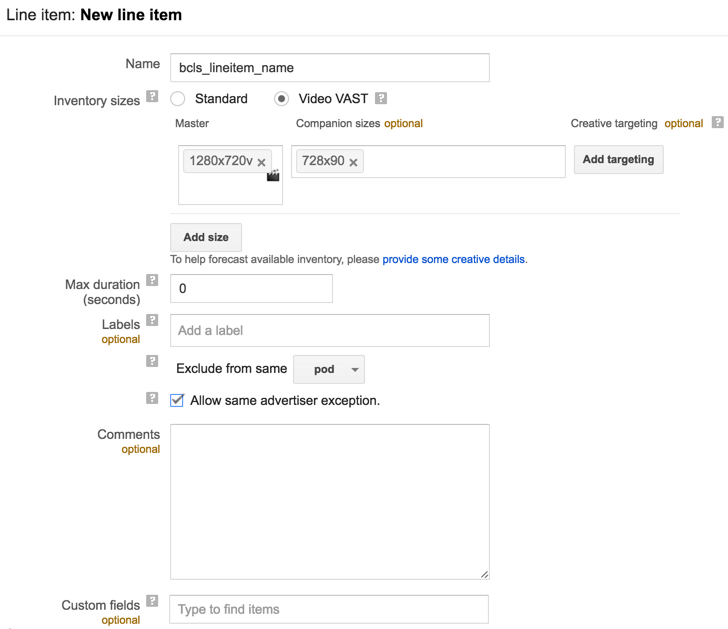
- Enter a Name for the line item.
- For the Inventory sizes, click Video VAST.
- Enter sizes for videos and companion ads. You will most likely enter the same sizes as used for step 9 above.
- Check the Allow same advertiser exception. This permits ads from the same advertiser to be used for pre-, mid- and post-rolls.
- Check to be sure your form is filled out similarly to the following:
- In the line item Settings section, set the following:
- Type: Sponsorship
- Start time: Immediately
- End time: Unlimited
- Scroll down to the Add targeting section.
- If it is not selected, click Inventory.
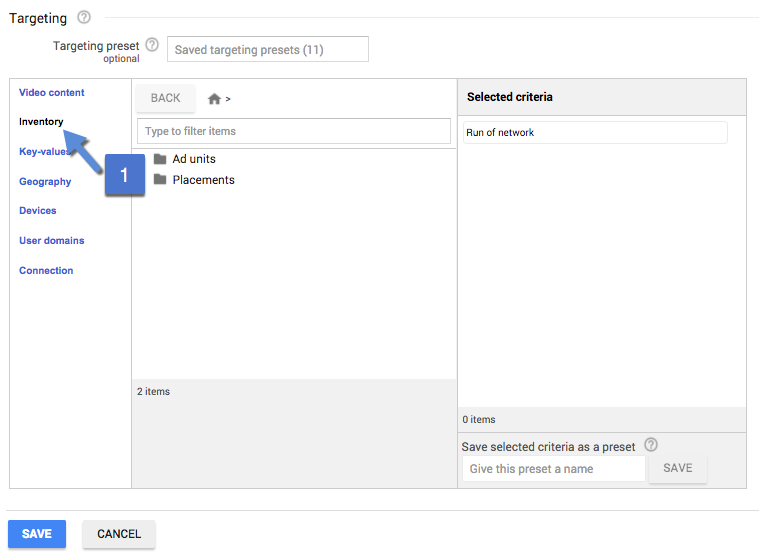
- Click Ad units.
- Click the include button next to your ad unit to associate this order with your ad unit.
- Click Save to finalize the configuration of the new order and line item.
- Click the Approve button to approve your newly created order.
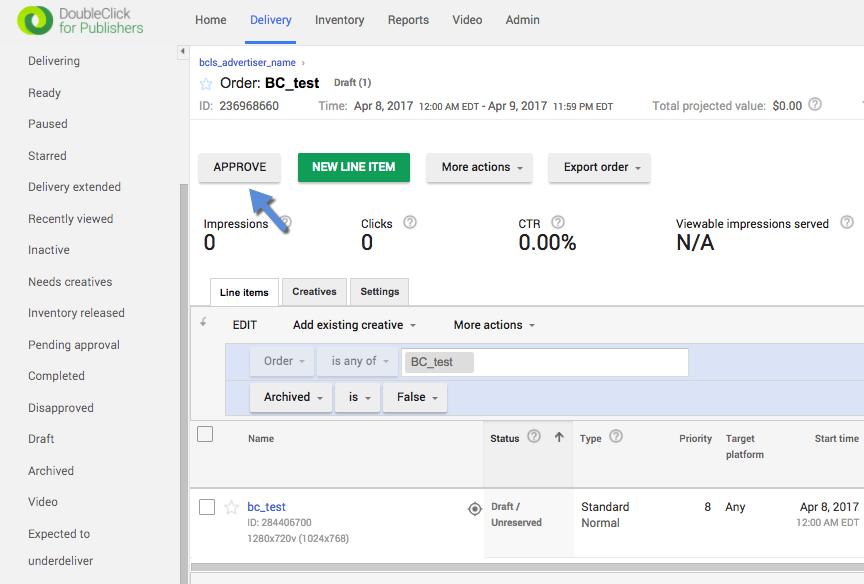
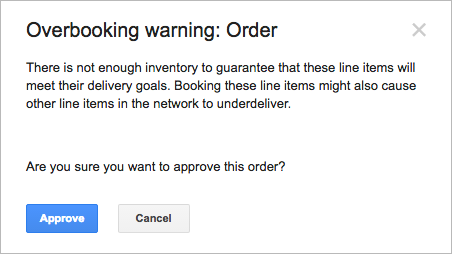
- Click the Approve button again to acknowledge the overbooking warning.
You have now created an order and an associated line item.
Create creative sets
You will repeat the steps in this section once for each creative set you wish to create. There are two parts to creating a creative set, uploading the video and also uploading the image for the companion ad.
- Follow the numbered steps and click New creative set.

- Select an advertiser with which to associate the new creative set.
- Click Video VAST.
- Enter sizes for videos and companion ads. You will most likely enter the same sizes as used for step 9 above.
- Click Continue.
- Enter a Name for the creative set.
- When ask to Select a creative set type, click Linear.
- Click Video.
- For the video asset, set the following:
- Creative set name
- Name (of the video asset)
- Click-through URL
- Duration
- Check to be sure your form is filled out similarly to the following:
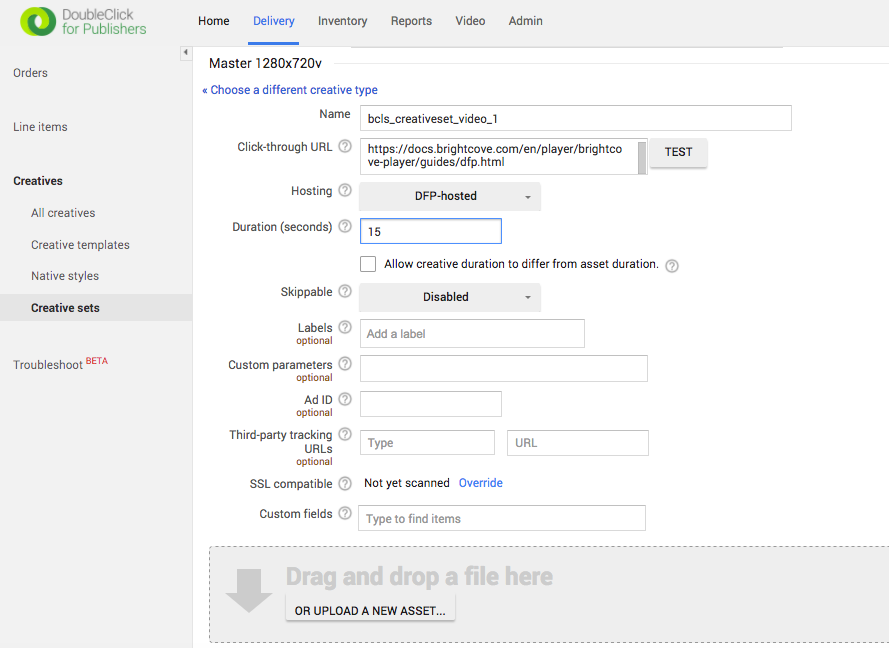
- Supply the video by either dragging and dropping into the highlighted area, or browse for the file.
- You will notice that various renditions of the video ad will be created.
- Scroll down to the Companion creative section.
- For the companion ad image asset, set the following:
- Name (of the image asset)
- Image file
- Click-through URL
- Click Save to finalize the configuration of this creative set.
Add creatives to the line item
- Follow the numbered steps and to see the orders you have created.
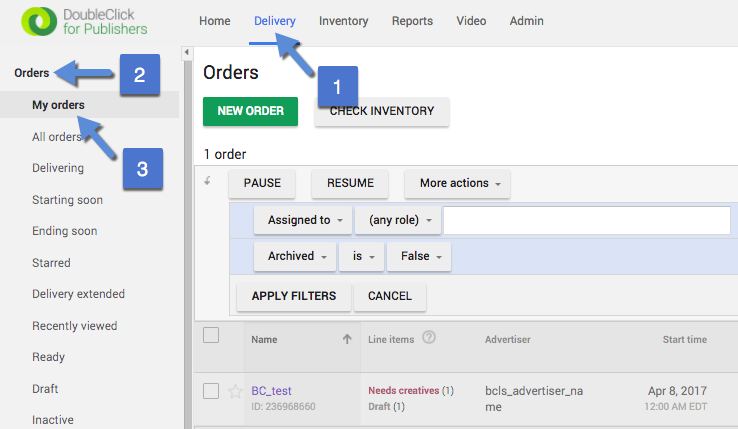
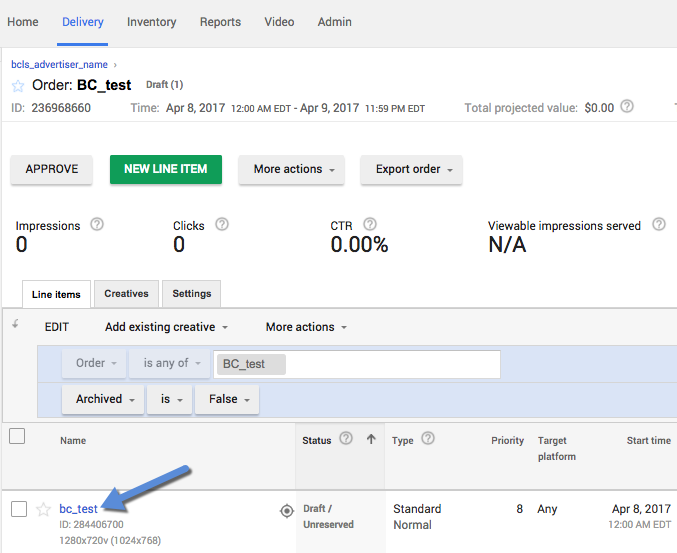
- Click on the order you've created during this exercise.
- Click your line item name to begin the process of adding creatives to the line item.
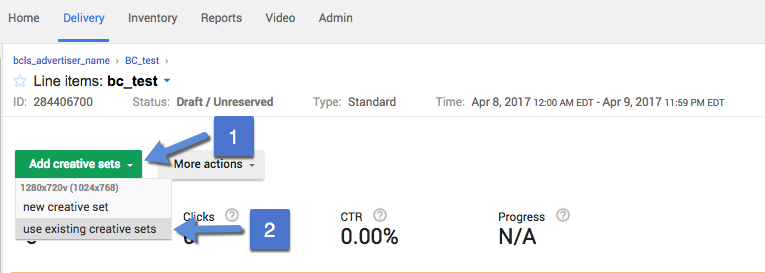
- Click the Add creative sets dropdown and select use existing creative sets.
- Click the Creatives folder in the dialog that pops up.
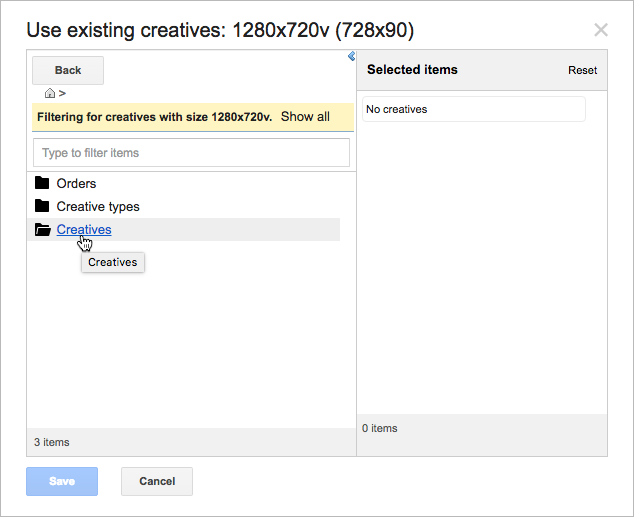
- Click the include button for the creative sets you wish to include.
- Click Save in the Use existing creatives dialog.
- Scroll down and click Save to finalize the changes to the line item.
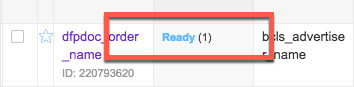
- Click on My orders again, and you will see the line item for your order is now labeled Ready.
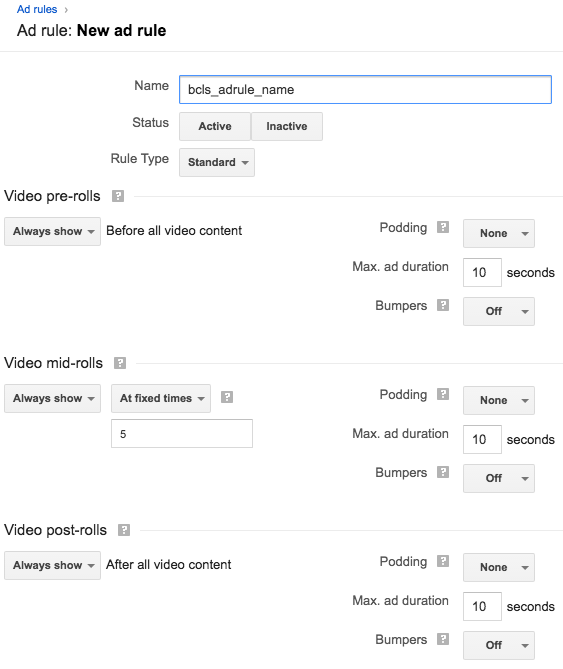
Create an ad rule
In an ad rule you configure when you want your ads to play. You will have options for each of pre-, mid- and post-role, as follows:
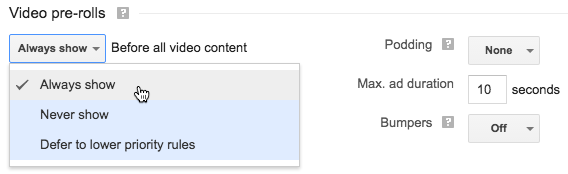
Depending on your selection from the dropdown, and the roll type, you will then be presented with further options.
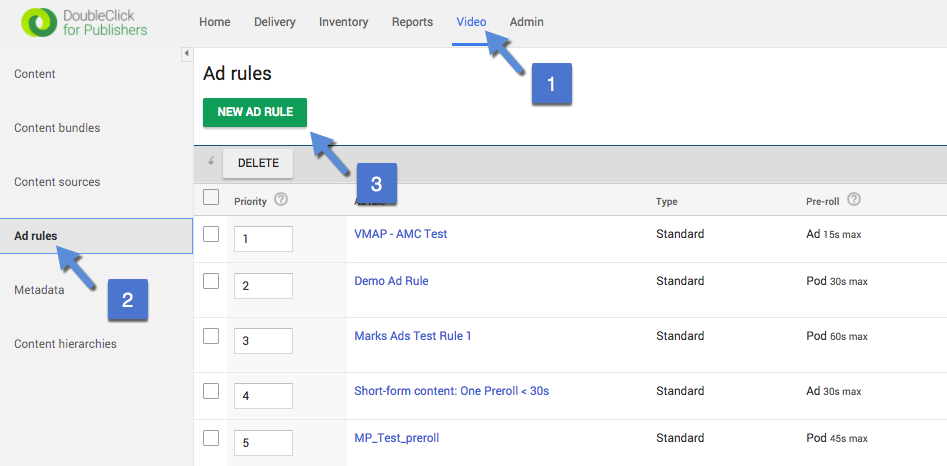
- Follow the numbered steps and click New ad rule.
- Provide a Name for the ad rule.
- For the Status, click the Active button.
- Configure the pre-, mid- and post-roll ads as desired. An example configuration follows:
- In the ad rule Settings section, set the following:
- Start time: Immediately
- End time: Unlimited
- Scroll down to the Targeting section.
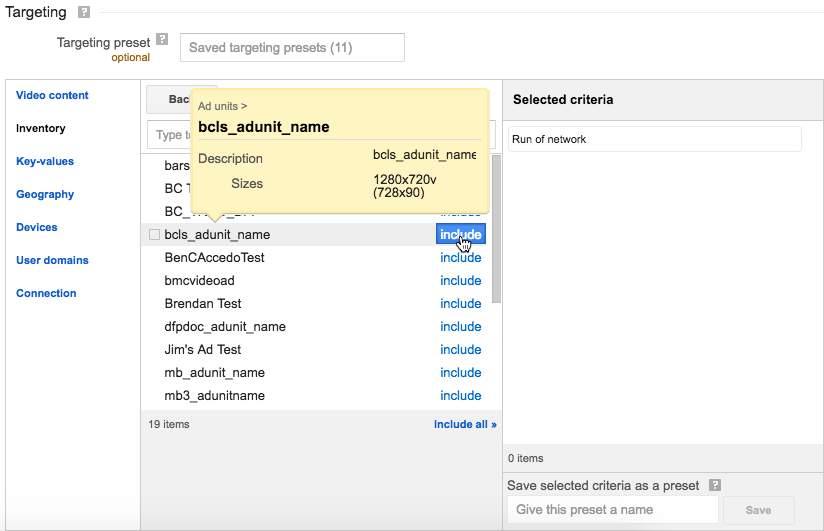
- Click Inventory then Ad units to see all available ad units.
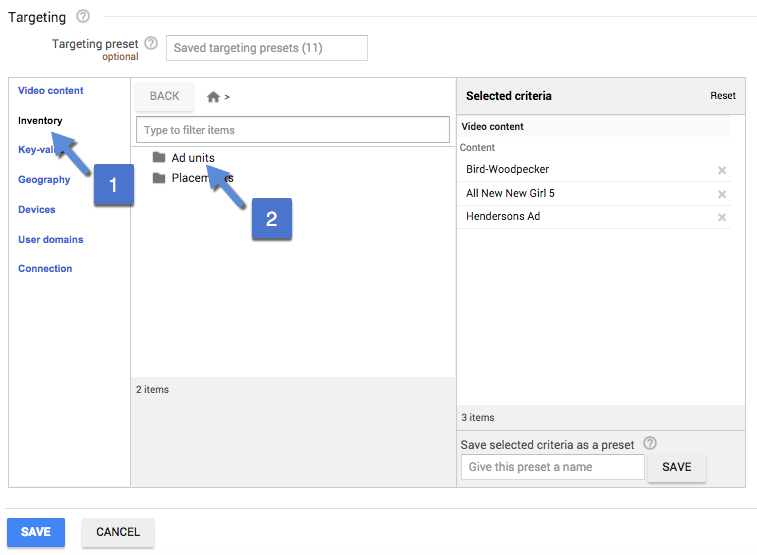
- Click the include button for the ad unit created earlier in this exercise. This instructs your ad unit to use this ad rule.
- Click Save to finalize the configuration of your ad rule.
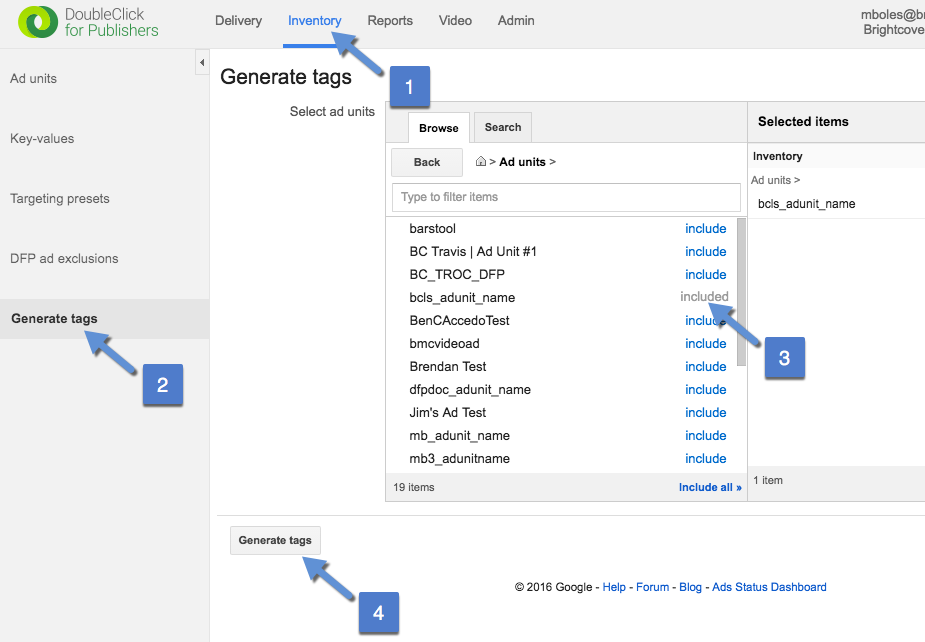
Generate an ad tag
- Follow the numbered steps to include your ad unit and then click Generate tags.
- Click the Continue button to accept Google Publisher Tag as the tag type.
- Click the Continue button again to accept the targeting and sizes.
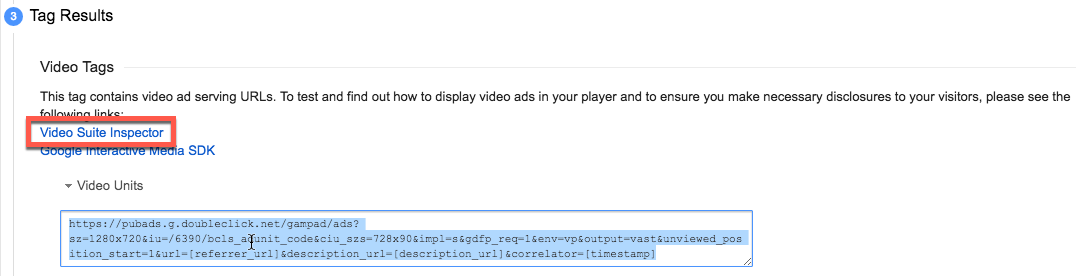
- Click in the Video Units text area and copy the entire ad tag.
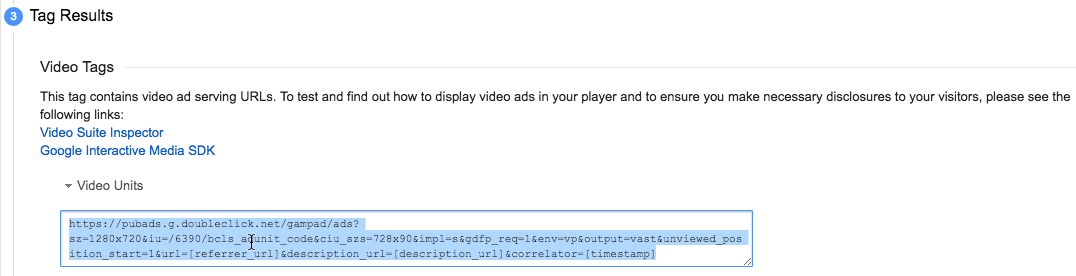
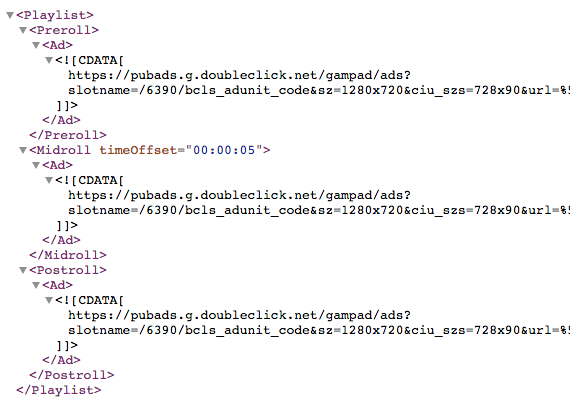
- Paste the copied URL into a browser, browse it, and you will see the VAST XML associated with your ad tag. NOTE, this is not the final version of the needed tag.
Connect to Video Cloud
The only reason the steps in this section of the document need to be performed for this exercise is to generate a source ID that indicates a connection to Video Cloud. This ID is required in the next section.
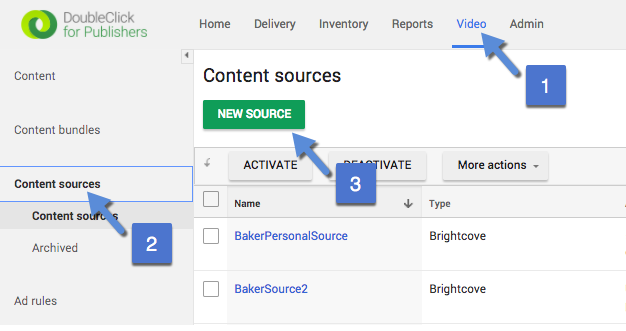
- Follow the numbered steps and click New source.
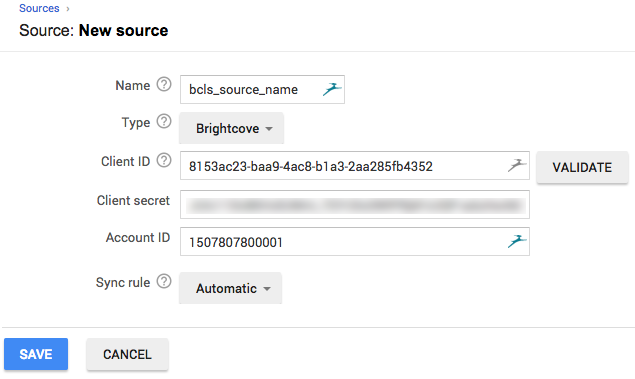
- Provide a Name for the source and set the Type to Brightcove.
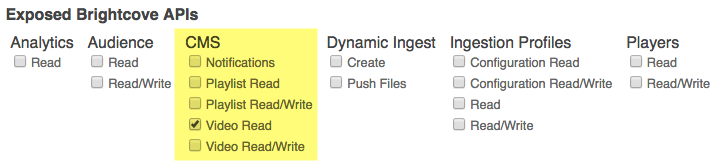
- Follow the steps in the Managing API Authentication Credentials document to obtain a Client ID and Client Secret. You will select the following for API permissions:
- Enter, then validate, the Client ID, Client secret and Account ID. When you validate the credentials, you will see a list of videos from your Video Cloud account.
- Check to be sure your form is filled out similarly to the following:
- Click Save.
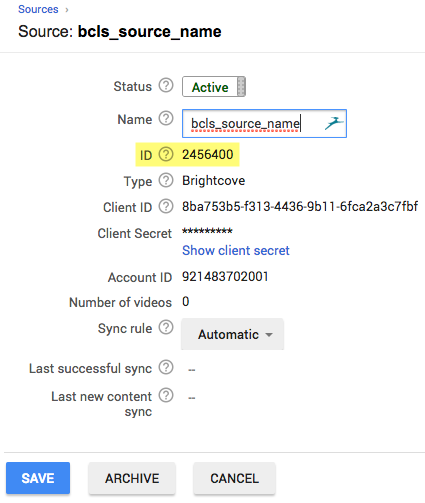
- After saving, you will see information similar to the following. Record your source ID as it will be used later in this exercise.
Test the ad tag
- Just above the ad tag you will see a link to the Video Suite Inspector. Open this link in another browser or tab.
- Paste your ad tag into the text box for the VAST tag.
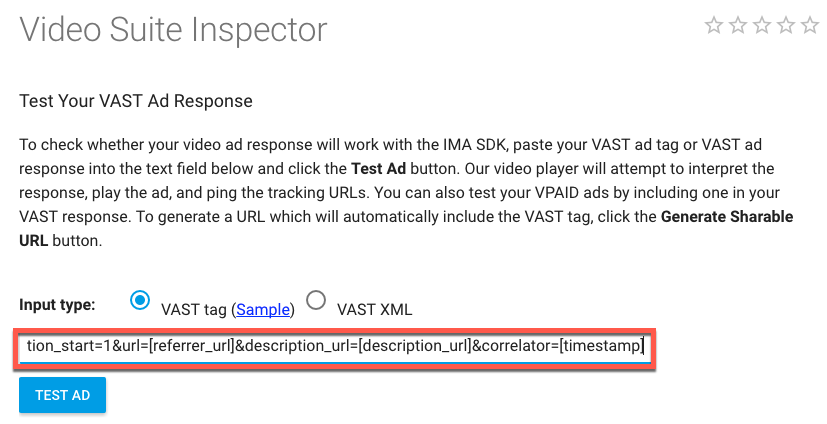
- Click the TEST AD button and you will see ONLY the pre-roll will play.
- Again, paste the ad tag into a browser, but before browsing, add the query string parameter &ad_rule=1 to the end of the ad tag. You will see the XML displayed has changed to reflect that a pre- and post-roll are defined. This query string parameter turns using ad rules on. There is a chance that ad rules may be turned on for the entire account, in which case, you will not have to use this query string parameter.
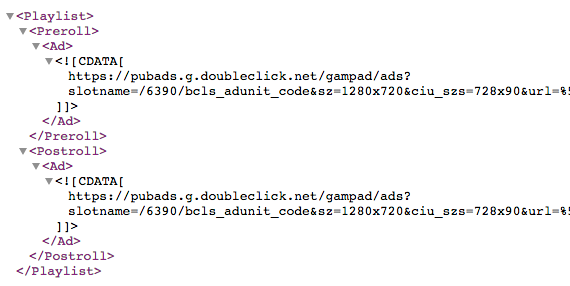
- Add the query string parameter to the ad tag in the Video Suite Inspector and you will see the pre- and post-roll ads now play.
- Locate the source ID recorded from step 72 above.
- Also, locate a video ID from a Video Cloud media asset.
- Add another query string to the ad tag, this time using the field to be cmsid, and the associated value to be the retrieved source ID.
cmsid=1111 - Add yet another query string to the ad tag, this time using the field to be vid, and the associated value to be the video asset ID.
&vid=4825296720001 - The entire query string added should appear similar to the following:
&ad_rule=1&cmsid=1111&vid=1234567891234 - Again, paste the ad tag into a browser, and add the complete query string to the ad tag. You will now see the mid-roll has been added to the generated XML.
- Add the query string parameter to the ad tag in the Video Suite Inspector and you will see the pre-, mid- and post-roll ads now play.
You now have a functioning ad tag, and are (finally) ready to use it with Brightcove Player.
Use the ad tag with Brightcove Player
Fairly broad steps will be used here on how to configure Brightcove Player's IMA3 plugin to use the ad tag you have constructed. If you need more detailed instruction, see the Implement using Players module section of the Advertising with IMA3 Plugin Guide document.
- In Studio's Players module, create a new player, or open an existing player.
- Open the Advertising accordion on the Overview tab.
- Turn on the Enable Client-Side (IMA) toggle.
- For the Ad Tag, enter the ad tag that includes the three query string parameters.
- To publish the player, click Publish Changes.
- Navigate to the Media module and click on the video whose ID you used in the vid query string parameter.
- Publish this video using the player to which you added IMA3 advertising.
- Use the JavaScript or Iframe code and test your configuration.
Display companion ads
Displaying companion ads is as easy as copying code from where the ad tag was generated. The following steps detail the process.
- Return to the results of the ad tag generation (or generate the tag again).
- Locate the Document header section and copy the code indicated.
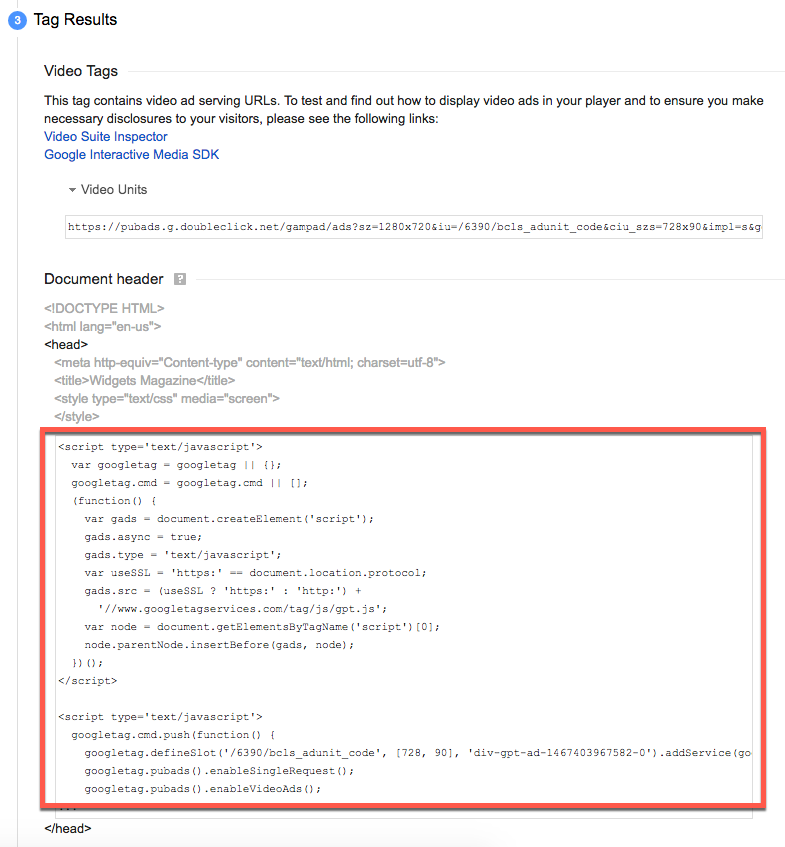
- Paste this code into the head section of your HTML page.
- Back in the results of the ad tag generation, copy the indicated code.
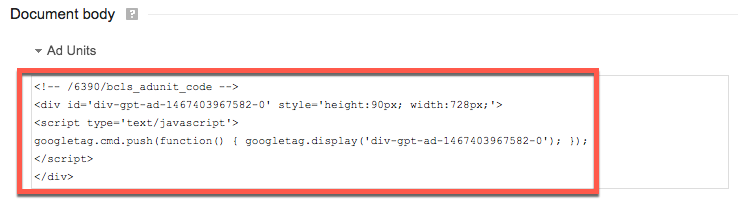
- Paste the code into the body of your HTML page where you wish the companion ad to be displayed.
- Test your HTML page and you will see the companion ad change with the video ad.