Player/Plugin Version Testing
Introduction
Brightcove Player plugins can be your own creations, or Brightcove supplied plugins. You will be given three options for testing:
- Using Studio to create a player and add the plugin and configurations.
- Using Studio to create the player, then in HTML programmatically add the plugin.
- Using the Player Management API and curl. The curl tool is used at the command line to leverage the Player Management API. For an introduction to using curl, see the Quick Start: Player Management document. If you are familiar with HTTP client tools, like Postman, they can also be used. The advantage of this approach is that you can choose any version of the player you wish, not only those that are available in Studio.
Testing Brightcove plugin pre-releases
At times Brightcove will make available pre-releases of certain plugins. You can use the instructions in this document to be sure your Brightcove Player and other plugins work with the pre-release.
Using Studio
In the following steps you will be guided through the process of using Studio to create a player and add a plugin to the player for testing.
- Open the PLAYERS module and either create a new player or locate the player to which you wish to add the plugin.
- Click the link for the player to open the player's properties.
- Expand the Plugins section on the Overview tab.
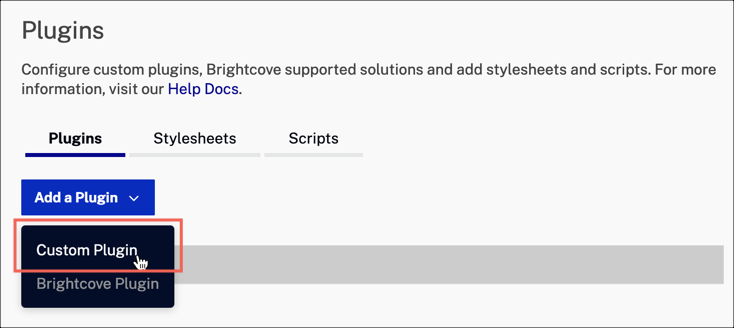
- Click Add Plugin and select Custom Plugin.
- For the Plugin Name enter the desired plugin's name.
- Enter the desired plugin's JavaScript URL.
- Enter the desired plugin's CSS URL.
- Enter the configuration options, if any, for the desired plugin.
- Click Save.
- To publish the player, click Publish Changes.
- To close the open dialog, click Close.
You are now ready to publish a video using the newly configured player and test the plugin.
Programmatically add the plugin
In this section of the document you will create the player in Studio, and then add the plugin using code in an HTML page.
- In Studio, select the PLAYERS module.
- Create a new player, using the desired version from the dropdown.
- Go to the MEDIA module and publish a video.
- Copy the Advanced (in-page embed) implementation code.
- Paste the player code into an HTML page.
- Add the path to the CSS file using an HTML
<link>tag. - Add the path to the JavaScript file using an HTML
<script>tag. - Once the player is ready, call the plugin and pass any options.
- The following shows a generic outline of the needed code:
<!doctype html>
  <html>

  <head>
    <meta charset="UTF-8">
    <title>Testing a plugin</title>
    <link href="//url_to_my_css/my.css" rel="stylesheet">
  </head>

  <body>

    <video-js id="myPlayerID"
      data-video-id="5350958927001"
      data-account="1507807800001"
      data-player="rJeuIHdbmW"
      data-embed="default"
      data-application-id=""
      controls=""></video-js>
    <script src="https://players.brightcove.net/1507807800001/rJeuIHdbmW_default/index.min.js"></script>

    <script src="//url_to_my_js/my.js"></script>

    <script type="text/javascript">
      videojs.getPlayer('myPlayerID').ready(function() {
        var myPlayer = this,
        options = {};
        options.prop1 = "value1";
        options.prop2 = "value2";

        myPlayer.pluginName(options);
      });
    </script>

  </body>

  </html>
You are now ready to browse this page to test your plugin.
Using curl and the Player Management API
In this section of the document you will see how you can use curl and leverage the Player Management API to test a plugin with a player. The advantage of this approach is that you can choose any version of the player you wish, not only those that are available in Studio.
Create a player
You have now successfully created a player of a specified version.
Create a testing page
Now that your player is created, you will want to test your plugin with it. The steps in this section guide you to get the advanced player code implementation and test with your plugin.
-
As mentioned in the Step-by-Step: Player Management document, you will want to set up environment variables for the following:
- Your email
export EMAIL=YourEmailAddress - Your account number
export ACCOUNT_ID=YourAccountID - Your player ID, once the player is created
export PLAYER_ID=MyPlayerID
In curl, you will use the variable preceded by a $, like so:
$EMAIL - Your email
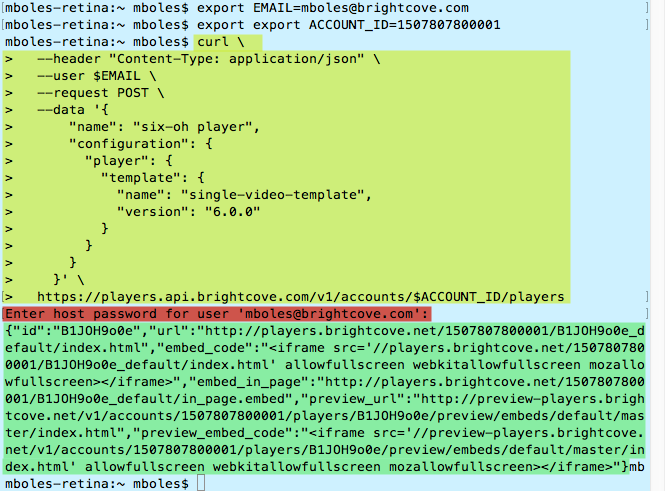
- To create a player named six-oh-player using version 6.0.0 you would paste the following curl statement into terminal (highlighted in yellow in the screenshot below):
curl \ --header "Content-Type: application/json" \ --user $EMAIL \ --request POST \ --data '{ "name": "six-oh player", "configuration": { "player": { "template": { "name": "single-video-template", "version": "6.0.0" } } } }' \ https://players.api.brightcove.com/v2/accounts/$ACCOUNT_ID/players - After pressing Enter, you will be prompted for your Brightcove password, which you will enter (highlighted in red in the screenshot below).
- Finally the Player Management API will return player information about the player you just created in JSON format (highlighted in green in the screenshot below).
The player JSON, more nicely formatted, is shown here:
{ "id": "B1JOH9o0e", "url": "https://players.brightcove.net/1507807800001/B1JOH9o0e_default/index.html", "embed_code": "<iframe src='//players.brightcove.net/1507807800001/B1JOH9o0e_default/index.html' allowfullscreen allow='encrypted-media'></iframe>", "embed_in_page": "https://players.brightcove.net/1507807800001/B1JOH9o0e_default/in_page.embed", "preview_url": "https://preview-players.brightcove.net/v1/accounts/1507807800001/players/B1JOH9o0e/preview/embeds/default/master/index.html", "preview_embed_code": "<iframe src='//preview-players.brightcove.net/v1/accounts/1507807800001/players/B1JOH9o0e/preview/embeds/default/master/index.html' allowfullscreen allow='encrypted-media'></iframe>" } - Now that the player is created, you can go into Studio and use the player to publish a video. For instance, the Advanced player code would look something like this, but of course using your account information.
<video-js data-video-id="5350958927001" data-account="1507807800001" data-player="B1JOH9o0e" data-embed="default" data-application-id="" controls="" width="640" height="360"></video-js> <script src="https://players.brightcove.net/1507807800001/B1JOH9o0e_default/index.min.js"></script> - Now place the player code into an HTML page. Note that an
idattribute has been added to thevideotag with an assigned value ofmyPlayerID.<!doctype html> <html> <head> <meta charset="UTF-8"> <title>Testing Player and Plugin Versions</title> </head> <body> <video-js id="myPlayerID" data-video-id="5350958927001" data-account="1507807800001" data-player="B1JOH9o0e" data-embed="default" data-application-id="" controls="" width="640" height="360"></video-js> <script src="https://players.brightcove.net/1507807800001/B1JOH9o0e_default/index.min.js"></script> </body> </html> - Now you want to test your plugin (assume you have named your plugin
myPluginName). The easiest process is to have your code saved locally, and simply load your plugin with ascripttag. You then call the plugin to be loaded. The code for both steps is highlighted below. An example is shown here:... <video-js data-video-id="5350958927001" data-account="1507807800001" data-player="B1JOH9o0e" data-embed="default" data-application-id="" controls="" width="640" height="360"></video-js> <script src="https://players.brightcove.net/1507807800001/B1JOH9o0e_default/index.min.js"></script> //Load my plugin source JavaScript <script src="my_plugin_source.js"></script> //Load my plugin into the player <script type="text/javascript"> videojs.getPlayer('myPlayerID').ready(function() { var myPlayer = this; myPlayer.myPluginName(); }); </script> ... - You can now test your player and, if needed, interactively debug.
Permanently add plugin to player
Once all is working well, and you want to include the plugin with the player whenever that player is used, you can assign the plugin to the player using curl and the Player Management API. The following curl statement is an example and you will need to add your specific configuration options and plugin name.
curl \
  --header "Content-Type: application/json" \
	 --user $EMAIL \
	 --request PATCH \
	 --data '{
      "plugins": [{
          "name": "myPluginName",
          "options": {
            "param1": "1",
            "param2": "2"
          }
        }
      ],
      "scripts": [
        "http://domain.com/wherever/myplugin.js"
      ],
      "stylesheets": [
        "http://domain.com/wherever/myplugin.css"
      ]
    }' \
https://players.api.brightcove.com/v2/accounts/$ACCOUNT_ID/players/$PLAYER_ID/configuration
After adding the plugin, you will either want to go into Studio and publish the player (it will be marked as needing publishing), or you can use the following curl statement to publish the player:
curl \
  --header "Content-Type: application/json" \
  --user $EMAIL  \
  --request POST \
  https://players.api.brightcove.com/v2/accounts/$ACCOUNT_ID/players/$PLAYER_ID/publish