Example
Let's say you have a web page with a Brightcove Player on it. Now, you want to let users share the video across social media platforms. With the social media plugin, you will see a social sharing icon in the title and description dock.
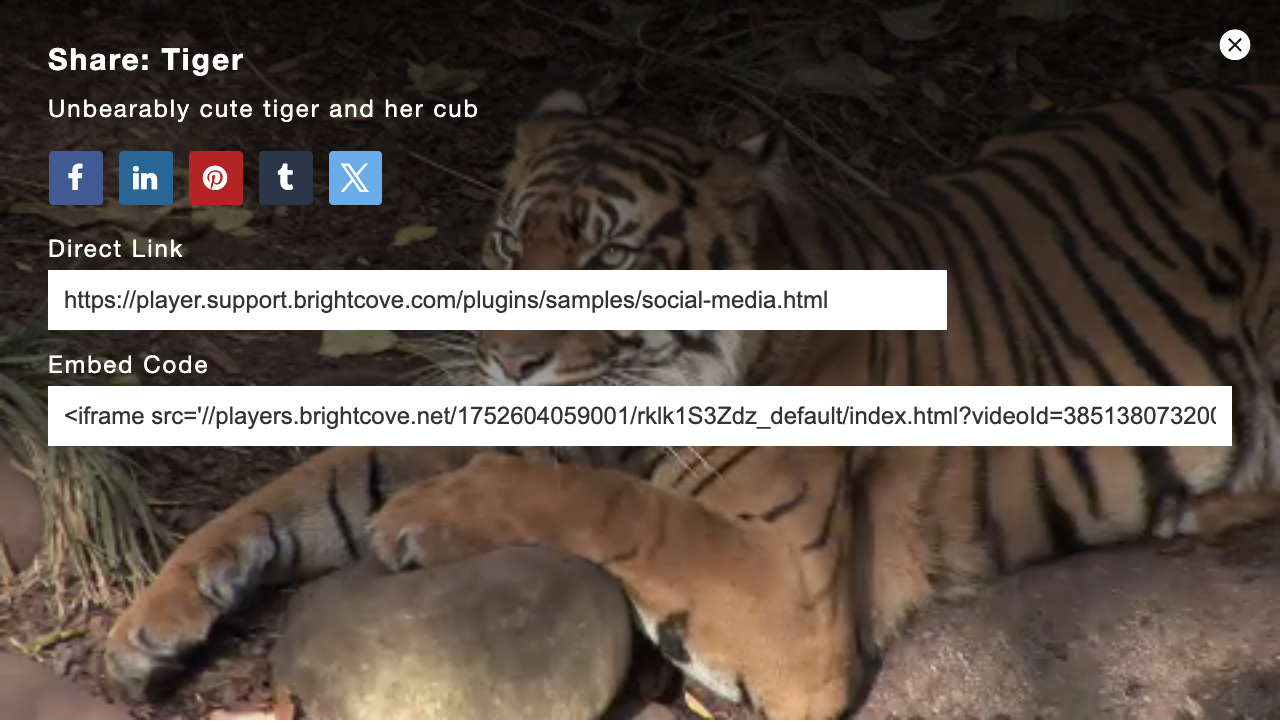
Clicking on this icon displays the social sharing screen, as shown here.
You will need to set a width and height for the player for two reasons:
- If no width or height are set there will be no values to pass to X, which will cause the X card not to validate.
- The width needs to be wide enough to accommodate the social plugin's interface as shown in the screenshot above. You can also have the interface automatically appear on video end using the
displayAfterVideoproperty, documented below.
Click here for a working sample of a web page that uses the plugin and includes the social media meta tags.
Overview
This document walks you through the steps to enable social media sharing for an existing HTML page with your Brightcove Player on it. This assumes that you have created a Brightcove Player with the proper configuration information and have added the player to an HTML page.
To add the social media plugin, follow these steps:
-
Configure the player. This will update your Brightcove Player to use the social media plugin. There are three ways to include social sharing with your player:
-
Configure the player properties
In Studio's Players module, you can configure properties in the Social section. This provides an interface to select different social media platforms, but offers no other configuration options. -
Configure the player with options
In Studio's Players module using the Plugins section, there is an interface to provide configuration options. -
Customizing sharing URLs
This implementation adds the social plugin using code.
-
- Add social meta tags to your player's HTML page.
- Validate the meta tags on your HTML page for FaceBook and X.
In a browser, open the HTML page with your Brightcove Player and use the social sharing icon in the player to share your video.
You can also implement the social media plugin within your page code, but this is a more advanced solution. You may want to use this approach to include custom sharing URLs. For details, see the Customizing sharing URLs section.
Configure player
To add the social sharing plugin, follow these steps:
- Open the PLAYERS module and either create a new player or locate the player to which you wish to add the plugin.
- Select the link for the player to open the player's properties.
- Expand the Social section on the Overview tab.
- Next, select the checkbox for Enable Sharing.
- Select the social media platforms to which you wish to share videos.
- To publish the player, select Publish Changes.
- To close the open dialog, select Close.
Implement with JSON Editor
For players 7.21.0 and newer, you can also follow these steps to add the plugin using the JSON editor:
In the Players module, navigate to the player you want to configure and click the JSON Editor accordion on the Overview tab.
Modify the "plugins" array to add the Social Sharing plugin.
    "plugins": [
    {
      "name": "social",
      "is_packaged": true,
      "options": {
        ...
      }
    }
  ]
Configure player with options
For a more advanced configuration, you can use Options to configure the plugin. To do so, follow these steps:
- Open the PLAYERS module and either create a new player or locate the player to which you wish to add the plugin.
- Add the plugin to the player using either the JSON Editor or the Social section in the Players module.
- Navigate to the JSON Editor and modify the
"options"object of thesocialplugin to add the desired options. In this example, the options do the following:- Lines 2-3: Set the name and description for your video.
- Line 4: Defines the URL for your custom web page with your video player and social sharing meta tags.
- Lines 5-6: For X, this allows a user to start viewing the video after a 5 second offset.
-
Lines 7-13: Enables social sharing for Facebook, X, Tumblr, Pinterest and LinkedIn.
{ "title": "Tiger", "description": "Video of two tigers", "url": "https://solutions.brightcove.com/bcls/brightcove-player/social-plugin/social-media.html", "deeplinking": true, "offset": "00:00:05", "services": { "facebook": true, "x": true, "tumblr": true, "pinterest": true, "linkedin": true } } - Click Add.
- To publish the player, click Publish Changes.
- To close the open dialog, click Close.
Options
For plugins in general, the options object is used to pass data to the plugin to customize initialization. Any options you pass are merged with defaults to produce a settings object, which is made available at player.socialSettings.
options.title
The share title for the video, which is used by most social services and is displayed in the overlay.
- Type:
String - Default:
''
options.description
A custom description for the share post which is supported by a few social services and is displayed in the overlay.
- Type:
String - Default:
''
options.url
A custom share url for the video. This URL points to your web page with your video and meta tags for sharing. Refer to the meta tags section for details on how to add the social media metadata to your player page.
- Type:
String - Default:
''(determined on demand)
options.embedCode
The custom embed code for sharing the video (the Brightcove Player iframe embed code). This option allows you to completely override the contents of the Embed Code field located in the sharing dialog.

You can get the value of this property by using the getEmbedCode() method.
- Type:
String - Default:
''(generated on demand)
options.embedDimensions
Enables or disables dimensions in the embed code. This can only be used when embedCode is generated by the plugin.
- Type:
Boolean - Default:
false
options.deeplinking
This enables/disables deep linking for the shared video. This feature allows a user to start viewing a video from a specific offset. For more details, view the Deep Linking document.
- Type:
Boolean - Default:
false
options.offset
A custom offset to start playing the video (hh:mm:ss). This is used with the deeplinking option and defines when to start playing the video. To offset 1 minute and 5 seconds, you would write: 00:01:05
- Type:
String - Default:
'00:00:00'
options.displayAfterVideo
Enables or disables the overlay from appearing after the video ends (listening for the ended event).
Requires the videojs-endscreen plugin.
- Type:
Boolean - Default:
false
options.buttonParent
Defines where the sharing icon will appear in the player. This can be a string, which represents the name of a child component of the player or it can be a component instance.
If set to shelf, the sharing icon appears in the dock. If the value is set to controlBar, the sharing icon will appear in the controlbar.
- Type:
String|Component - Default:
controlBar
options.removeEmbed
If set to true, turns off (hides) the iframe embed code.
- Type:
Boolean - Default:
false
options.services
An object denoting which services should be allowed. To enable or disable support for a service, set the property value to true or false instead of removing them.
- Type:
Object
options.services.facebook
Enables Facebook sharing link.
- Type: Boolean
- Default:
true
options.services.x
Enables X sharing link.
- Type: Boolean
- Default:
true
options.services.tumblr
Enables Tumblr sharing link.
- Type: Boolean
- Default:
true
options.services.facebook
Enables Facebook sharing link.
- Type: Boolean
- Default:
true
options.services.pinterest
Enables Pinterest sharing link.
- Type: Boolean
- Default:
true
options.services.linkedin
Enables LinkedIn sharing link.
- Type: Boolean
- Default:
true
Options example:
{
  "title": "Tiger",
  "description": "Video of two tigers",
  "url": "https://solutions.brightcove.com/bcls/brightcove-player/social-plugin/social-media.html",
  "deeplinking": true,
  "offset": "00:00:05",
  "buttonParent": "controlBar",
  "services": {
    "linkedin": true,
    "pinterest": true,
    "tumblr": true,
    "x": true,
    "facebook": true
  }
}
Getter and setter configuration methods
There are a number of methods available to both set and retrieve configuration options. All of the methods are associated with the SocialOverlay component, which extends the videojs.ModalDialog class. (Information on this class can be found in the Implementing the ModalDialog document.)
When the social plugin is initialized, an instance of the SocialOverlay component becomes available at player.socialOverlay . The general format for using the getter and setter methods is as follows:
player.socialOverlay.methodName()setDirectLink(string)
- Usage:
player.socialOverlay.setDirectLink(string) - Purpose: Updates the URL used by the social overlay. Setting the value to the empty string ('') causes the URL to be determined on demand.
getDirectLink()
- Usage:
player.socialOverlay.getDirectLink() - Purpose: Returns the URL used by the social overlay.
setEmbedCode(string)
- Usage:
player.socialOverlay.setEmbedCode(string) - Purpose: Updates the embed code used by the social overlay.
getEmbedCode()
- Usage:
player.socialOverlay.getEmbedCode() - Purpose: Gets the embed code used by the social overlay.
SocialButton
When the social plugin is initialized, an instance of the SocialButton component becomes available at player.socialButton . This component extends the videojs.Button class.
Generate meta tags
After you update your Brightcove Player to use the social sharing plugin in the previous section, you are ready to add social meta tags to your HTML page.
These meta tags allow social sharing sites to embed your video players and thumbnails in the post. The form below calls the CMS API with your information and retrieves your video data. It then generates social meta tags with your specific data.
To add social media meta tags to the HTML page with your Brightcove Player, follow these steps:
- Enter your account, player and video information into the form below and select the Generate Social Tags button.
Data Input
- Press the Select the code button. Then, copy and paste the selected code into the
<head>section of your HTML player page.
The Generated Social Sharing Meta Tags
- Save your changes. You are now ready to use the social media sharing interface with your player.
Sharing on Facebook
At this time, only Facebook's native player will play videos in a Facebook wall. If you would like to share your videos and have them play in the Facebook wall, you can use Brightcove Social. For details, see the Getting Started with Brightcove Social document.
The Brightcove Player will create a link in the wall which will open your video and player in a new browser tab or window. For most people, this behavior may be fine. To do this, Facebook lets you define the video using Open Graph (og) meta tags in your page HTML page. For details about how to use og tags for Facebook, see the Sharing Best Practices document.
To share a link to your player and video, follow these steps:
- Expand the Social section on the Overview tab, and select the Enable Sharing checkbox.
- Save your changes and publish your player.
- Create an HTML page with your player and video.
- Generate your social meta tags for your HTML page and update them as follows:
- Lines 9-11: define your site name, the title of your video and type as video.
- Line 12: points to the URL for your video with the Brightcove Player.
-
Line 13: points to a thumbnail image for your video.
- Lines 14-16: provide a description for your video, along with player dimensions.
<!DOCTYPE html>
  <head>
    <meta charset="utf-8">
    <meta name="apple-mobile-web-app-capable" content="yes" />
    <title>Social Media Plugin</title>
    <!-- Open Graph Sharing Metadata -->
    <meta property="og:site_name" content="Brightcove"/>
    <meta property="og:title" content="Social Media Plugin"/>
    <meta property="og:type" content="video"/>
    <meta property="og:url" content="https://solutions.brightcove.com/bcls/brightcove-player/social-plugin/social-media.html"/>
    <meta property="og:image" content="https://solutions.brightcove.com/bcls/assets/images/Tiger_poster.png" />
    <meta property="og:description" content="Tiger"/>
    <meta property="og:video:width" content="640"/>
    <meta property="og:video:height" content="360"/>
    <!-- X: card/meta-tags -->
    <meta name="x:card" content="player"/>
    <meta name="x:site" content="@username" />
    <meta name="x:title" content="Tiger"/>
    <meta name="x:description" content="Tiger video"/>
    <meta name="x:image" content="https://solutions.brightcove.com/bcls/assets/images/Tiger_poster.png"/>
    <meta name="x:player" content="https://solutions.brightcove.com/bcls/brightcove-player/social-plugin/social-media.html"/>
    <meta name="x:player:width" content="640"/>
    <meta name="x:player:height" content="360"/>
    <meta name="x:stream" content="https://solutions.brightcove.com/bcls/brightcove-player/social-plugin/social-media-x.html"/>
    <meta name="x:player:stream:content_type" content="video/mp4" />
    <style>
      /* player dimensions */
      iframe {
        width: 640px;
        height: 360px;
      }
    </style>
  </head>
  <body>
    <iframe src='https://players.brightcove.net/1752604059001/oVYJtofHRF_default/index.html?videoId=4172255216001' allowfullscreen allow='encrypted-media'></iframe>
  </body>
To do this, follow these steps:
- Expand the Social section on the Overview tab, and select the Enable Sharing checkbox.
- Save your changes and publish your player.
- Create an HTML page with your player and video.
- Generate your social meta tags for your HTML page and update them as follows:
- Lines 92-94: define your site name, the title of your video and type as video.
- Line 95: points to the URL for your video.
-
Line 96: points to a thumbnail image for your video.
- Lines 97-99: provide a description for your video, along with player dimensions.
  <!DOCTYPE html>
    <head>
      <meta charset="utf-8">
      <meta name="apple-mobile-web-app-capable" content="yes" />
      <title>Social Media Plugin - Share Smart Player</title>
      <!-- Open Graph Sharing Metadata -->
      <meta property="og:site_name" content="Brightcove"/>
      <meta property="og:title" content="Social Media Plugin"/>
      <meta property="og:type" content="video"/>
      <meta property="og:url" content="https://solutions.brightcove.com/bcls/brightcove-player/social-plugin/social-media.html"/>
      <meta property="og:image" content="https://solutions.brightcove.com/bcls/assets/images/Tiger_poster.png" />
      <meta property="og:description" content="Modus 550"/>
      <meta property="og:video:width" content="640"/>
      <meta property="og:video:height" content="360"/>
      <!-- X: card/meta-tags -->
      <meta name="x:card" content="player"/>
      <meta name="x:site" content="@username" />
      <meta name="x:title" content="Tiger"/>
      <meta name="x:description" content="Tiger video"/>
      <meta name="x:image" content="https://solutions.brightcove.com/bcls/assets/images/Tiger_poster.png"/>
      <meta name="x:player" content="https://players.brightcove.net/3676484087001/f28fbfc5-9153-4c51-ac67-ec6bcad8a28e_default/index.html"/>
      <meta name="x:player:width" content="640"/>
      <meta name="x:player:height" content="360"/>
      <meta name="x:stream" content="https://solutions.brightcove.com/bcls/brightcove-player/social-plugin/social-media-custom.html"/>
      <meta name="x:player:stream:content_type" content="video/mp4" />
    </head>
    <body>
      <iframe style='width: 640px;height: 360px;' src='https://players.brightcove.net/3676484087001/oVYJtofHRF_default/index.html' allowfullscreen allow='encrypted-media'></iframe>
    </body>
  </html>
- Don't forget to check that you have valid meta tags, as described in the validate section.
For more information about sharing to Facebook, see the following:
Sharing on X
If you want to share your video on X, you need to include the X meta tags.
Currently, X is the only social site that will allow you to use deep linking to start a video at a specified point in time. If you don't want to use this feature, simply leave the time parameter off the player URL in the example below.
To use the deep linking feature, you must add a time parameter to the query string, as defined in the Deep Linking document.
Here is an example:
- Expand the Social section on the Overview tab, and select the Enable Sharing checkbox.
- Save your changes and publish your player.
- Once you have generated your social meta tags, update them as follows:
- Lines 64-67: define the X card type as
player, your X site, the title and description. -
Line 68: points to a thumbnail image for your video.
- Line 69: points to the URL for your Brightcove Player. Notice that the query parameters define the
videoId, and tells the player to automatically start playing at the 15 second point of the video. This is how you can deep link into a video with X. - Lines 70-71: provide the player dimensions.
- Line 72: points to the URL for your HTML page with your Brightcove Player.
- Lines 64-67: define the X card type as
<!DOCTYPE html>
  <head>
    <meta charset="utf-8">
    <meta name="apple-mobile-web-app-capable" content="yes" />
    <title>Social Media Plugin - Deep Linking with X</title>
    <!-- Open Graph Sharing Metadata -->
    <meta property="og:site_name" content="Brightcove"/>
    <meta property="og:title" content="Social Media Plugin"/>
    <meta property="og:description" content="Great Blue Heron"/>
    <meta property="og:url" content="https://solutions.brightcove.com/bcls/brightcove-player/social-plugin/social-media-twitter.html"/>
    <meta property="og:image" content="https://solutions.brightcove.com/bcls/assets/images/Great-Blue-Heron.png"/>
    <meta property="og:type" content="video"/>
    <meta property="og:video:width" content="640"/>
    <meta property="og:video:height" content="360"/>
    <!-- X: card/meta-tags -->
    <meta name="x:card" content="player"/>
    <meta name="x:site" content="@username" />
    <meta name="x:title" content="Social Media Plugin"/>
    <meta name="x:description" content="Great Blue Heron"/>
    <meta name="x:image" content="https://solutions.brightcove.com/bcls/assets/images/Great-Blue-Heron.png"/>
    <meta name="x:player" content="https://players.brightcove.net/1752604059001/2c7eac7c-181c-41d1-aae8-4a5107c05ee2_default/index.html?videoId=4172255216001#t=00h00m15s&autoplay=true"/>
    <meta name="x:player:width" content="640"/>
    <meta name="x:player:height" content="360"/>
    <meta name="x:stream" content="https://solutions.brightcove.com/bcls/brightcove-player/social-plugin/social-media-twitter.html"/>
    <meta name="x:player:stream:content_type" content="video/mp4" />
  </head>
  <body>
    <iframe style='width: 640px;height: 360px;' src='https://players.brightcove.net/1752604059001/oVYJtofHRF_default/index.html?videoId=4172255216001' allowfullscreen allow='encrypted-media'></iframe>
  </body>
Here is an example:
- Expand the Social section on the Overview tab, and select the Enable Sharing checkbox.
- Save your changes and publish your player.
- Once you have generated your social meta tags, update them as follows:
- Lines 139-142: define the X card type as
player, your X site, the title and description. -
Line 143: points to a thumbnail image for your video.
- Line 144: points to the URL for your Brightcove Player. Notice that the query parameters define the
videoId, and tells the player to automatically start playing at the 15 second point of the video. This is how you can deep link into a video with X. - Lines 145-146: provide the player dimensions.
- Line 147: points to the URL for your HTML page with your Brightcove Player.
- Lines 139-142: define the X card type as
  <!DOCTYPE html>
  <head>
    <meta charset="utf-8">
    <meta name="apple-mobile-web-app-capable" content="yes" />
    <title>Social Media Plugin - Deep Linking with X</title>
    <!-- Open Graph Sharing Metadata -->
    <meta property="og:site_name" content="Brightcove"/>
    <meta property="og:title" content="Social Media Plugin"/>
    <meta property="og:description" content="Tiger video"/>
    <meta property="og:url" content="https://solutions.brightcove.com/bcls/brightcove-player/social-plugin/social-media-perform.html"/>
    <meta property="og:image" content="https://solutions.brightcove.com/bcls/assets/images/Tiger.jpg"/>
    <meta property="og:type" content="video"/>
    <meta property="og:video:width" content="640"/>
    <meta property="og:video:height" content="360"/>
    <!-- X: card/meta-tags -->
    <meta name="x:card" content="player"/>
    <meta name="x:site" content="@username" />
    <meta name="x:title" content="Social Media Plugin"/>
    <meta name="x:description" content="Tiger video"/>
    <meta name="x:image" content="https://solutions.brightcove.com/bcls/assets/images/Tiger.jpg"/>
    <meta name="x:player" content="https://players.brightcove.net/3676484087001/f28fbfc5-9153-4c51-ac67-ec6bcad8a28e_default/index.html?t=00h00m15s&autoplay=true"/>
    <meta name="x:player:width" content="640"/>
    <meta name="x:player:height" content="360"/>
    <meta name="x:stream" content="https://solutions.brightcove.com/bcls/brightcove-player/social-plugin/social-media-perform.html"/>
    <meta name="x:player:stream:content_type" content="video/mp4" />
  </head>
  <body>
    <iframe style='width: 640px;height: 360px;' src='https://players.brightcove.net/3676484087001/oVYJtofHRF_default/index.html' allowfullscreen allow='encrypted-media'></iframe>
  </body>
  </html>
- Don't forget to check that you have valid meta tags, as described in the validate section.
For more details about configuring your X meta tags, see the following:
Validate
Once you have followed the steps to include the meta tags on your page you can validate the page for both Facebook and X. If errors occur in either validation process, update the player configuration as needed.
For Facebook, go to the Facebook Debugger and paste the URL to the page that contains the meta tags and click Debug to validate.
X
For X, go to the Card Validator, paste the URL to the page that contains the meta tags and click Preview card to validate. An added advantage to validating is that X will then ask you to verify your website and you will go on the waiting list to be approved for X Cards.
Customizing sharing URLs
A more advanced implementation for the social media plugin is to use the In-Page Embed Code from the Players module. This will allow you to pass configuration options from within your page code. One reason to do this, would be to provide custom embedCode values to share a different player than the one on your page.
To implement the plugin using custom code, follow these steps:
- Open the PLAYERS module and either create a new player or locate the player to which you wish to add the plugin.
- Select the link for the player to open the player's properties.
- Expand the Social section on the Overview tab, and be sure that the Enable Sharing checkbox is NOT checked.
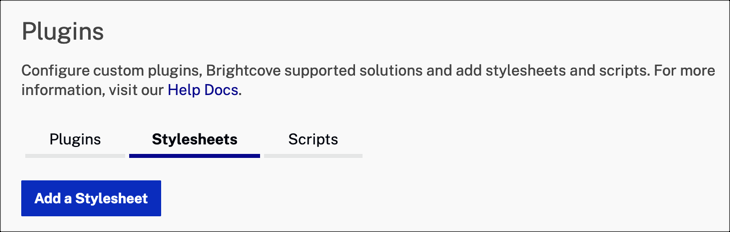
- Expand the Plugins section on the Overview tab.
- Select Stylesheets and select the Add Stylesheet button.
- For the CSS URL, enter:
https://players.brightcove.net/videojs-social/3/videojs-social.css - Select Scripts and select the Add Script button.
- For the JavaScript URL, enter:
https://players.brightcove.net/videojs-social/3/videojs-social.min.js - Select Add.
- Publish the changes to the player.
Your player now includes all the code for the social media sharing functionality, but it won't automatically initialize the plugin and create the sharing button.
-
Associate the player with which you are working, and copy the JavaScript code into your HTML page. If you run your page in the browser, notice that the sharing button does not appear in the player. It will once the social plugin has been initialized.
- To your HTML page code, add JavaScript code as follows:
- Line 23-24: Gets a reference to your player.
- Lines 25-40: Set the options for the social sharing plugin. For details, see the Properties section.
- Line 28: Sets the sharing URL.
-
Line 41: Initializes the social plugin with the specific options.
<!DOCTYPE html>
<head>
    <meta charset="utf-8">
    <meta name="apple-mobile-web-app-capable" content="yes" />
    <title>Social Media Plugin</title>
</head>

<body>
<div style="max-width: 960px;">
  <video-js
    id="myPlayerID"
    data-account="1752604059001"
    data-player="vQgKqFD0n"
    data-embed="default"
    controls=""
    data-application-id=""
    class="vjs-fluid"
    style="padding-top: 56.25%;">
  </video-js>
</div>
<script
  src="//players.brightcove.net/1752604059001/vQgKqFD0n_default/index.min.js">
</script>
  <script type="text/javascript">
      videojs.getPlayer('myPlayerID').ready(function() {
        var myPlayer = this,
        options = {
          "title": "Tiger",
          "description": "Video of two tigers",
          "url": "https://solutions.brightcove.com/bcls/brightcove-player/social-plugin/social-media.html",
          "embedCode": "<iframe src='http://bcove.me/niqx01er'>",
          "deeplinking": true,
          "offset": "00:00:05",
          "services": {
            "facebook": true,
            "x": true,
            "tumblr": true,
            "pinterest": true,
            "linkedin": true
          }
        };
        myPlayer.social(options);
      });
    </script>

</body>
</html>- To your HTML page code, add JavaScript code as follows:
- Line 147: Gets a reference to your player.
- Lines 149-164: Set the options for the social sharing plugin. For details, see the Options section.
- Line 153: Sets the sharing URL to use a Smart Player. You can use this property to set the Sharing URL to any Brightcove Player or Smart Player.
-
Line 166: Initializes the social plugin with the specific options.
  <!DOCTYPE html>
  <head>
      <meta charset="utf-8">
      <meta name="apple-mobile-web-app-capable" content="yes" />
      <title>Social Media Plugin</title>
  </head>

  <div style="max-width: 640px;">
    <video-js
      data-account="1752604059001"
      data-player="rklk1S3Zdz"
      data-embed="default"
      controls=""
      data-video-id="3851380732001"
      data-playlist-id=""
      data-application-id=""
      class="vjs-fluid">
    </video-js>
  </div>
  <script src="https://players.brightcove.net/1752604059001/rklk1S3Zdz_default/index.min.js"></script>
    <script type="text/javascript">
        videojs.getPlayer('myPlayerID').ready(function() {
          var myPlayer = this,
          options = {
            "title": "Tiger",
            "description": "Video of two tigers",
            "url": "https://player.support.brightcove.com/plugins/samples/social-media.html",
            "embedCode": "<iframe src='http://bcove.me/niqx01er'>",
            "deeplinking": true,
            "offset": "00:00:05",
            "services": {
              "facebook": true,
              "x": true,
              "tumblr": true,
              "pinterest": true,
              "linkedin": true
            }
          };
          myPlayer.social(options);
        });
      </script>

  </body>
  </html>
-
You should see the social sharing button in your player. Look for the sharing icon in the control bar.

- You are now ready to add the social meta tags to your player page. See the Meta tags section to generate these tags.
Custom services
The plugin has built in support for six popular social media platforms, but you can also add others using custom services. To do this you configure an options.customServices object. This object is an array of custom service objects. A short example configuration is shown, then the details of the example provided.
The following example would add three buttons. The first and second buttons for Xing and WhatsApp. The WhatsApp button will only appear on mobile. These two examples are using Font Awesome for the icon, which is convenient if the player is an in-page embed in a page already using the font, but any other styling could be used. The third is a Facebook share button using Facebook's feed API which allows a Facebook app id to be included for attribution. You would want to disable the regular Facebook button when using this.
[{
  className: 'fa fa-xing',
  title: 'Xing',
  hrefTemplate: 'https://www.xing.com/spi/shares/new?url=',
  bgColor: '#026466'
},
{
  className: 'fa fa-whatsapp',
  title: 'WhatsApp',
  hrefTemplate: 'https://api.whatsapp.com/send?phone=&text=title%20',
  bgColor: '#25d366',
  mobileOnly: true
},
{
  classSuffix: 'facebook',
  title: 'Facebook',
  hrefTemplate: 'https://www.facebook.com/dialog/feed?app_id=123456789&caption=&display=page&link='
}]
The following define the properties of a custom service object:
customService.title
- Type: string
- The title of the sharing destination.
customService.className
- Type: string
- A class or space-separated list of classes to add to the button.
customService.classSuffix
- Type: string
- The suffix is appended to
vjs-icon-to generate the button's class. Only used ifclassNameis not specified. Only useful if replacing one of the standard destinations, since the Video.js font contains no additional social destination icons.
customService.hrefTemplate
- Type: string
- A sting template to generate the sharing URL, which may contain the macros
{{{url}},{{poster}},{{title}}and{{description}}may be used instead ofcustomService.hrefwhere it is not possible to specify a function, e.g. providing the options in a JSON string to the Player Management API.
customService.href
- Type: string
- A function to generate the sharing url. Must take an object and return a string. Unless specified this is generated from
hrefTemplate.
customService.bgColor
- Type: string
- An optional CSS color value which will be applied as the background color element style. Not required if the button is styled by CSS, but provided for convenience especially where the icon will be styled by an existing stylesheet.
customService.mobileOnly
- Type: boolean
- Default: false
- If
true, the button will only display on Android and iOS.
Known issues
No Short Description on endscreen
The video's Short Description is displayed if you click the sharing button while the video is playing back. On the endscreen that contains the sharing information, the Short Description is not displayed. This is as designed.
Keyboard navigation of buttons - Firefox for OS X
Firefox for OSX has default tabbing behavior to tab through text boxes and lists elements only. Since the Social Plugin's buttons are link elements, navigating through them with keyboard won't be possible unless you check the box All controls under System Preferences > Keyboard > Shortcuts.
Changelog
For historical release notes and changelog up to v5.0.2, see the Social Sharing Plugin Releases.
Notable changes made after version v5.0.2 will be included in the Brightcove Player Release Notes.