Step-by-Step: Player Customization
Overview
This document will have several sections as using CSS with the in-page embed and the iframe implementations of the player are quite different.
The content in this document uses Chrome's development tools, but all modern browsers have equivalent functionality. For a brief introduction to using development tools in different browsers, see the Debugging Basics document.
Determine player selector
CSS selectors allow you to select and manipulate HTML elements on a page. CSS selectors are used to "find" (or select) HTML elements based on their id, class, type, attribute, and more. The first thing you must do when trying to alter the look of an element on an HTML page is determine the selector to use to address the element. The following steps show how to find the selector for the player and then change the size of the player.
- In Video Cloud Studio, open the Media module and select a video to publish.
- Click Embed to Web, then select the player with which you wish to play the video. The Brightcove Default Player is fine.
- Set the Player Sizing, Aspect ratio and player dimensions.
- Click the JavaScript tab and copy the embed code.
- Using your HTML editor, create a new HTML page.
- Paste the publishing code into the body of your HTML page.
- Browse the newly created page.
- Open your browser's development tools inspect the HTML code and drill down into the HTML to find the
<video-js>tag. You will see the<video-js>tag has a class also namedvideo-js. The<video-js>tag will always have a class ofvideo-js. You will utilize thevideo-jsclass frequently when styling the player. - Check the screenshot below to see the class highlighted in red. Highlighted in green is the
<video-js>tag, which is, of course, Brightcove Player.
Play button selector
Another approach is going to be used to find the selector for the play button. The following steps show you how to find the correct selector for the play button and then change its appearance.
- Browse your HTML page.
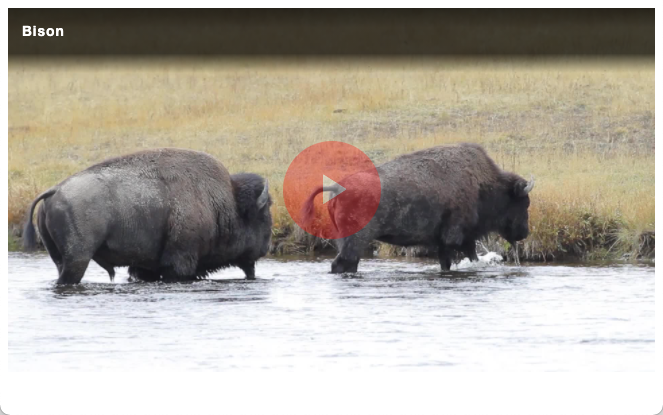
- Right click on the play button that overlays the player (you will have to right click twice since the first right click displays the Brightcove Player info) and select Inspect.
- Note that the
<div>tag that is highlighted represents the play button and has a class ofvjs-big-play-button.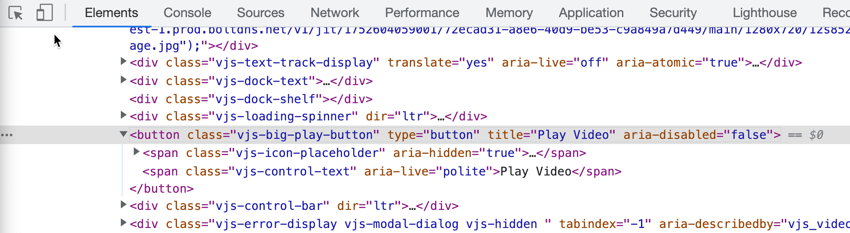
- Alter your styles to include CSS that changes the color and opacity of the play button.
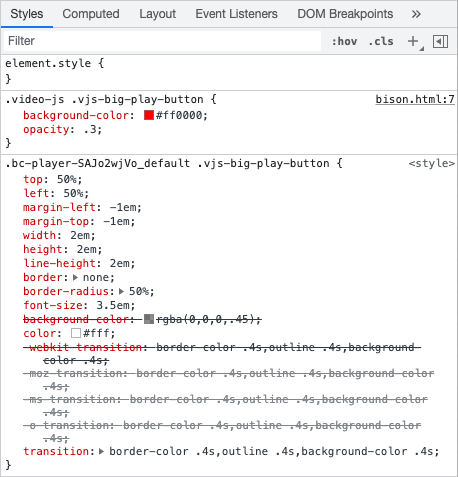
<style> .vjs-big-play-button { background-color: red; opacity: .3; } </style> - Browse your page and you will see not all the styles have been used. The button is not red.

- Look to the right of your developer tools and you will see a summary of your styles. You can look down and see that changing the background to red is overridden, represented by it being crossed out.

What has happened is that numerous changes are made to the background color. The style you set has been overridden in the "cascading" part of CSS. You can change this by utilizing functionality of CSS called specificity. Specificity determines which CSS rule is applied by browsers and is a type of weighting that has a bearing on how your cascading style sheet (CSS) rules are displayed. Using specificity, you can make your style more important than others, forcing it to be used. There is a brief introduction to CSS specificity in the Customize Player Appearance doc, and numerous references in any search.
- In this case, using the
video-jsclass will "boost" your styles to take precedence. Alter your styles to use the new combination selector. Note there is one space before the last class (details of why can be found in rules for specificity).<style> .video-js .vjs-big-play-button { background-color: #ff0000; opacity: .3; } </style> - Browse your page and see that all styles are now applied.
- Again look to the right of your developer tools and you will see a summary of your styles. Now you see that your background color change is not overridden.
Advanced code implementation
When working with selectors and styles above, the results were used with the Advanced code implementation of the player, as shown here:
<!doctype html>
<html>

<head>
  <meta charset="UTF-8">
  <title>Untitled Document</title>
  <style>
    .video-js .vjs-big-play-button {
      background-color: red;
      opacity: .3;
    }
  </style>
</head>

<body>

  <video-js data-account="1507807800001"
    data-player="default"
    data-embed="default"
    controls=""
    data-video-id="6065136830001"
    data-playlist-id=""
    data-application-id=""
    width="640" height="360">

  </video-js><script src="https://players.brightcove.net/1507807800001/default_default/index.min.js"></script>

</body>

</html>
This is a very common way to use CSS with an HTML page. You see the <style> block is on the page with the <video-js> tag.
Note: Depending upon your CSS experience, you may be wondering why the code above did not assign an id attribute to the <video-js> tag. You could then use a selector like #myPlayer .vjs-big-play-button. In fact, you could have and it would have worked. The problem is, the CSS created using id selectors will not work when using the iframe player implementation, so only existing class names were used. By not using an id attribute, the styles will be directly applicable to iframe player implementations.
Standard code implementation
The Standard, or iframe, code implementation, not surprisingly, places the Brightcove Player in an iframe that you then place in an HTML page. You can style the actual iframe itself, change its size for instance, using styles on the page that contains the iframe, but styles on page of the iframe DO NOT cascade into the iframe itself. The iframe literally pulls in a separate HTML page, so desired styles for the contents of the iframe must be associated with the HTML page in the iframe.
When using the iframe implementation of the Brightcove Player, the steps to apply CSS are:
- Place styles in an Internet accessible file
- Link the stylesheet to the player (done using Studio or the Player Management API)
Note: The following steps assume you will be working from the HTML you completed in the previous steps and shown in the code snippet above. If you wish to keep that as a working example, simply copy the code into another file and start the following steps in the new file.
- In Studio, publish a video and copy the code for an iframe implementation of the player.
- In your HTML page, replace the in-page embed code with the iframe code.
- Check to be sure your HTML page looks similar to the following:
<!doctype html> <html> <head> <meta charset="UTF-8"> <title>Untitled Document</title> <style> .video-js .vjs-big-play-button { background-color: red; opacity: .3; } </style> </head> <body> <iframe src="https://players.brightcove.net/1507807800001/default_default/index.html?videoId=6065136830001" allowfullscreen="" allow="encrypted-media" width="640" height="360"></iframe> </body> </html> - Browse the page and you will see the styles for the button are NOT being used.
- Create a file named customize-qs.css and save it in an Internet accessible location.
- Cut the styles for the button and paste them into the file and save it. Cut only the styles for the button, you cannot include the
<style>tags. The file should contain only this content:.video-js .vjs-big-play-button { background-color: red; opacity: .3; } - Check to be sure your HTML page looks similar to the following:
<!doctype html> <html> <head> <meta charset="UTF-8"> <title>Untitled Document</title> </head> <body> <iframe src="https://players.brightcove.net/1507807800001/default_default/index.html?videoId=6065136830001" allowfullscreen="" allow="encrypted-media" width="640" height="360"></iframe> </body> </html> - In Studio, go into the Players module and edit the player you are using for this quick start.
- Expand the Plugins section on the Overview tab.
- Click Stylesheets, then the Add Stylesheet button, and enter your path:
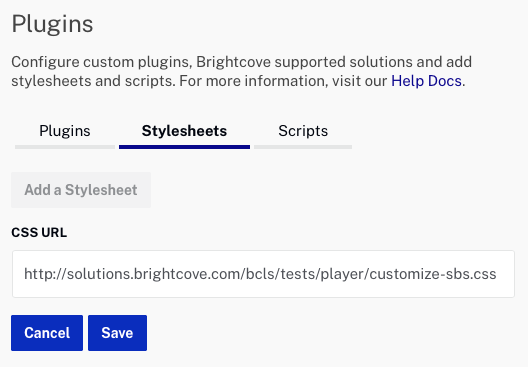
- Click Save to save your changes. The preview player on the right side of the page will update to show the CSS styles applied to the button.
- To publish the player, click Publish Changes.
- To close the open dialog, click Close.
- Return to your browser and refresh the page. Once the published changes are active, you will see your styles applied to the iframe player. It can be several minutes before the published changes are visible.
Explore styles
In this section a CodePen is used to allow you to explore styles and make more customizations to the big play button than what is shown above. Once you get a look you like, you can simply copy the CSS generated and use it with either player implementation as shown above.
One issue that may seem confusing is that the actual arrow in the button is not an image but part of a font family. That is why you control its size using font-size and use ems as units.
See the Pen 5.x Big Play Button Customization by Matt Boles (@mboles) on CodePen.