Player example
The following is a Brightcove Player that is using the quality selection plugin. Once you play the video, in the controlbar you will see the following icon: ![]()
Once you make a selection, the gear will spin until the new quality is rendered, for DASH sources, or until the new quality is being loaded, for HLS sources. More information is provided below on the quality options you see for the selection, and gear spinning behavior.
Quality options
When the gear icon is clicked, a number of quality options are displayed for user selection. For example, a video with the following renditions:
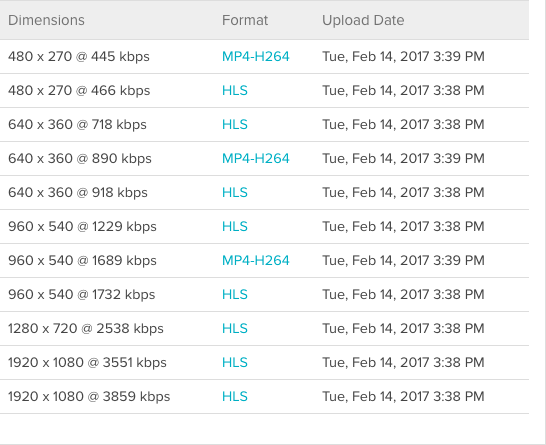
will create the following quality options:
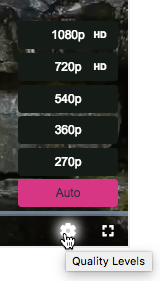
Here is how those options are built and then a specific rendition selected:
- All renditions are grouped based on lines of horizontal resolution (e.g. 270p, 360p, 540p, 720p and 1080p in the example above) and used as quality options.
- After user selection of a group, if there are multiple renditions in the selected group the standard adaptive bitrate streaming algorithm then chooses the optimal rendition in the selected resolution group. The process is how rendition selection currently works, but only within a selected resolution group.
- If resolution information is not available, options will fallback to show options SD and HD, for Standard Definition and High Definition respectively. The plugin will use bitrate information for each rendition to determine whether it is SD or HD, using a configurable dividing line.
Buffering
When changing the quality it is possible that some buffering will take place and you will see the loading spinner appear. This is because the quality is changed immediately on quality selection and segments will need to be downloaded.
In the past, if you preferred to have the same smooth transition behavior seen with automatic rendition switches, you could manually initialize the player with the following option:
var options = {
  html5: {
    hls: {
      smoothQualityChange: true
    }
  }
};
Details on manually initializing the player using the bc() method can be found in the Using bc() and getPlayer() Methods document.
The smoothQualityChange option has been replaced by the fastQualityChange method in our player playback engine. This method is integrated into the ABR (Adaptive Bitrate) switching logic and does not require manual invocation.
Unlike smoothQualityChange option, which tried to provide a seamless transition without clearing the buffer, fastQualityChange deliberately clears the buffer and quickly switches to the new quality level, starting to load content from the current position in the playback timeline.
This approach aims to minimise the time it takes to switch between different qualities, even though it might momentarily disrupt the playback more than the deprecated method because the player needs to load new data that aligns with the current playback position in the higher quality rendition.
Gear spinning
The gear icon spinning represents changes to the rendition used. The rules for spinning differ for DASH and HLS sources:
- For DASH sources, the gear will spin until the quality has changed in the player and being rendered on screen.
- For HLS sources, the gear stops spinning when the internal algorithm has decided to start LOADING the new quality, not when it has been rendered. This decision happens quickly, so it is probable you won't see the spinning action that frequently with an HLS source.
Implement using Players module
To implement the quality selection plugin using the Players module, follow these steps:
- Open the Players module and either create a new player or locate the player to which you wish to add the plugin.
- Click the link for the player to open the player's properties.
- Expand the Controls section in the player properties.
- Check the box in front of Quality Selector.
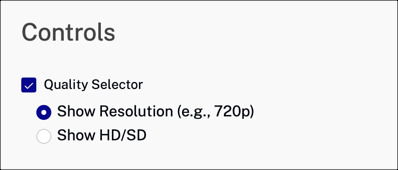
- Use a radio button to display either the different resolutions available, or simply an HD/SD option.
- Click Save.
- To publish the player, click Publish Changes.
- To close the open dialog, click Close.
Implement with JSON Editor
For players 7.21.0 and newer, you can also follow these steps to add the plugin using the JSON editor:
In the Players module, navigate to the player you want to configure and click the JSON Editor accordion on the Overview tab.
Modify the "plugins" array to add the Quality Selection plugin.
    "plugins": [
    {
      "name": "qualityMenu",
      "is_packaged": true,
      "options": {
        ...
      }
    }
  ]
Configuration options
The following options are available to configure the plugin if you are implementing the plugin using code:
-
defaultResolution- Type:
String - Default:
none - Defines the default resolution or resolution mapping to use. Pass it either the horizontal resolution or SD/HD.
Change default initial resolution in Video Cloud Studio
Follow these steps to change the default resolution in Video Cloud Studio:
- In the PLAYERS module, select the player to which you have added the Quality Selection Plugin.
- Expand the JSON Editor section on the Overview tab.
- Locate the section about the Quality Selection Plugin in the
pluginssection, shown here:{ "name": "qualityMenu", "is_packaged": true, "options": { "useResolutionLabels": true } } - To the
optionssection, add your desired default resolution, as shown in the highlighted section (don't forget to add a comma at the end of the previous line):{ "name": "qualityMenu", "is_packaged": true, "options": { "useResolutionLabels": true, "defaultResolution": "720p" } } - Click Save to save the altered JSON.
- Publish the changed player.
- Type:
-
sdBitrateLimit- Type:
Number - Default:
2000000 - Defines the upper bitrate limit (exclusive) for considering a rendition SD.
- Type:
-
useResolutionLabels- Type:
Boolean - Default:
true - When
true, the plugin will attempt to categorize renditions by lines of horizontal resolution when available. Set to false to always use SD/HD categorization.
To implement the
useResolutionLabelsoption, you would enter the following in the plugin's options in Studio:{ "useResolutionLabels": false }The resulting quality options would appear as follows:
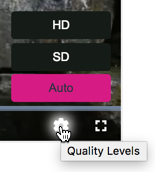
The player would then select the optimal rendition from the selected group. As detailed in this section,
sdBitrateLimitis configurable to determine the renditions classified as SD and HD. - Type:
-
resolutionLabelBitrates- Type:
Boolean - Default:
false - When
true, the plugin will attach bitrate information to the resolution labels (e.g. 720p @ 13806 kbps). This option has no effect whenuseResolutionLabelsis false or when resolution information is unavailable.
When this configuration option is set the
true, the quality selector will appear as follows: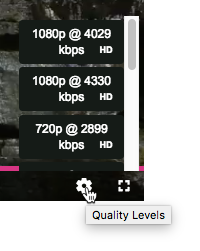
- Type:
Styling the control
CSS is used to style the gear icon, as well as the menu that appears. The following table shows the common components you can style, the components' selectors and finally the CSS property to set.
| Component | Selector | Property |
|---|---|---|
| Gear icon | button.vjs-quality-menu-button.vjs-menu-button.vjs-menu-button-popup.vjs-button | color |
| Color of menu items | div.vjs-quality-menu-wrapper.vjs-menu-button.vjs-menu-button-popup.vjs-control.vjs-button.vjs-quality-menu-button-use-resolution .vjs-menu-item | background-color |
| Text color of menu items | div.vjs-quality-menu-wrapper.vjs-menu-button.vjs-menu-button-popup.vjs-control.vjs-button.vjs-quality-menu-button-use-resolution .vjs-menu-item-text | color |
| Color of selected menu item | div.vjs-quality-menu-wrapper.vjs-menu-button.vjs-menu-button-popup.vjs-control.vjs-button.vjs-quality-menu-button-use-resolution .vjs-menu-item.vjs-selected | background-color |
| Text color of selected item | div.vjs-quality-menu-wrapper.vjs-menu-button.vjs-menu-button-popup.vjs-control.vjs-button.vjs-quality-menu-button-use-resolution .vjs-menu-item.vjs-selected .vjs-menu-item-text | color |
| Text color of HD label | div.vjs-quality-menu-wrapper.vjs-menu-button.vjs-menu-button-popup.vjs-control.vjs-button.vjs-quality-menu-button-use-resolution .vjs-quality-menu-item-sub-label | color |
For example, to achieve the following:
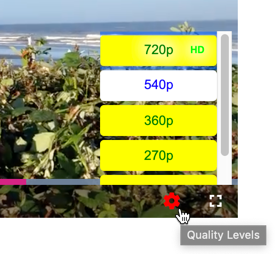
You would use this CSS:
/* Style the icon */
button.vjs-quality-menu-button.vjs-menu-button.vjs-menu-button-popup.vjs-button {
  color: red;
}
/* Style the background of the menu items */
div.vjs-quality-menu-wrapper.vjs-menu-button.vjs-menu-button-popup.vjs-control.vjs-button.vjs-quality-menu-button-use-resolution .vjs-menu-item {
  background-color: yellow;
}
/* Style the text of menu items */
div.vjs-quality-menu-wrapper.vjs-menu-button.vjs-menu-button-popup.vjs-control.vjs-button.vjs-quality-menu-button-use-resolution .vjs-menu-item-text {
  color: green;
}
/* Style the background color of selected menu item */
div.vjs-quality-menu-wrapper.vjs-menu-button.vjs-menu-button-popup.vjs-control.vjs-button.vjs-quality-menu-button-use-resolution .vjs-menu-item.vjs-selected {
  background-color: white;
}
/* Style the text color of selected menu item */
div.vjs-quality-menu-wrapper.vjs-menu-button.vjs-menu-button-popup.vjs-control.vjs-button.vjs-quality-menu-button-use-resolution .vjs-menu-item.vjs-selected .vjs-menu-item-text{
  color: blue;
}
/* Style the HD label */
div.vjs-quality-menu-wrapper.vjs-menu-button.vjs-menu-button-popup.vjs-control.vjs-button.vjs-quality-menu-button-use-resolution .vjs-quality-menu-item-sub-label {
  color: lime;
}
Known issues
- The plugin functions with Brightcove Player version 5.17.0 and later. Functionality with earlier versions of the player is not supported.
- The quality selector does not appear in Safari.
- The quality selector does not appear in iOS. This is an Apple limitation, Apple does not allow manually controlling the playback quality on iOS or desktop as it uses adaptive bitrate streaming to adjust the quality level automatically, based on bandwidth, connection speed, screen size, etc.
- At times the quality switch will not happen at the desired time, it can take longer than expected.
- Setting the source in the player configuration and building with single video template will cause the quality menu to not be initialized properly. This is because the source will be set through a call to the
videojsconstructor, which does not have access to the player or plugins. The source should be set by callingplayer.src(). This does not affect Video Cloud users. - The quality menu will not be displayed when using DASH content with Silverlight.
- The Video Quality in the selector is re-set to Auto at every player load. It does not maintain any previous setting.
Changelog
For historical release notes and changelog up to v3.0.2, see the Quality Selection Plugin Releases.
Notable changes made after version v3.0.2 will be included in the Brightcove Player Release Notes.