Overview
You can control the display of the overlay message based on:
- Player events - such as
play,pauseor custom events - Time interval - at a specified time during video playback
The sample video below demonstrates the use of the Overlay Plugin. An overlay will appear on start as well as different time periods, one starting at five seconds. Start and pause the video to see the overlay react to those events.
This topic contains the following sections:
Implement using Players module
To implement the Overlay Plugin using the Players module, follow these steps:
- Open the Players module and either create a new player or locate the player to which you wish to add the plugin.
- Click the link for the player to open the player's properties.
- Expand the Plugins section in the player properties.
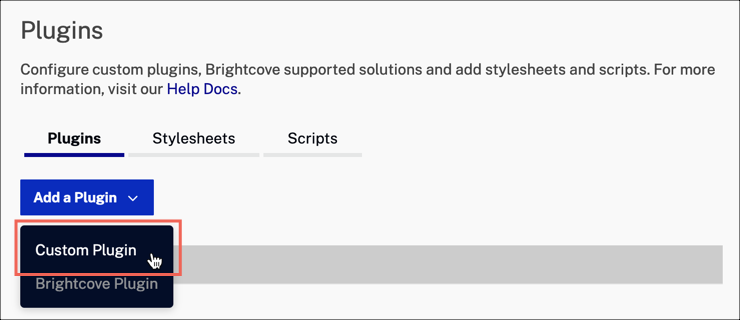
-
Click the Add Plugin dropdown and select Custom Plugin.
- In the Add Custom Plugin dialog, enter the following:
- For the Plugin Name, enter
overlay. -
For the JavaScript URL, enter:
https://players.brightcove.net/videojs-overlay/3/videojs-overlay.min.js -
For the CSS URL, enter:
https://players.brightcove.net/videojs-overlay/3/videojs-overlay.css -
Enter the configuration options in the Options(JSON) text box. The example below will display an anchor at the bottom of the player starting at the 2 second mark and ending at the 6 second mark.
{
  "overlays": [
    {
      "align": "bottom",
      "start": 2,
      "end": 6,
      "content": "<a href='http://www.brightcove.com'>Proceed to Home Page</a>"
    }
  ]
}

- For the Plugin Name, enter
- Click Add.
- Click Publish Changes.
Implement using code
To implement the plugin using custom code, you will configure the following plugin properties:
scripts- JavaScript supplied for the plugin and will not change for different plugin implementationsstylesheets- CSS supplied to you for the plugin and will not change for different plugin implementationsplugin name- Alwaysoverlayplugin options- Contains an array of properties and values
To add the plugin to your code, follow these steps:
-
Add the overlay plugin default style sheet. You can use the default style sheet, or create your own styles.
<link href="https://players.brightcove.net/videojs-overlay/3/videojs-overlay.css" rel='stylesheet'> -
Add the
videojs-overlay.jsscript file to include the overlay plugin. This plugin will automatically register itself when included in your page.<video-js id="myPlayerID" data-account="1752604059001" data-player="972ee851-3d7e-43a0-8db1-2c6fb06bad34" data-embed="default" controls=""> </video-js> <script src="https://players.brightcove.net/1752604059001/972ee851-3d7e-43a0-8db1-2c6fb06bad34_default/index.min.js"></script> <script src="https://players.brightcove.net/videojs-overlay/3/videojs-overlay.min.js"></script> -
Get a reference to the Brightcove Player. In this example, we are creating a variable named
myPlayerand assigning it a reference to the player.<script> videojs.getPlayer('myPlayerID').ready(function() { var myPlayer = this; }); </script>To display an overlay message, use the
optionsproperty to pass data to the plugin. This example shows how to include 3 overlay messages:-
First overlay:
-
This is displayed when the
playevent is dispatched and is hidden when thepauseevent is dispatched.
-
This is displayed when the
-
Second overlay:
- This is displayed when the video playback passes 5 seconds and is hidden when the video playback passes 10 seconds.
- This is positioned in the bottom right corner of the player.
-
Third overlay:
- This is displayed when the video playback passes 12 seconds and is hidden when the video playback passes 17 seconds.
- This is positioned in the bottom left corner of the player.
-
Since this overlay does not have a
contentoption defined, it uses the default value of Default overlay content, defined before theoverlaysarray.
If you include the overlay script in your code, you can define messages as follows:
<script id="pageScript" type="text/javascript"> videojs.getPlayer('myPlayerID').ready(function() { var myPlayer = this; myPlayer.overlay({ content: '<strong>Default overlay content</strong>', overlays: [{ align: "top", content: 'This event-triggered overlay message appears when the video is playing', start: 'play', end: 'pause' }, { content: 'This timed overlay message appears between 5 and 10 seconds', start: 5, end: 10, align: 'bottom-right' }, { start: 12, end: 17, align: 'bottom-left' }] }); }); </script> -
First overlay:
Options
The following plugin options are used to control the overlay object:
-
align:- The value must be a supported string value.
-
This defines where to show the overlay. If you include the default stylesheet, the following values are supported:
top-left,top,top-right,right,bottom-right,bottom,bottom-left,left.
-
attachToControlBar:- The value can be a string or boolean. If the value is a string, the value must be the name of a ControlBar component.
-
If set to
trueor a string value, bottom aligned overlays will adjust positioning when the control bar minimizes. This has no effect on overlays that are not aligned to bottom, bottom-left, or bottom-right. The option is for use with the default control bar, and may not work for custom control bars. Bottom aligned overlays will be inserted before the specified component. Otherwise, bottom aligned overlays are inserted before the first child component of the ControlBar. All other overlays are inserted before the ControlBar component. -
The option can set for all eligible alignments by using it at the top level:
myPlayer.overlay({
  content: 'Default overlay content',
  attachToControlBar : true,
  overlays: [{
    align: "top",
    content: 'This event-triggered overlay message appears when the video is playing',
    start: 'play',
    end: 'pause'
  }, {
    content: 'This timed overlay message appears between 5 and 10 seconds',
    start: 5,
    end: 10,
    align: 'bottom-right'
  }, {
    start: 12,
    end: 17,
    align: 'bottom-left'
  }]
});
Or for individual overlay objects:
myPlayer.overlay({
  content: 'Default overlay content',
  overlays: [{
    align: "top",
    content: 'This event-triggered overlay message appears when the video is playing',
    start: 'play',
    end: 'pause'
  }, {
    content: 'This timed overlay message appears between 5 and 10 seconds',
    start: 5,
    end: 10,
    align: 'bottom-right'
  }, {
    start: 12,
    end: 17,
    align: 'bottom-left',
    attachToControlBar : true
  }]
});
A top level setting can be overridden by option use on individual overlay objects.
-
The visual impact can be seen in these screenshots:
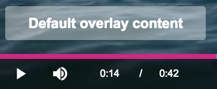
attachToControlBaroption NOT being used
(overlay does not move regardless if controlbar visible or not)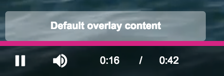
attachToControlBarused with controlbar displayed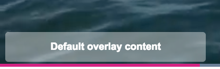
attachToControlBarused and controlbar hidden
(the overlay moves with controlbar visibility)
-
class:-
A custom HTML class to add to overlay elements. You define the style as you would any class selector, with the exception that you must use the
.video-jsselector along with the selector you choose (the specificity must be increased so the style is not overridden):.video-js .customOverlay { color: yellow; background-color: red; } -
The option can set for all eligible alignments by using it at the top level:
myPlayer.overlay({
  content: 'Default overlay content',
  class: 'customOverlay',
  overlays: [{
    align: "top",
    content: 'This event-triggered overlay message appears when the video is playing',
    start: 'play',
    end: 'pause'
  }, {
    content: 'This timed overlay message appears between 5 and 10 seconds',
    start: 5,
    end: 10,
    align: 'bottom-right'
  }]
});
Or for individual overlay objects:
myPlayer.overlay({
  content: 'Default overlay content',
  overlays: [{
    class: 'customOverlay',
    align: "top",
    content: 'This event-triggered overlay message appears when the video is playing',
    start: 'play',
    end: 'pause'
  }, {
    class: 'customOverlay2',
    content: 'This timed overlay message appears between 5 and 10 seconds',
    start: 5,
    end: 10,
    align: 'bottom-right'
  }]
});
A top level setting can be overridden by option use on individual overlay objects.
-
A custom HTML class to add to overlay elements. You define the style as you would any class selector, with the exception that you must use the
-
content:- The value can be a string or DOM object.
- This is the HTML that will be contained in the overlay. You can pass in a string, an HTML element or a DOM DocumentFragment.
- The default value is the string
This overlay will show up while the video is playing. - This option can be set at the top level, or for individual overlay objects.
-
end:- The value can be a string or number.
-
This defines when to hide an overlay. If the value is a string, it is interpreted as an event name. If it is a number, the overlay will be hidden when that time (in seconds) in the video playback has passed. If the value is a string, it is interpreted as a Brightcove Player event name, like
play,pauseorended. A list of all player events is located in the Player API.
-
overlays:- An array of overlay objects.
-
An overlay object should consist of at least an
startandendoption. Other options used as desired.
-
showBackground:- The value is boolean.
- Determines whether or not to include background styling & padding around the overlay. This setting can be overridden by being set on individual overlay objects.
-
start:- The value can be a string or number. This defines when to show an overlay.
- If it is a number, the overlay will be displayed when that time (in seconds) in the video playback has passed.
-
If the value is a string, it is interpreted as a Brightcove Player event name, like
play,pauseorended. Here are some helpful links: -
Here's an example that displays overlay text before the video starts playing:
videojs.getPlayer('myPlayerID').ready(function() {
  var myPlayer = this;
  myPlayer.overlay({
    content: '<strong>Default overlay content</strong>',
    overlays: [{
      align: "top",
      content: 'This event-triggered overlay message appears before the video starts playing',
      start: 'loadstart',
      end: 'play'
    }]
  });
});
You can use any event dispatched from the player, which are defined in the Player Methods/Events API document, or you can use your own custom events.
All of these properties are optional, but you may get strange results if you don't include at least the start and end properties.
Styling the overlay
Two styles could be helpful for you when working with the overlay. They are detailed here.
Hide the background
The following CSS will hide the background:
.vjs-overlay.vjs-overlay-top.vjs-overlay-background {
  width: 100 % ;
  margin: auto;
  left: 0;
  background: none;
}
Hide the overlay
The following CSS will hide the background:
.hide-overlay.vjs-overlay {
  display: none;
}
Both of these styles are helpful in the Brightcove Player Sample: Toggling an Overlay document.
Display video metadata
You may wish to display information about the video in the overlay. For instance, display some message from one of the video's custom fields, before the video starts to play, as shown in the screenshot below.
The following section explains how to do that particular task, but moreover, once you have data from the mediainfo object, any video metadata could be displayed whenever you choose.
- Line 112: Include the CSS for the overlay plugin.
-
Lines 113-124: CSS to perform the following:
- Change the size of the player
- Set the font size and color for the message
- Set the width of the overlay
- Change the background-color of the overlay
- Lines 128-135: Standard in-page embed code used. Note an
idis added. - Line 136: Specify the source for the JavaScript code for the overlay plugin.
- Lines 139,140,152: Standard setup for using code with the player.
-
Lines 141,151: Use the
on()method to add an event listener for theloadstartevent. In the anonymous event handler function you can act upon the video in the player, like mute it and use information from themediainfoobject. - Lines 143,150: Call the
overlay()method. -
Lines 144-149: Define a single overlay using the
contentto display message stored in the custom field, using the JavaScript variablemyPlayer.mediainfo.customfield1. The overlay will display once the video is paused (start: 'pause') and disappear once the video starts (end: 'play').
<!doctype html>
<html>
<head>
  <meta charset="utf-8">
  <title>Video.js Overlay</title>

  <link href="https://players.brightcove.net/videojs-overlay/3/videojs-overlay.css" rel='stylesheet'>
  <style type="text/css">
    .video-js {
      width: 600px;
      height: 338px;
    }
    .vjs-overlay.vjs-overlay-bottom-left {
      font-size: 1.5em;
      width: 60%;
      color: red;
      background-color: black;
    }
  </style>
</head>
<body>

  <video-js id="myPlayerID"
    data-video-id="3495887198001"
    data-account="1507807800001"
    data-player="default"
    data-embed="default"
    controls=""></video-js>
  <script src="https://players.brightcove.net/1507807800001/default_default/index.min.js"></script>
  <script src="https://players.brightcove.net/videojs-overlay/3/videojs-overlay.min.js"></script>

  <script type="text/javascript">
    videojs.getPlayer('myPlayerID').ready(function() {
      var myPlayer = this;
      myPlayer.on('loadstart',function() {
        myPlayer.muted(true);
        myPlayer.overlay({
          overlays: [{
            align: 'bottom-left',
            content: myPlayer.mediainfo.custom_fields.customfield1,
            start: 'pause',
            end: 'play'
          }]
        });
      });
    });
  </script>

</body>
</html>
Changelog
See the changelog here.