Displaying Ads Using Ad Cue Points
Example player
The following demonstrates a player showing an advertisement at a cue point created at the two second mark of the video.
Instructional video
The following is an instructional video that leads you through the process of using ad cue points to play ads during video playback.
Implementation overview
To play ads based on ad cue points in the video, you will need to perform the following:
- In Studio's Media module, create the ad cue point(s) in the video at your desired time(s).
- Obtain/create a VAST tag that will serve the desired ads to the video when a cue point triggers a request.
- Be sure the IMA3 plugin is loaded in the player. In this document, you will see two ways to perform this task.
- Configure the IMA3 plugin to use ad cue points.
Create ad cue points
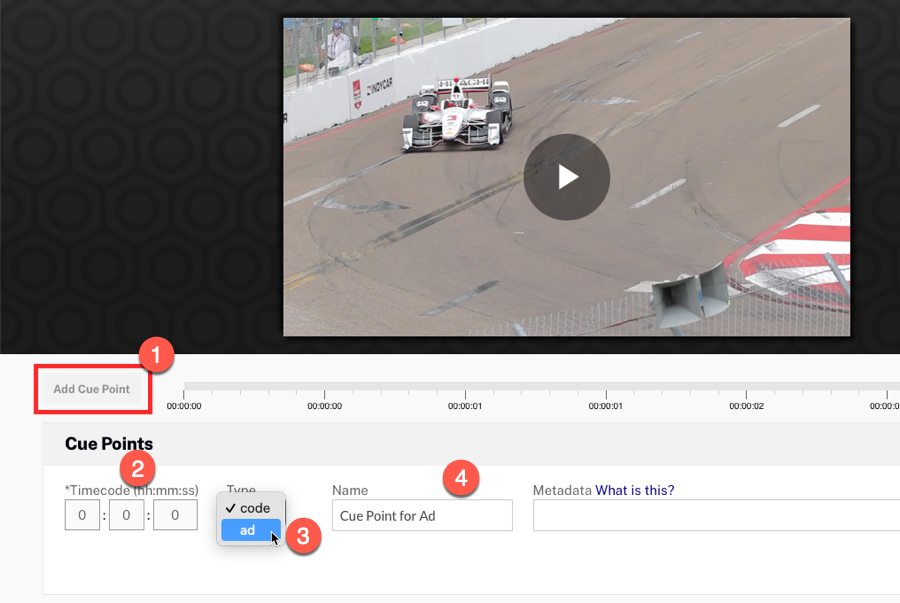
You use Studio's Media module to add ad cue points to a video. Click on a video, then perform the following tasks:
- Just below the video, click the Cue Point button.
- In the Timecode field, enter the time you want the cue point to be dispatched.
- Give the cue point a Name.
- From the Type dropdown, select Ad.
- Click Add.
You may add multiple cue points. For more information on using cue points in Studio see the Working with Cue Points in the Media Module document.
Create/obtain a VAST tag
When configuring the IMA3 plugin you will need to provide a URL to a location of a VAST tag. The VAST tag serves the ad for the player to play. In this example, a static VAST tag (which is actually a URL to a VAST XML document) is used. You may wish to use an ad server to randomly choose from multiple ads to be viewed. Regardless, the IMA3 plugin will need to point to a valid VAST tag.
For this document, a static VAST tag will be used that plays a single advertisement. The VAST XML appears as follows:
      <VAST version="3.0">
        <Ad id="1">
          <InLine>
            <AdSystem version="1.0">Test Ad Server</AdSystem>
            <AdTitle>
              <![CDATA[ Portals ]]>
            </AdTitle>
            <Description>
              <![CDATA[ Demo ad number 6 ]]>
            </Description>
            <Error>
              <![CDATA[ ]]>
            </Error>
            <Creatives>
              <Creative>
                <Linear>
                  <Duration>00:00:8</Duration>
                  <TrackingEvents/>
                  <AdParameters>
                    <![CDATA[ <xml></xml> ]]>
                  </AdParameters>
                  <VideoClicks/>
                  <MediaFiles>
                    <MediaFile type="video/mp4" width="1280" height="720" delivery="progressive" id="2" bitrate="4316" minBitrate="320" maxBitrate="320" scalable="true" maintainAspectRatio="true">
                      <![CDATA[
                        http://solutions.brightcove.com/bcls/ads/bc-ads/bcls-ad-6-5seconds.mp4
                      ]]>
                    </MediaFile>
                  </MediaFiles>
                </Linear>
              </Creative>
            </Creatives>
            <Extensions>
              <Extension>
                <xml>data</xml>
              </Extension>
            </Extensions>
          </InLine>
        </Ad>
      </VAST>
Studio implementation
You can use Studio to set up ad cue points. From a high-level you do the following:
- Set up the IMA3 plugin using the Advertising accordion in the Players module.
- Publish your player.
Here are the detailed steps that carry out the set up:
- Open the Players module and either create a new player or locate the player to which you wish to add cue point advertising.
- Click the link for the player to open the player's properties.
- On the Overview tab, expand the Advertising accordion.
- Check the Enable Client-Side (IMA) checkbox.
- Supply the appropriate Ad Tag.
- From the Request Ads dropdown, select On cue point.
- Click Publish Changes to apply the configuration to your published players.
- Return to the Media module and publish a video with ad cue points using the newly configured player.
Plugin configuration
There are configuration settings you must make to the IMA3 plugin to correctly use ad cue points. They are:
useMediaCuePointsmust be set totruerequestModemust be set to the stringoncueserverUrlmust be set to a valid VAST tag
For complete details on these options, see the Advertising with the IMA3 Plugin document's Options section.
In-page embed implementation
You can also implement ad cue points using the in-page embed player code. In the code below, the IMA3 plugin is loaded and configured all in the HTML page.
The following code is the actual implementation:
- Lines 7-12: Style the size of the player.
- Line 13: Link to the IMA3 plugin's CSS.
- Lines 19-27: The player publishing code, with the addition of an
idattribute, which will be used in the JavaScript. - Line 29 : Include the IMA3 plugin's JavaScript.
- Lines 32-33, 40: Standard code to wait for the player code to be ready to interact with, and assign a variable the player object.
- Lines 34-38: Assign the required options their prescribed values.
- Line 39: Call the
ima3plugin, passing the options as a parameter.
<!doctype html>
<html>

<head>
  <meta charset="UTF-8">
  <title>Untitled Document</title>
  <style>
    .video-js {
      height: 344px;
      width: 610px;
    }
  </style>
  <link href="https://players.brightcove.net/videojs-ima3/4/videojs-ima3.css" rel="stylesheet">

</head>

<body>

  <video-js id="myPlayerID"
    data-video-id="4607746980001"
    data-account="1507807800001"
    data-player="rkNxoBMOe"
    data-embed="default"
     data-application-id=""
     controls=""></video-js>
  <script src="https://players.brightcove.net/1507807800001/rkNxoBMOe_default/index.min.js"></script>

  <script src="https://players.brightcove.net/videojs-ima3/4/videojs-ima3.min.js"></script>

  <script type="text/javascript">
    videojs.getPlayer('myPlayerID').ready(function() {
      var myPlayer = this,
      options = {
        useMediaCuePoints: true,
        requestMode: 'oncue',
        serverUrl: "//solutions.brightcove.com/bcls/brightcove-player/vmap/simple-vast.xml"
      };
      myPlayer.ima3(options);
    });
  </script>

</body>

</html>
Notes
- Cue point key/value pairs will only be substituted if the player's Request Ads setting is set to On cue point. This is especially important when using
mediainfo.ad_keys. - The
mediainfo.customFieldsvariable name is case sensitive.
Known issues
- When naming your cue points in Studio, as shown in the Create ad cue points section above, do NOT use curly braces and double quotes in the name. Doing so will cause the dynamically generated VMAP to be incorrectly formatted.