Step-by-Step: Plugin Development
Development approach
The JavaScript and CSS you develop for plugins will eventually need to be stored in an Internet accessible location, but it is recommended that during development you create and test locally. To do this, you will perform the following:
- Create a file to contain your JavaScript plugin code
- Create a file to contain your CSS plugin code (if needed)
- Create an HTML file for testing. Use the
embed_in_pageimplementation for the player - Add an
idto the<video-js>tag - Link to the JavaScript and CSS pages
- Use a
<script>tag to call the function - Develop and debug your code
The rest of this document guides you through these steps to build and deploy a simple plugin.
Build the basics
To begin the process of building a plugin, you need to perform some of the foundational, high-level steps mentioned above.
- Create a folder named
plugin-devthat can be browsed using an actual HTTP server. The server is necessary for the iframe implementation testing later in this document. - In the folder, create three files with the following names:
- plugin-dev.html (Insert the basic elements for an HTML page into the file)
- plugin-dev.js
- plugin-dev.css
- Using Studio's Players module, create a new player.
- In the Media module, select a video and publish it with the newly created player.
- On the Overview tab, expand the Sources accordion to associate a video with the player, then click Publish Changes.
- Copy the JavaScript embed code and paste into the body of the
plugin-dev.htmlpage. - Click Embed Code & URL for the Published Player and copy the JavaScript embed code into the body of the
plugin-dev.htmlpage. - Add an
idattribute to the<video-js>tag with a value ofplayer. - Check to be sure your HTML page appears similar to the following (Brightcove Player customers will not have a
data-video-idproperty):<!doctype html> <html> <head> <meta charset="UTF-8"> <title>Quick Start Plugin Dev</title> </head> <body> <video-js id="myPlayerID" data-account="1507807800001" data-player="default" data-embed="default" controls="" data-video-id="4607746980001" data-playlist-id="" data-application-id="" width="960" height="540"></video-js> <script src="https://players.brightcove.net/1507807800001/default_default/index.min.js"></script> </body> </html> - Browse the page to be sure your video is playing.
Scan reserved names
A custom plugin's name must not match the name of a plugin that is either built into the player itself or provided by Brightcove. Doing so creates a conflict and could interfere with the correct functioning of the player.
-
When naming your plugin, make sure NOT to use any of these names:
- ampSupport
- bcAa
- bcAirplay
- bcAnalytics
- bcGa
- bcGtm
- bcPlaylistUi
- bcTealium
- catalog
- chromecastReceiver
- contextmenu
- contextmenuUI
- customEndscreen
- dock
- eme
- encryptedWatcher
- endscreen
- errors
- FreeWheelPlugin
- ima3
- kollective
- perSourceBehaviors
- pip
- plugin
- playerInfo
- playlist
- playlistEndscreen
- playlistUi
- proxyTracks
- qualityMenu
- reloadSourceOnError
- seekEvents
- social
- ssai
- thumbnails
- touchActive
- urlparams
Create JavaScript
Next you will create and test the JavaScript code to build an overlay for the video.
- Open the file
plugin-dev.jsand paste in the following JavaScript code:videojs.registerPlugin('pluginDev', function() { var player = this, overlay = document.createElement('p'); overlay.className = 'vjs-overlay'; overlay.innerHTML = "Becoming a plugin developer"; player.el().appendChild(overlay); }); - Check your understanding of each line inserted:
- Lines 1 and 7 are the standard syntax to begin and end a new player plugin. In this case, the plugin name is
pluginDev. - Line 2 is a standard way to have a way to get a handle to the player. This is necessary to call methods of the player, which you will do later.
- Line 3 creates a paragraph element in the document and assigns it to the
overlayvariable. - Line 4 assigns a class to the overlay which will be used later in conjunction with CSS.
- Line 5 adds text to the paragraph element.
- Line 6 uses the
el()method of the player to retrieve the player's DOM element, then appends the new paragraph element to that DOM.
- Lines 1 and 7 are the standard syntax to begin and end a new player plugin. In this case, the plugin name is
- In the HTML file, add the following code just below the existing
<script>tags. This code includes the JavaScript file and then calls the method defined in that JavaScript.<script type="text/javascript" src="plugin-dev.js"></script> <script>videojs.getPlayer('myPlayerID').pluginDev();</script> - Browse the HTML page again, and you will see nothing visible has changed. The problem is that the overlay is there, but not visible. You will change this later.
- To verify the overlay is present, use the development tools of your browser. In the Elements section, check the player's
<div>element, and you will see the newly inserted paragraph element, as shown here: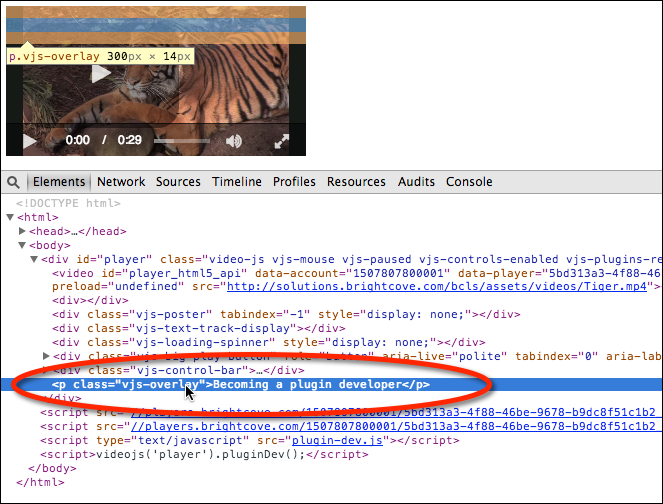
Style the plugin
You know the overlay is now part of the player, but not visible. Next you will style the overlay so it becomes visible. In this section of the document, you will use a very simple CSS to ensure the overlay is visible.
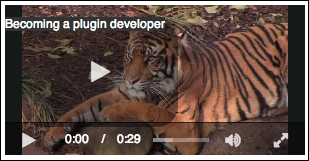
- Open the file
plugin-dev.cssand paste in the following styles:.vjs-overlay { background-color: #333333; color: white; position: absolute; margin-top: 100px; margin-left: 20px; } - In the HTML file, add the following code just below the existing
<link>tag. This code links to your newly created CSS file.<link href="plugin-dev.css" rel="stylesheet"> - Browse the HTML page and you will see the overlay is now visible.
Pass data to the plugin
It will often be the case that you want to change the behavior of your plugin at initialization time. This is possible by passing data into the plugin using the options property. In this example you will pass in the text to be displayed in the overlay.
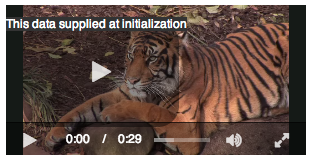
- Open the HTML page and alter the
<script>tags so a variable namedoptionsis created and assigned an object with a key-value pair of "overlayText":"This data is supplied at initialization". Also, pass theoptionsvariable as an argument when calling thepluginDev()method. The changes should appear as follows:<script type="text/javascript" src="plugin-dev-copy.js"></script> <script type="text/javascript"> var options = {"overlayText": "This data supplied at initialization"}; </script> <script>videojs.getPlayer('myPlayerID').pluginDev(options);</script> - You now need to alter the plugin's JavaScript to use the data passed to the function. Line 110 shows the function accepting the data as a parameter, and line 114 uses the object's data.
videojs.registerPlugin('pluginDev', function(options) { var player = this, overlay = document.createElement('p'); overlay.className = 'vjs-overlay'; overlay.innerHTML = options.overlayText; player.el().appendChild(overlay); }); - Browse the HTML page and you will see the new text being used.
Deploy the plugin
Once you have the plugin, CSS and player functioning correctly, you need to deploy the assets for proper use. Here is an overview of the steps required for deployment:
- Copy/move the JavaScript and CSS files to your remote location
- Use Studio to add the plugin configuration to the player.
- Create an HTML file for testing and use the iframe implementation for the player
- Test for anomalies
You will now be guided through these steps.
- Move your plugin JavaScript and CSS files to an Internet accessible location of your choice.
- In the folder in which you are working, create another file called
plugin-dev-iframe.html. - Use Studio's Players module to edit the player you created earlier.
- On the Overview tab, expand the Plugins accordion.
- Click Add Plugin > Custom Plugin.
- For the Plugin Name enter
pluginDev. This name MUST match the name of your plugin. - For the JavaScript URL, enter (or your URL):
https://solutions.brightcove.com/bcls/brightcove-player/plugins/plugin-dev.js - For the CSS URL, enter (or your URL):
https://solutions.brightcove.com/bcls/brightcove-player/plugins/plugin-dev.css - Enter the configuration options in the Options(JSON) text box.
{"overlayText": "This data is supplied at initialization"} - Click Publish Changes to apply the configuration to your published players.
- In the Media module, select a video and publish it with the newly updated and published player.
- Copy the Iframe embed code and paste into the body of the
plugin-dev-iframe.htmlpage. - From the Embed Code & URL > Published Player menu, copy the Iframe Embed Code and paste into the body of the
plugin-dev-iframe.htmlpage.<!doctype html> <html> <head> <meta charset="UTF-8"> <title>Quick Start Plugin Dev - iframe</title> </head> <body> <iframe src='https://players.brightcove.net/1507807800001/Bk6LLayNQ_default/index.html' allowfullscreen allow='encrypted-media'></iframe> </body> </html> - Browse the HTML page and you should see the plugin functioning correctly with the iframe.
Plugins with multiple players on one page
When using different players on one page and both players happen to be using a plugin of the same name, but are actually different plugins, only the first player loaded's plugin will be used. The reason this happens is that videojs is a global variable. Because the two players appear to be the same version since the plugin names are the same, they share the same videojs, and for efficiency's sake the player only loads one version. This means plugins of the same name registered using videojs.registerPlugin() are shared between all players of the same version.
There are a couple of solutions to this issue. They are:
- Make the plugin names different.
- Do not implement the functionality as a Video.js plugin, but rather as a general script.
3rd party libraries
If your plugin has dependencies on 3rd party libraries, for instance jQuery, you need to include them in one of these two ways:
- Add the library as another JavaScript file in the Plugins section of Players module in Video Cloud Studio.
- Add multiple entries in the scripts section of the player configuration in a curl statement.
BE SURE you put the libraries on which your plugin is dependent before your plugin's JavaScript entry in both scenarios listed above. The order of entry DOES matter.
Potential Web Player Publishing Failures
Packaging and Deploying Custom Player Plugins
The process of packaging and deploying custom player plugins into web player builds through publishing requests can be intricate, often involving unpredictable custom variables beyond the scope of the development and testing efforts conducted by Brightcove's Players Team.
Although the five million character limit per plugin is well-documented, publishing player builds can still encounter failures given the magnitude of contributing factors that form part of the player build workflow. The specific reasons for a failure may not be immediately apparent and can include, but are not limited to:
The number of files/requests included.
The bytes downloaded.
JavaScript syntax errors.
Network conditions.
Specific nuances with the web player.
Recommendations for Repeated Publishing Failures:
In the event of repeated publishing failure, it is recommended that the offending plugin(s) be properly evaluated prior to attempting re-publishing. For example, loading a custom plugin at a web page-level in a staging environment may help identify any errors or developmental oversights.
Best Practices for Simplified Build/Publishing Requests
To facilitate simplified build/publishing requests, publishers who intend to include a larger number of plugins within a given player build or operate more complex integrations bundling plugins might consider:
Bundling multiple plugins into a single JavaScript resource or file, ensuring the character limit for a single plugin is not met.
Carefully consider the inclusion of packaged plugins within the player build and potentially electing to load select (or all) player plugins at runtime.