Step-by-Step: Video.js Plugin Generator
The video.js plugin generator creates the files and folders needed to create a conventional plugin. It includes a test environment so that you can easily see your changes as you develop your plugin. It even generates the final plugin files that you can use when you are ready to release it.
Overview
In this topic, you will perform the following tasks:
- Setup your environment
- Create the plugin foundation
- View the source files
- Test your plugin
- Edit the JavaScript file
- Edit the CSS file
- Build your plugin
- Pass data to your plugin
- Recommendations
- Resources
For a video overview, see the following:
Setup your environment
To setup your environment to run the plugin generator, follow these steps:
-
If you don't already have it, download and install the Node.js JavaScript runtime. This includes npm, which is a package ecosystem that includes a large collection of open source libraries.
- Create a local folder on your computer. For this example, we will create one named test. This is where the generator files and your plugin files will go.
- Review the README information for the video.js plugin generator. In the docs folder, open and review the video.js Plugin conventions. This document talks about the recommended rules for creating your plugin.
- Open the Terminal app in the folder you created in a previous step. For this example, open the Terminal app in the test folder.
-
In the Terminal app, install the plugin generator along with Yeoman:
$ npm install -g yo generator-videojs-pluginThe video.js plugin generator uses a Yeoman generator, which is a scaffolding tool to setup the foundation for any project. This sets up the basic files and folders. You do not need to understand Yeoman. You just need to install it with the plugin generator.
Create the plugin foundation
In this section, you will create the foundation folders and files for your plugin.
-
In the Terminal, run the following command:
$ yo videojs-plugin -
Next, you'll be asked a series of questions about the details of your plugin. Here is a list of the options as well as a brief description for each.
Option Description Values for this example Package scope Optional: This is only needed if you plan to publish your plugin to a private npm organization. You could use your company name here or leave it blank. blank Plugin name Give your plugin a name. Entering the name demo creates a plugin named videojs-demo. demo Description Enter a description for your plugin. This is a demo Author The name and email address format is not required, but is used to populate the author field in the package.json file. The generator will try to guess these values based on your git setup, but you can change them. [your name] <your email address> License Select one of the license options. For your private plugins, you can select Unlicensed. Unlicensed Basic or Advanced Plugin The basic, function-based plugin is a plain JavaScript function. If you've written a Video.js plugin in the past, then you should be familiar with the basic plugin concept.
The advanced, class-based plugin was introduced with Video.js 6. This plugin type starts with a JavaScript class, which is a constructor function.
For details, see the Video.js Plugins readme documentation.Basic plugin (function-based) CSS tooling Select yes, if you want to include CSS styling. This will generate a CSS file. Yes Documentation tooling If yes, the generator includes JSDoc and provides a command to generate documentation. No Internationalized strings This is helpful if you have text that you want translated into different languages. The tool doesn't offer automatic translation, but it converts files from video.js JSON format to JavaScript. Then, you can create languages as you would for video.js and have them compiled into your plugin's output. No Lint changed files Include a Linting tool called videojs standard. This process checks your code for some common errors. Yes Before Git push This gives you the option to prevent pushing to a git repository if the selected checks fail. Checking code quality is a good way to prevent pushing code that is not up to standards. No Here is what the output looks like with values set for this example:
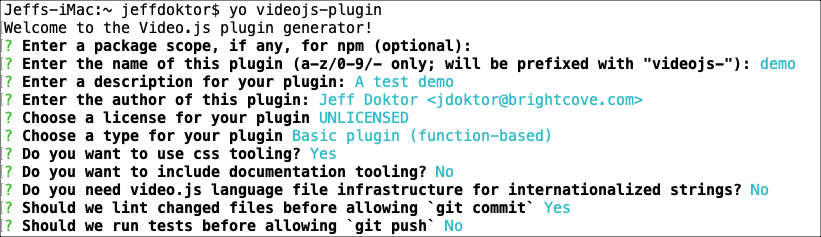
Option values - When the setup is complete, you will see several messages. There may be some warning messages, but no errors.

Setup complete Notice that the name of the plugin is videojs-demo.
View the source files
In this section, we will review the source files that were created by the videojs generator.
-
In an editor, open the top folder where you put your plugin project. Open the src folder. Here you will find the following:
- A plugin.js file. This file contains the code for your plugin.
- A plugin.css file, if you selected Yes to the CSS tooling option.
- (If you did not select Yes to the CSS tooling option, you can skip this step.) Open the src > plugin.css file.
Your code should look similar to the following:
/* Note: all vars must be defined here, there are no "local" vars */ :root { --main-color: red; --base-font-size: 9; --font-size: 7; } .video-js { &.vjs-demo { /* This class is added to the video.js element by the plugin by default. */ display: block; & .remove-me, & .remove-me-too, &.finally-remove-me { /* examples of postcss syntax, you probably want to remove this */ color: var(--main-color); /** * Note that you have to use calc and multiply by a value with a unit * prepending the unit like `var(--base-font-size)px` or * `calc(10 * var(--base-font-size)em` will NOT work! */ font-size: calc(var(--font-size) * 8 * var(--base-font-size) * 1px); } } } - Open the src > plugin.js file.
Your code should look similar to the following:
- Lines 25-27: call the
onPlayerReady()function, when the player is ready. Here, you can pass variables into your plugin using theoptionsobject. - Line 26: adds the
vjs-democlass to your player. By default, this is the only thing the skeleton code does. This is where you can add functionality to your plugin. - Line 48: registers your plugin with video.js.
- Line 51: adds a version parameter to your plugin. When you run the npm version script, it will update this variable to the version you are on.
import videojs from 'video.js'; import {version as VERSION} from '../package.json'; // Default options for the plugin. const defaults = {}; // Cross-compatibility for Video.js 5 and 6. const registerPlugin = videojs.registerPlugin || videojs.plugin; // const dom = videojs.dom || videojs; /** * Function to invoke when the player is ready. * * This is a great place for your plugin to initialize itself. When this * function is called, the player will have its DOM and child components * in place. * * @function onPlayerReady * @param {Player} player * A Video.js player object. * * @param {Object} [options={}] * A plain object containing options for the plugin. */ const onPlayerReady = (player, options) => { player.addClass('vjs-demo'); }; /** * A video.js plugin. * * In the plugin function, the value of `this` is a video.js `Player` * instance. You cannot rely on the player being in a "ready" state here, * depending on how the plugin is invoked. This may or may not be important * to you; if not, remove the wait for "ready"! * * @function demo * @param {Object} [options={}] * An object of options left to the plugin author to define. */ const demo = function(options) { this.ready(() => { onPlayerReady(this, videojs.mergeOptions(defaults, options)); }); }; // Register the plugin with video.js. registerPlugin('demo', demo); // Include the version number. demo.VERSION = VERSION; export default demo; - Lines 25-27: call the
Test your plugin
The plugin generator makes it easy to develop and test your plugin using a local test environment. Follow these steps to test your plugin:
-
In the Terminal, enter the following command to start the development server:
$ npm start - In a browser, enter the following to open the development server:
http://localhost:9999/You should see the player with a test video. The generator gives you a demo player that runs in the page. In the browser developer tools, open the Elements tab to see the HTML for the player.
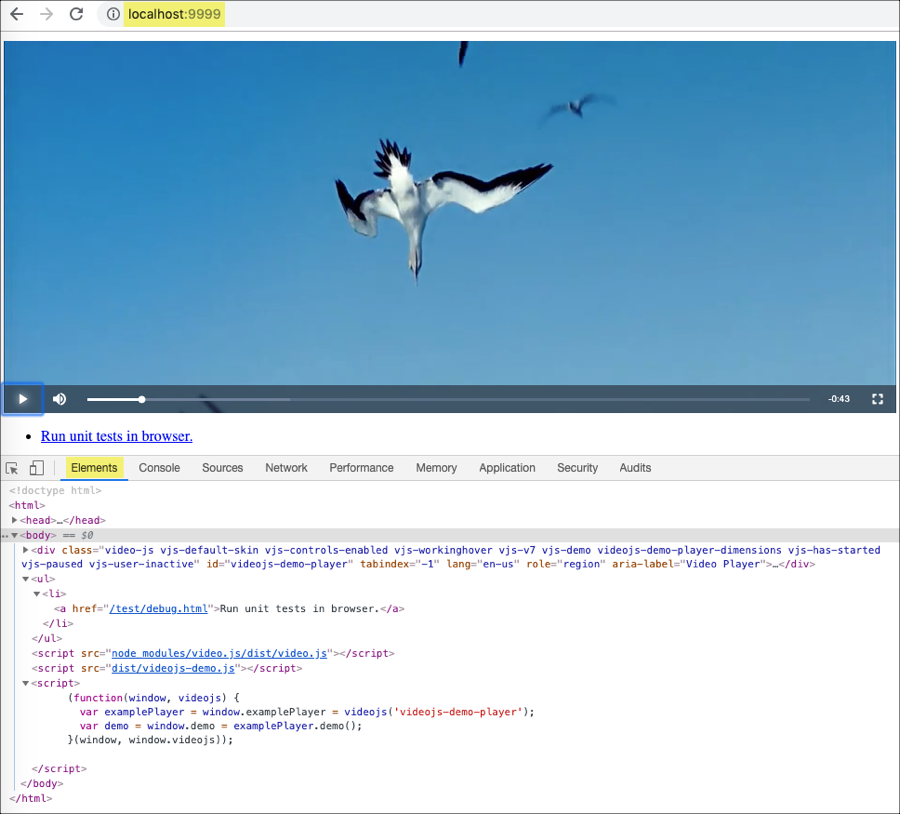
Browser testing - Inspect the Elements of this web page. You should see that the
vjs-democlass has been added to the player. Remember that we added this class to the player in the plugin code.
vjs-demo class - Now, let's try adding code to the plugin to automatically start playing the video when the player loads. Return to the src > plugin.js file in your editor.
- In the
onPlayerReady()method, add code to start playback of the video.const onPlayerReady = (player, options) => { player.addClass('vjs-demo'); player.play(); }; - Save the plugin.js file in your editor. When you refresh your browser, you should see that the video starts playing in the test environment.
As you develop your plugin in the plugin.js file and save changes, the tool automatically rebuilds and reloads the player in the browser. This makes it easy to develop and test your plugin.
-
Remove the line of code to start playing the video.
player.play();
Edit the JavaScript file
In this section, you will add code to the JavaScript source file to add a paragraph element with custom text to the player.
- In your editor, return to the src > plugin.js file.
- In the
onPlayerReady()function, add code to add a<p>element with custom text to the player.const onPlayerReady = (player, options) => { player.addClass('vjs-demo'); var textDisplay = document.createElement('p'); textDisplay.className = 'vjs-text'; textDisplay.innerHTML = "Becoming a plugin developer"; player.el().appendChild(textDisplay); }; - Save the file. Remember that your changes will be automatically updated in the testing browser.
- Return to the testing browser. You will see nothing has changed in the player. The problem is that the text is there, but it is not visible. We'll fix that next.
To verify that the text element has been added to the player, use the development tools in the browser. In the Elements section, expand the player's
<div>element. You should see the newly added paragraph tag.
Added paragraph tag We'll make the text visible in the next section by using CSS.
Edit the CSS file
In this section, you will add code to the CSS source file to display text over the player.
- In your editor, return to the src > plugin.css file.
- Add the
.vjs-textselector with styles to display the custom text in the player./* Note: all vars must be defined here, there are no "local" vars */ :root { --main-color: red; --base-font-size: 9; --font-size: 7; } .vjs-text { background-color: #333333; color: white; position: absolute; font-size: 2em; text-align: center; width: 100%; margin-top: 10%; } - Save the file. Remember that your changes will be automatically updated in the testing browser.
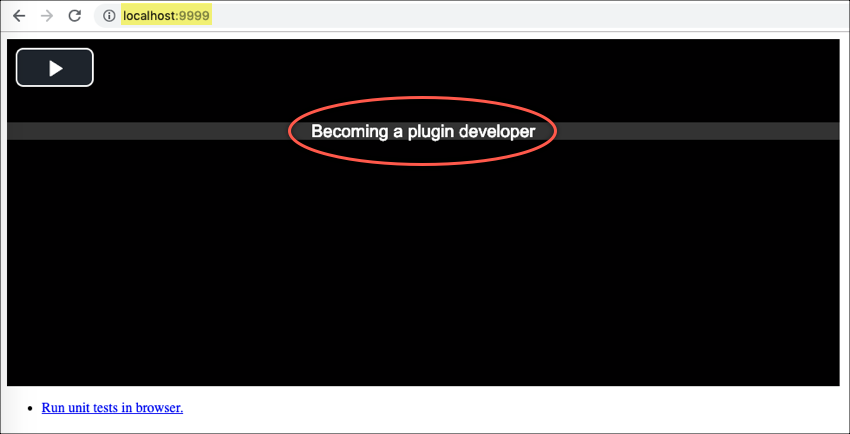
- Return to the testing browser. You should now see the custom text displayed over the player.
Text displayed over the player - Stop the development server by pressing CTRL-C in the Terminal app.
Now, you are ready to prepare your plugin for distribution. We'll do that next.
Build your plugin
In this section, you will build your plugin. This takes your source code and creates distributable CSS and JavaScript files.
-
In the Terminal, run the following command:
$ npm run buildThe build takes your ES6 source code and converts it into ES5 JavaScript code.
-
In your project folder, expand the dist folder. This is where you will find a distributable version of your plugin. Here, you should find the following files (assuming you selected Yes for CSS tooling):
- videojs-demo.css
- videojs-demo.js
- videojs-demo.min.js
You will also find these less commonly used files:
- In the dist folder, open the videojs-demo.js file.
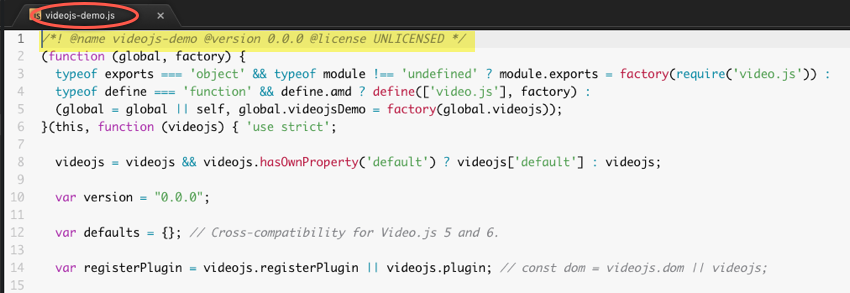
Distribution files A few things to note about this distribution file:
- A license banner has been added to the top of the file.
- Your plugin has been wrapped in a browserify namespace. This means that there are no global variables that might conflict with your page code.
- The plugin internally registers itself with videojs. This means that you can create multiple plugins, each working independently, for a player.
Pass data to your plugin
This section is optional. You can skip this section unless you want to learn how to pass data to your plugin.
-
We'll use the
optionsproperty to pass data from our HTML page into the plugin. For details on using this property, see the Pass Data to the Plugin document. -
In your editor, return to the src > plugin.js file.
-
In the
onPlayerReady()function, add code to use the text value in theoptionsproperty if it exists, otherwise use a default text value.- Line 4: creates a paragraph element
- Line 5: assigns the text class type
- Line 6: checks if the
displayTextobject exists in theoptionsproperty - Line 7: uses the
displayTextvalue to populate the text display - Line 9: uses the default text display value
- Line 13: adds the display text element to the DOM
const onPlayerReady = (player, options) => { player.addClass('vjs-demo'); var textDisplay = document.createElement('p'); textDisplay.className = 'vjs-text'; if ('displayText' in options) { textDisplay.innerHTML = options.displayText; } else { textDisplay.innerHTML = "Becoming a plugin developer"; } player.el().appendChild(textDisplay); }; - Save the file and return to the testing browser. You should not see any change to the text display.
- If you haven't already done so, add the css for the
.vjs-textselector from the Edit the CSS file section. - Build your plugin. We'll use the files in the dist folder in a test web page.
- In your local testing server, like MAMP, create a folder named plugin-generator.
- In this folder, copy the videojs-demo.css and videojs-demo.js files from the dist folder and paste them into your testing server folder, plugin-generator.
- Next, in this folder, create an HTML file with a player that calls our
demoplugin and passes in a value for the display text. We'll name this file testing.html.- Line 8: includes our plugin styles.
- Lines 13-22: add a Brightcove Player to our web page.
- Line 24: includes our plugin JavaScript file.
- Lines 26-32: execute a custom page script.
- Line 27: waits for the player to be ready.
- Line 28: gets a reference to the player.
- Line 29: defines the
optionsobject. - Line 30: calls our
demoplugin and passes in theoptionsobject. Notice that the plugin name isdemo, while the plugin files names arevideojs-demo.
<!doctype html> <html> <head> <meta charset="UTF-8"> <title>Passing data to the plugin</title> <link href="videojs-demo.css" rel="stylesheet"> </head> <body> <video-js id="myPlayerID" data-video-id="5977793284001" data-account="1752604059001" data-player="default" data-embed="default" data-application-id="" width="640px" height="360px" controls=""></video-js> <script src="//players.brightcove.net/1752604059001/default_default/index.min.js"></script> <script type="text/javascript" src="videojs-demo.js"></script> <script type="text/javascript"> videojs.getPlayer('myPlayerID').ready(function() { var myPlayer = this, options = {"displayText": "This data supplied at initialization"}; myPlayer.demo(options); }); </script> </body> </html> - In a browser, run the testing.html file. You should see the display text value is coming from the page code instead of the plugin.
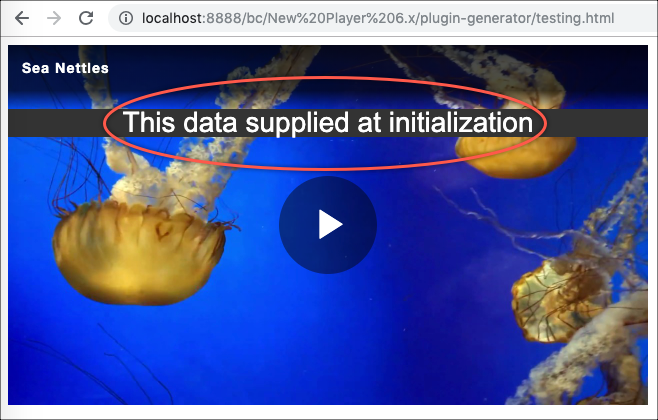
Data passed to the plugin
Recommendations
It is recommended to use this generator for all of your plugins, even the simple ones. This way, you will always have the same setup for all of your plugins. It also frees you from the task of having to create scripts to perform certain functions, like linting or minifying.
With this generator, you can focus on developing and testing your plugin without having to worry about the underlying tools.
You can keep your plugin local or put it on your private GitHub repo. Creating a videojs plugin means that it will work with the Brightcove Player.
Resources
Here is a summary of the resources you will use while working through this quick start. These links are also provided in the steps below:
- Download and install: Node.js (This includes npm)
Use the "Recommended For Most Users" version.
- The video.js generator
- The video.js plugin conventions
- Getting started with npm
- The yeoman scaffolding tool