Step-by-Step: Brightcove Player Debugger
Once you add the debugger plugin in your player, you can track information in real-time as playback occurs in the web browser.
The player with the debugger
Select the image below to open the player and debugger in another window.

Overview
The Brightcove Player debugger is a plugin that works with either the Brightcove Player or the standard Video.js player. The debugger logs, captures and displays information about the player, media and advertising that is currently in use. It works on the following player platforms:
- Brightcove Player v5+, v6+
- Video.js v5, v6
The debugger records ad settings when the following plugins are used:
- IMA
- FreeWheel
- Once UX
Resource links:
Learn about the debugger
Learn about the Brightcove Player Debugger:
-
Review the README information for the Brightcove Player debugger. Here, you will find a code sample along with debugger options and display data.
The Brightcove Player debugger attaches itself to a Brightcove Player by using the
<video>element'sidattribute. -
The features of the debugger include:
- A toggle button lets you minimize the debugger to reduce its footprint when testing players in the wild.
- It listens to player events using the
player.on()method, and displays them in the Log section. - It captures the browser's debug console messages and displays them in the Log section.
- For the current video loaded in the player, the debugger records data from the
mediainfoproperty. - When the IMA plugin is used, the debugger records IMA3 ad settings.
- When the FreeWheel plugin is used, the debugger records the FreeWheel ad settings.
- When an ad is playing, the debugger records the current ad information. Pause the player to make sure you can view this information in the Ad Settings tab.
- It captures and displays the current player state using CSS classes that are attached to the player.
- By selecting/de-selecting a class name in the Player Classes section, you can add/remove classes from the player.
- By toggling the Log, Classes, Player Settings and Ad Settings tabs, you can show/hide the corresponding display sections.
Create the player
First, we'll create a player in Studio and assign a video to it.
- In Studio, navigate to the Players module. Here, create a new player or use an existing one. You can even use the default player in your account.
- In the Settings section, select the Edit button and do the following:
- Set the Width option to 640.
- Set the Height option to 360.
- Click Save and then Publish the player.
- In the Media module, select a video and publish it with this player.Assign video content to the player and publish it.
-
Copy the Advanced (In-Page) embed code and paste it into a new HTML file.
-
In the opening
<video>tag, add anidattribute with a value of myPlayer.The embed code should look similar to this:
<video-js id="myPlayerID"
  data-video-id="4825296720001"
  data-account="1752604059001"
  data-player="default"
  data-embed="default"
  data-application-id=""
  controls=""
  width="640"
  height="360"></video-js>
<script src="https://players.brightcove.net/1752604059001/default_default/index.min.js"></script>
<video-js id="myPlayerID" data-account="3676484087001" data-player="BkE8DMCzl" data-embed="default" data-application-id="" controls="" width="640" height="360"></video-js> <script src="https://players.brightcove.net/3676484087001/BkE8DMCzl_default/index.min.js"></script>
Add the debugger files
In this section, we will add the styles and scripts and needed for the Brightcove Player debugger.
-
Below the player code, add a
<link>tag which points to your copy of the debugger CSS file. The tag should look similar to this:<link href="//your web domain/videojs-player-debugger.css" rel="stylesheet"> -
Below the previous code, add a
<script>tag which points to your copy of the debugger JavaScript file. The tag should look similar to this:<script src="//your web domain/videojs-player-debugger.min.js"></script>
Call the debugger with options
In this section, we will set options for the debugger and then call it to add the debugger to our player.
-
Here is a list of the options along with a brief description for each:
Option Description Default value captureConsole Include the messages output from the JavaScript console in the log. true debugAds Log ad events and debugging information. true logClasses Log player classes with each event. This is useful for tracking player state. false logType Choose the format for the logged data - either table or list. list showMediaInfo Include the mediainfodata in the Player Settings Pane.true showPosterStyles Log and record poster classes and styles. false showProgress Log progress events. false startMinimized Start the debugger in the minimized (button) state. false useLineNums Include line numbers in log output. false verbose Log detailed player and ad event messages. false -
In your HTML page code, before the closing
</body>tag, add the following script code:- Line 2: gets a reference to your player.
- Line 3: waits for your player to be ready.
- Line 4: defines the options for the debugger. For this example, we have a player without ads.
- Line 6: calls the debugger with the specified options.
<script> var myPlayer = videojs.getPlayer('myPlayerID'); myPlayer.ready(function(){ var options = {"debugAds":false, "logClasses": true}; myPlayer.playerDebugger(options); }); </script> -
Your complete HTML page code should look similar to this:
<!doctype html>
<html>

<head>
    <meta charset="UTF-8">
    <title>BC Player Debugger</title>
</head>

<body>

    <video-js id="myPlayerID"
      data-video-id="4825296720001"
        data-account="1752604059001"
        data-player="default"
        data-embed="default"
        data-application-id=""
        controls=""
        width="640"
        height="360"></video-js>
    <script src="https://players.brightcove.net/1752604059001/default_default/index.min.js"></script>

  <!-- BC Player Debugger styles and script -->
    <link href="/assets/css/videojs-player-debugger.css" rel="stylesheet">
    <script src="/assets/js/videojs-player-debugger.min.js"></script>

  <!-- page script -->
    <script>
      var myPlayer = videojs.getPlayer('myPlayerID');
      myPlayer.ready(function(){
        var options = {"debugAds":false, "logClasses": true};
        myPlayer.playerDebugger(options);
      });
    </script>

</body>
</html>
<!doctype html> <html> <head> <meta charset="UTF-8"> <title>BC Player Debugger</title> </head> <body> <video-js id="myPlayerID" data-account="1752604059001" data-player="default" data-embed="default" data-application-id="" controls="" width="640" height="360"></video-js> <script src="https://players.brightcove.net/1752604059001/default_default/index.min.js"></script> <!-- BC Player Debugger styles and script --> <link href="/assets/css/videojs-player-debugger.css" rel="stylesheet"> <script src="/assets/js/videojs-player-debugger.min.js"></script> <!-- page script --> <script> var myPlayer = videojs.getPlayer('myPlayerID'); myPlayer.ready(function(){ var options = {"debugAds":false, "logClasses": true}; myPlayer.playerDebugger(options); }); </script> </body> </html> -
In a browser, run your HTML file. You should see the debugger below the player.
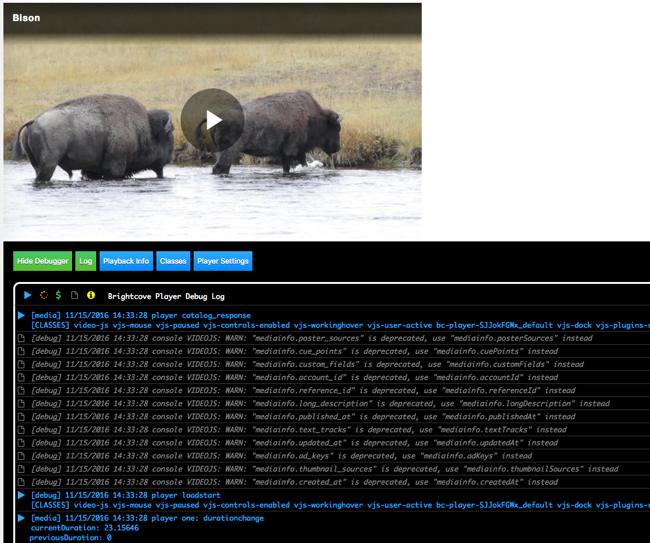
Brightcove Player debugger
The Log tab
The Log section displays all of the player events that the plugin has captured.
-
In the player debugger, make sure that the Log tab is selected. The tab will appear green when selected.
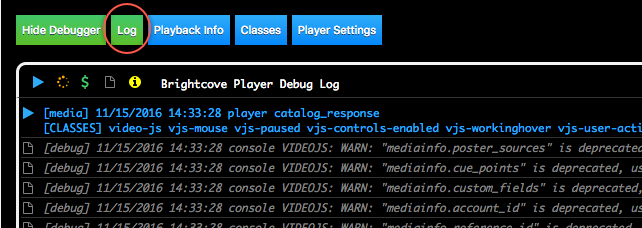
Log section display If an event exposes additional information, that information can also be displayed. For example, on
loadedmetadata, the following data is also displayed:- account id
- video id
- duration
- short description
To log the events without details, set the verbose option to false.
-
Notice the initial events in the log. Start playing the video and then pause it. You should now see events associated with playing and pausing the video.
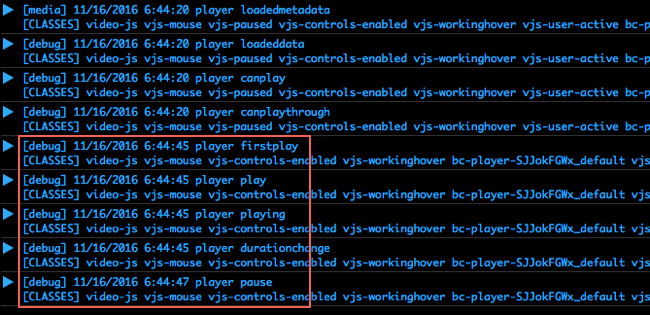
Play and pause events -
Let the video play to the end. Notice that there is a pause event before the ended event.
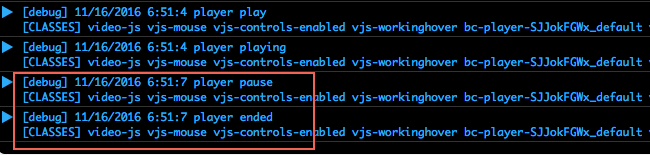
Ended event
The Playback Info tab
The Playback Info section displays playback information for the loaded video.
-
In the player debugger, select the Playback Info tab. The tab will appear green when selected.
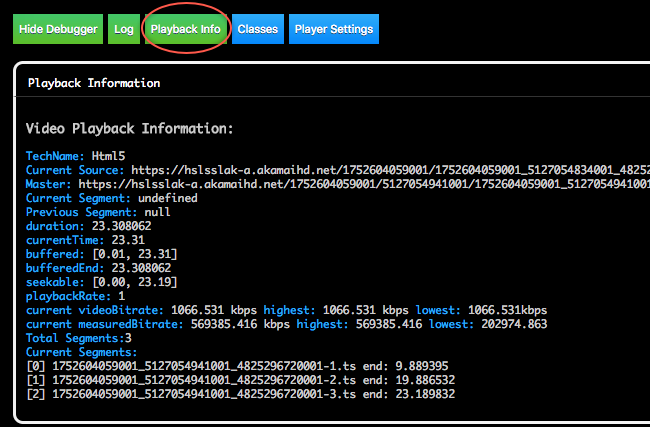
Playback Info tab Notice that information that is displayed for the currently loaded video.
The Classes tab
The Classes section displays the CSS classes attached to the player. Active classes appear in green/bold text, while inactive classes appear in white/normal text.
-
In the player debugger, select the Classes tab. The tab will appear green when selected.
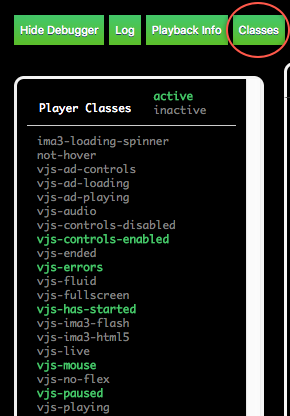
Classes tab You can select a class to apply it to the player. This lets you test various player states.
The Player Settings tab
The Player Settings section displays player information, including player id and account id. It also displays the data from the mediainfo object for the currently loaded video, including renditions, sources, master files, etc.
-
In the player debugger, select the Player Settings tab. The tab will appear green when selected.
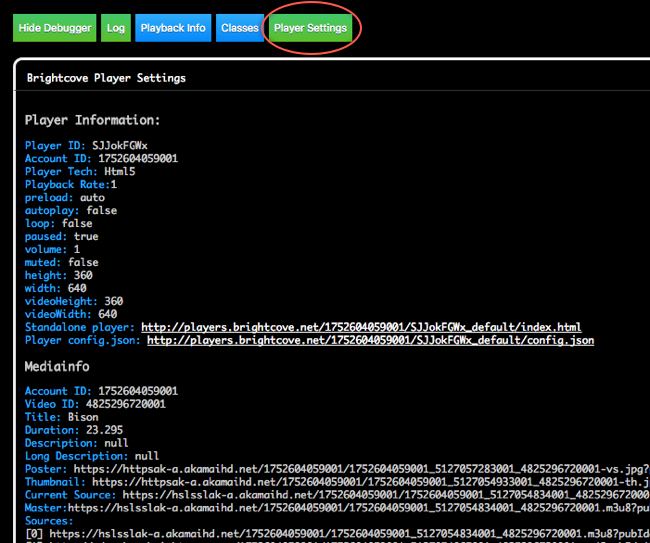
Player Settings tab
Debug IMA ads
The debugger captures and records ad events and the state of the player at the time the event occurs. The debugger creates a breadcrumb trail, making it easier to see the progression of events during ad playback.
First, we'll include the ad plugin and ad URL to our player. In this example, we are using IMA ads.
-
Return to your HTML file. Below the player's
<script>tag, add the following files for the IMA plugin:- Line 4: defines the styles for the IMA plugin.
- Line 5: defines the JavaScript file for the IMA plugin.
    <script src="https://players.brightcove.net/1752604059001/SJJokFGWx_default/index.min.js"></script>

    <!-- IMA styles and script -->
    <link href="https://players.brightcove.net/videojs-ima3/4/videojs-ima3.css" rel="stylesheet">
    <script src="https://players.brightcove.net/videojs-ima3/4/videojs-ima3.min.js"></script>
<script src="https://players.brightcove.net/3676484087001/BkE8DMCzl_default/index.min.js"></script> <!-- IMA styles and script --> <link href="https://players.brightcove.net/videojs-ima3/4/videojs-ima3.css" rel="stylesheet"> <script src="https://players.brightcove.net/videojs-ima3/4/videojs-ima3.min.js"></script> -
In the page script section, add code to define the ad URL and call the IMA plugin.
- Line 4: defines the options for the player debugger. Notice that
debugAdsoption has been set totrue. - Line 5: defines the ad URL.
- Lines 7-11: call the IMA plugin with the ad URL and options.
<script> var myPlayer = videojs.getPlayer('myPlayerID'); myPlayer.ready(function(){ var options = {"debugAds":true, "logClasses": true}; myAdUrl = "https://pubads.g.doubleclick.net/gampad/ads?sz=640x480&iu=/124319096/external/single_ad_samples&ciu_szs=300x250&impl=s&gdfp_req=1&env=vp&output=vast&unviewed_position_start=1&cust_params=deployment%3Ddevsite%26sample_ct%3Dlinear&correlator=" myPlayer.ima3({ serverUrl: myAdUrl, timeout: 5000, debug: true }); myPlayer.playerDebugger(options); }); </script> - Line 4: defines the options for the player debugger. Notice that
-
Your complete HTML page code should look similar to this:
<!doctype html>
<html>

<head>
    <meta charset="UTF-8">
    <title>BC Player Debugger</title>
</head>

<body>

    <video-js id="myPlayerID"
      data-video-id="4825296720001"
        data-account="1752604059001"
        data-player="default"
        data-embed="default"
        data-application-id=""
        controls=""
        width="640"
        height="360"></video-js>
    <script src="https://players.brightcove.net/1752604059001/default_default/index.min.js"></script>

  <!-- BC Player Debugger styles and script -->
    <link href="/assets/css/videojs-player-debugger.css" rel="stylesheet">
    <script src="/assets/js/videojs-player-debugger.min.js"></script>

		<!-- IMA styles and script -->
    <link href="https://players.brightcove.net/videojs-ima3/4/videojs-ima3.css" rel="stylesheet">
    <script src="https://players.brightcove.net/videojs-ima3/4/videojs-ima3.min.js"></script>

  <!-- page script -->
    <script>
      var myPlayer = videojs.getPlayer('myPlayerID');
      myPlayer.ready(function(){
        var options = {"debugAds":true, "logClasses": true};
        myAdUrl = "https://pubads.g.doubleclick.net/gampad/ads?sz=640x480&iu=/124319096/external/single_ad_samples&ciu_szs=300x250&impl=s&gdfp_req=1&env=vp&output=vast&unviewed_position_start=1&cust_params=deployment%3Ddevsite%26sample_ct%3Dlinear&correlator="

        myPlayer.ima3({
          serverUrl: myAdUrl,
          timeout: 5000,
          debug: true
        });
        myPlayer.playerDebugger(options);
      });
    </script>

</body>
</html>
<!doctype html> <html> <head> <meta charset="UTF-8"> <title>BC Player Debugger</title> </head> <body> <video-js id="myPlayerID" data-account="1752604059001" data-player="default" data-embed="default" data-application-id="" controls="" width="640" height="360"></video-js> <script src="https://players.brightcove.net/1752604059001/default_default/index.min.js"></script> <!-- BC Player Debugger styles and script --> <link href="/assets/css/videojs-player-debugger.css" rel="stylesheet"> <script src="/assets/js/videojs-player-debugger.min.js"></script> <!-- IMA styles and script --> <link href="https://players.brightcove.net/videojs-ima3/4/videojs-ima3.css" rel="stylesheet"> <script src="https://players.brightcove.net/videojs-ima3/4/videojs-ima3.min.js"></script> <!-- page script --> <script> var myPlayer = videojs.getPlayer('myPlayerID'); myPlayer.ready(function(){ var options = {"debugAds":true, "logClasses": true}; myAdUrl = "https://pubads.g.doubleclick.net/gampad/ads?sz=640x480&iu=/124319096/external/single_ad_samples&ciu_szs=300x250&impl=s&gdfp_req=1&env=vp&output=vast&unviewed_position_start=1&cust_params=deployment%3Ddevsite%26sample_ct%3Dlinear&correlator=" myPlayer.ima3({ serverUrl: myAdUrl, timeout: 5000, debug: true }); myPlayer.playerDebugger(options); }); </script> </body> </html> -
Run your HTML page in the browser. Select the Ad Settings tab. You should see the Ad Settings section below the player.
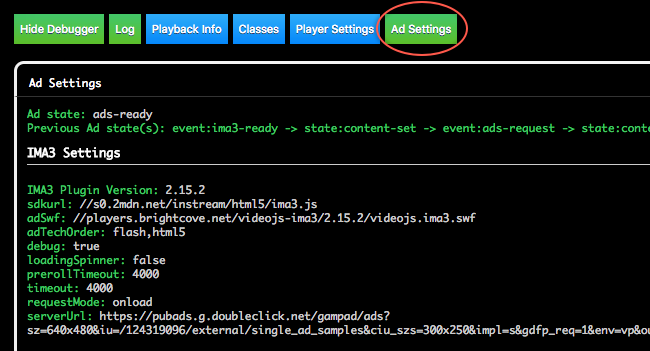
Ad Settings tab -
Start playing the video. This example has one ad at the beginning of the video. You should see additional event information as the ad plays.
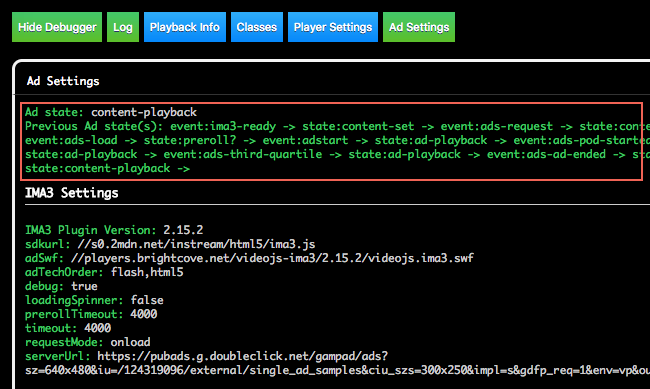
IMA ad events - Now you know the basics of using the Brightcove Player debugger. You are ready to explore on your own.