Step-by-Step: Brightcove Player
Overview
This document provides a hands-on introduction to creating a Brightcove Player, then using two different code implementations to publish a video using the newly created player. You will also programmatically start the video playing and then add a plugin to the player.
In this quick start you will perform the following tasks:
- Create a player using Studio
- Publish a video in the player using Studio
- Use the iframe player implementation
- Use the In-page embed implementation
- Programmatically play the video
- Add the overlay plugin to the player
Create player
To create a new player, follow these steps.
- Login to Studio at https://studio.brightcove.com/ .
- Click the Profile icon in the top-right corner. You will see your current account and any other accounts. Click the account you want to work in.
- Open the Players module.
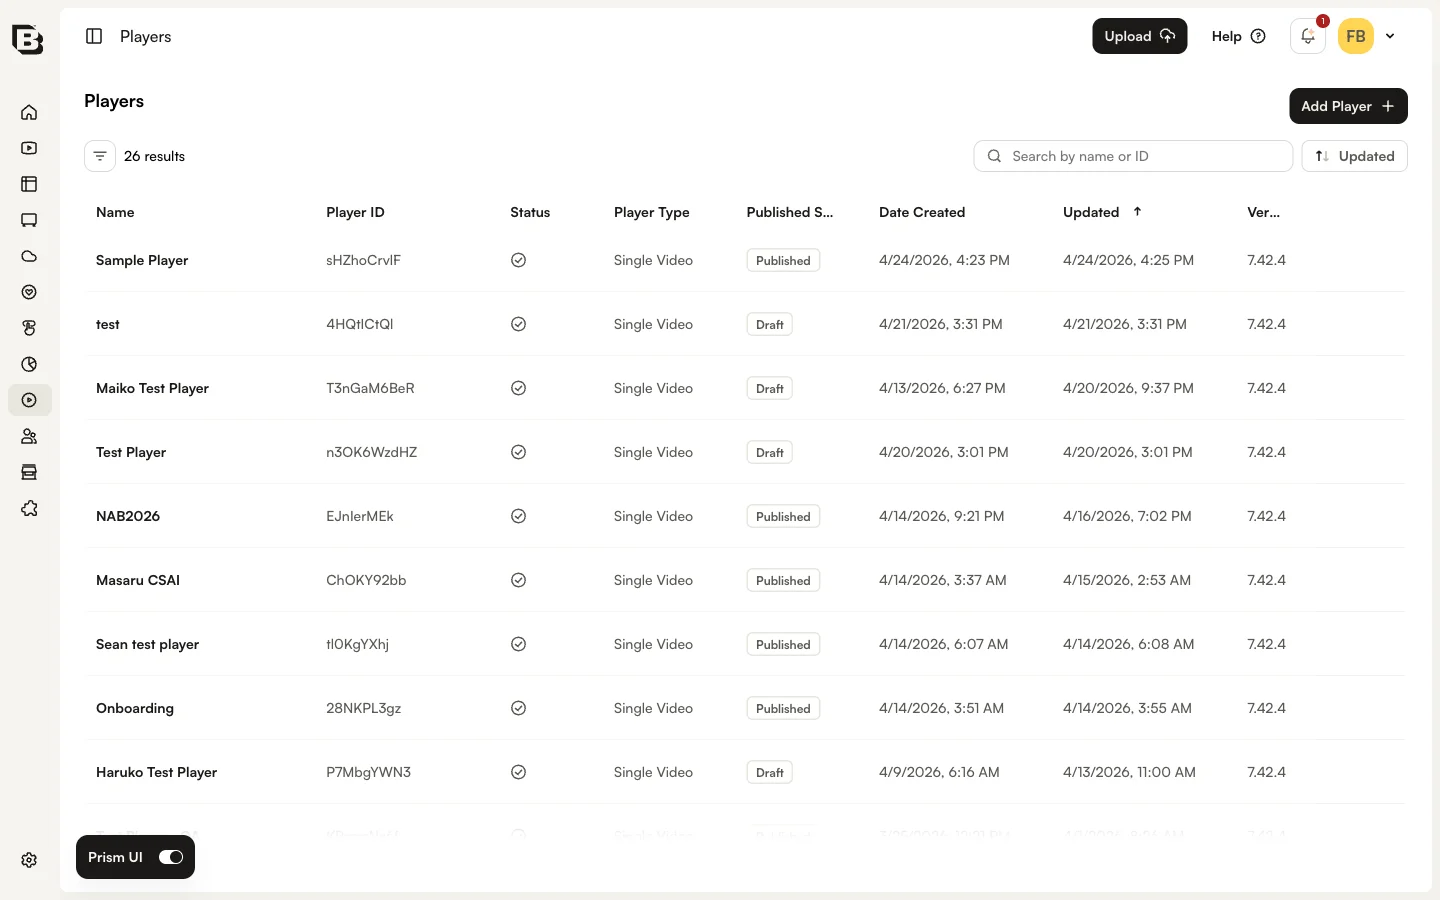
- Click the Add Player button.
- Enter a Name and Short Description for the player. For this quick start, the player name will be Sample Player.
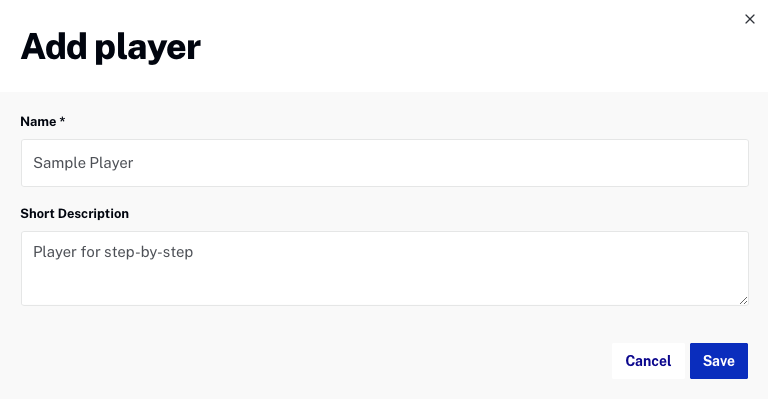
- Click Create.
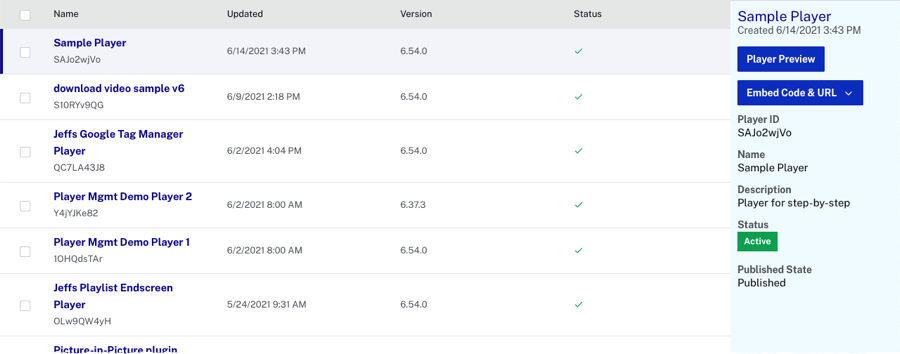
- Confirm that the newly created player appears in the list of players.
Publish video in player
Next you will embed a video using the newly created player. Once you associate the video with your player you will have access to two embed code implementations.
To embed a video with your player, follow these steps:
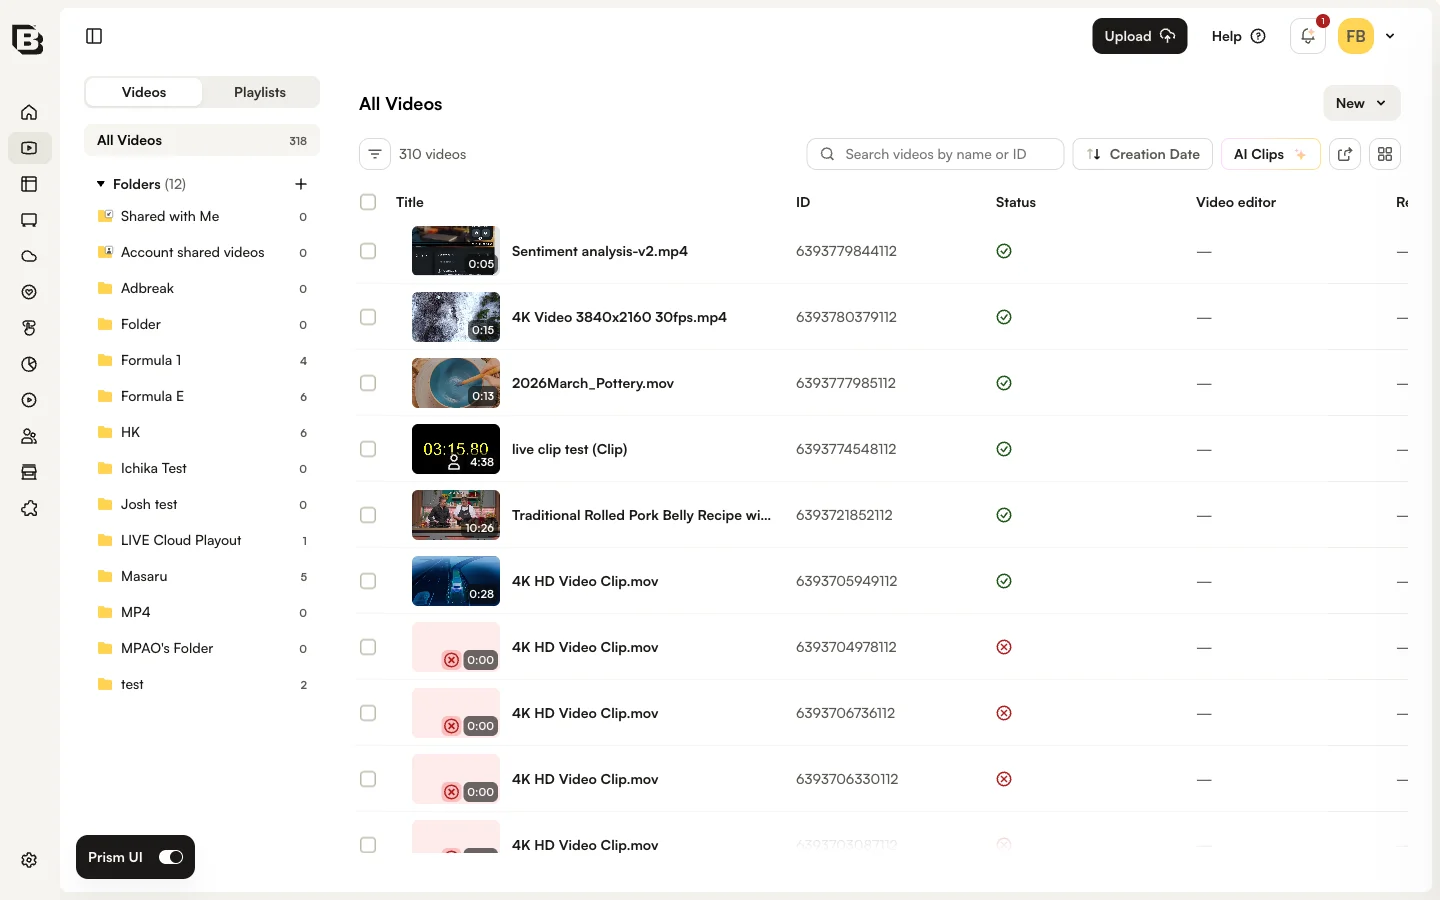
- In Studio, navigate to the Media module.
- Click on the video you wish to publish to open the video detail page, then click Embed to Web.
- In the Embed on Web dialog, from the Player dropdown, choose your newly created player. You can also configure Player Sizing, Aspect ratio, and dimensions.
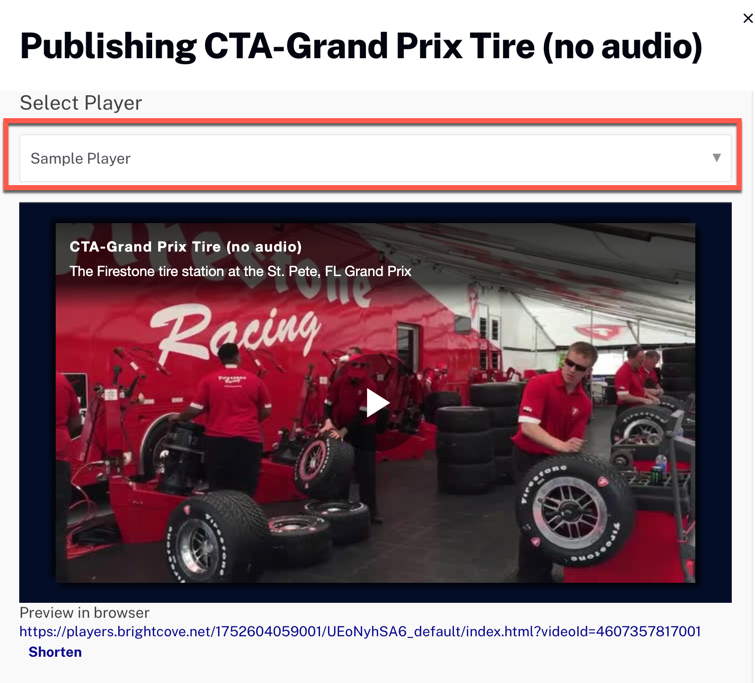
- You now have access to two embed code implementations: Iframe and JavaScript (in-page embed). Use the Copy code button to copy the embed code. You can also click URL to get the player URL or Preview to preview the player in a new tab. Do not close this window as you will be copying code from it later in this quick start.
You will use the JSON editor to add a video to the player. To configure the video content, follow these steps.
- Click the link for the Sample Player to open the player properties page.
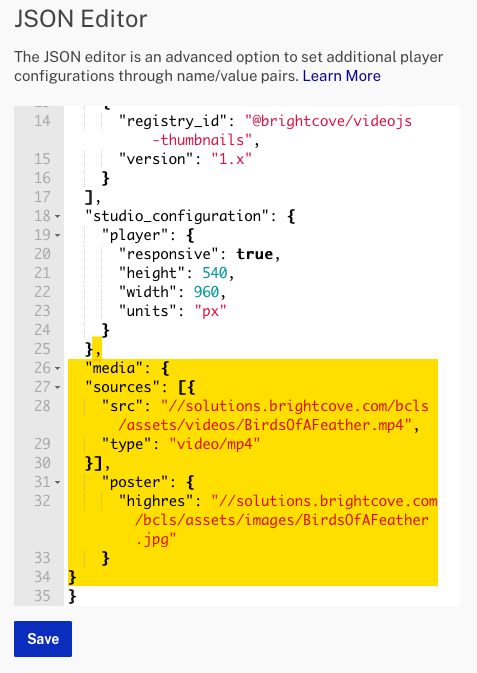
- Expand the JSON Editor section on the Overview tab.
- Place a comma after the SECOND TO THE LAST brace in the JSON.
- Just above the last closing brace, add the following to assign a video and poster to the player. Of course, you can substitute your own video and poster.
"media": { "sources": [{ "src": "//solutions.brightcove.com/bcls/assets/videos/BirdsOfAFeather.mp4", "type": "video/mp4" }], "poster": { "highres": "//solutions.brightcove.com/bcls/assets/images/BirdsOfAFeather.jpg" } } - Your JSON should appear similar to the following (the added text is highlighted in yellow):
- Click Save .
- Click Publish Changes to publish your player.
- Click Embed & Preview to open the Embed Player dialog. You can copy the Iframe or JavaScript (in-page embed) player implementation code. Note that the implementation code will reflect the Player Sizing, Aspect Ratio and Dimensions choices made in the Information section.
- Copy both of the code implementation types to a text file for later use.
Use Iframe embed code
- Create an HTML page and paste the Iframe code from the previous step into the body.
- When you browse this page you will see the video reflects the Sizing ( Responsive or Fixed ), Aspect Ratio and Dimensions choices made.
Use JavaScript embed code
In this section you will use the JavaScript (in-page embed) code implementation.
- Return to the Embed on Web dialog in Video Cloud Studio.
- Click the JavaScript tab and select Fixed for Player Sizing.
- Create an HTML page and paste the JavaScript (in-page embed) code from above, into the body.
- Examine the code, which will appear similar to the following (insert carriage returns as shown for easier reading of player code), and note the attributes:
<video-js data-account="1507807800001" data-player="EUYJo0AOB" data-embed="default" controls="" data-video-id="6071787405001" data-playlist-id="" data-application-id="" width="640" height="360"></video-js> <script src="https://players.brightcove.net/1507807800001/default_default/index.min.js"></script>-
data-account: The account number -
data-player: The ID of the Brightcove Player -
data-embed: Eitherdefaultif the player is a parent embed, or the ID of the parent player; see Embed APIs Guide for more information on embeds (parent/child players) -
controls: Acts as a Boolean if the player controls should be present (controlsattribute included in the tag), or not shown (controlsattribute not present in the tag) -
data-video-id: The ID of the Video Cloud video (do not use if supplying a playlist ID) -
data-playlist-id: The ID of the Video Cloud playlist (do not use if supplying a video ID) -
data-application-id: Allows you to re-use a single player, but differentiate analytics on a per-site or per-application basis; see Adding an Application ID to the Player Embed Code for more information -
width & height: Sets player dimensions. -
<script>tag: Any time you use in-page code there will be an accompanyingscripttag; the referenced JavaScript file contains all JavaScript and CSS associated with the particular player
-
- Examine the code, which will appear similar to the following, and note the attributes:
<video data-account="1507807800001" data-player="H15p1gTkg" data-embed="default" data-application-id controls=""></video> <script src="https://players.brightcove.net/1507807800001/H15p1gTkg_default/index.min.js"></script>-
data-account: The account number -
data-player: The ID of the Brightcove Player -
data-embed: Eitherdefaultif the player is a parent embed, or the ID of the parent player; see Embed APIs Guide for more information on embeds (parent/child players) -
class: The standard Brightcove Player CSS class associated with in-page embed code -
controls: Acts as a Boolean if the player controls should be present (controlsattribute included in the tag), or not shown (controlsattribute not present in the tag) -
<script> tag: All associated JavaScript and CSS associated with the particular player
-
- When you browse this page you will see the video reflects the Sizing ( Fixed ), Aspect Ratio and Dimensions choices made.
Programmatically play video
There is a rich API to use with Brightcove Player. In this section you will use the play() method to programmatically start the video playing.
- Add an
idattribute to thevideotag with a value of myPlayerID .<video id="myPlayerID" - Just above the closing
bodytag, insert ascriptblock.<script> </script> </body> - In the script block, use the
on()method to listen for theloadedmetadataevent. When the event is dispatched an anonymous event handler function is called.videojs.getPlayer('myPlayerID').on('loadedmetadata', function() { }); - In the function, create a variable named
myPlayer, that assigns the player instance, referenced asthis, to that variable.var myPlayer = this; - Since most browsers no longer allow autoplay for videos with an audio track, it is best to use the
muted()method to mute the video and ensure the video will autoplay.myPlayer.muted(true);See the Autoplay Considerations document for more information on the autoplay issue.
- Use the player's
play()method to start the video.myPlayer.play(); - Confirm your script block appears as follows.
<script> videojs.getPlayer('myPlayerID').on('loadedmetadata', function() { var myPlayer = this; myPlayer.muted(true); myPlayer.play(); }); </script> - Save your changes and refresh your page in the browser to see the video automatically start playing. If you chose a video with an audio track you will not hear it, as autoplay videos will not play the audio track (browser rules, not Brightcove's).
Add plugin
Brightcove Player has many plugins you can utilize to enhance the player. One such plugin is the Overlay Plugin. In this section you will add that plugin to the Advanced code you finished in the last section. For details on the plugin see the Display Overlay Plugin document.
When using a plugin you must supply the path to the JavaScript that is the plugin implementation. You may also have to supply the link to a CSS if needed by the plugin.
- Just above the closing
headtag, insert the following link statement which points to the location of the CSS for the overlay plugin.<link href="https://players.brightcove.net/videojs-overlay/2/videojs-overlay.css" rel='stylesheet'> </head> - Just above the script block you added earlier, add the following
scripttag that is the actual JavaScript code that implements the overlay plugin functionality.<script src="https://players.brightcove.net/videojs-overlay/2/videojs-overlay.min.js"></script> <script> videojs.getPlayer('myPlayerID').on('loadedmetadata', function() { - Just after where the
play()method is used, call the player'soverlay()method, and add braces as a parameter to prepare for passing a JSON configuration object.myPlayer.overlay({ }); - Multiple overlay objects can be passed as an array to the plugin to display different content at various times and in various locations. In this case, just one overlay object will be passed to display some text, and have it appear only when the video is playing. When the video is paused the overlay will not be displayed. You also want the overlay to appear in the middle-right side of the player. To implement this, add the following overlay object as a configuration parameter.
overlays: [{ content: 'This event-triggered overlay message appears when the video is playing', start: 'play', end: 'pause', align: 'right' }] - Confirm your script block appears as follows, and that the overlay plugin has been called and configured correctly.
<script> videojs.getPlayer('myPlayerID').on('loadedmetadata', function() { var myPlayer = this; myPlayer.muted(true); myPlayer.play(); myPlayer.overlay({ overlays: [{ content: 'This event-triggered overlay message appears when the video is playing', start: 'play', end: 'pause', align: 'right' }] }); }); </script> - Save your changes and refresh your page in the browser to see the video automatically start playing. You will see the overlay appear when the video starts. Pause the video to see the overlay removed.
- For your review, the entire page's HTML code can be viewed here:
<!doctype html>
<html>
<head>
  <meta charset="UTF-8">
  <title>Untitled Document</title>
  <link href="https://players.brightcove.net/videojs-overlay/2/videojs-overlay.css" rel='stylesheet'> </head>
<body>
  <video-js id="myPlayerID"
    data-account="1752604059001"
    data-player="UEoNyhSA6"
    data-embed="default"
    controls=""
    data-video-id="4607357817001"
    data-playlist-id=""
    data-application-id=""
    width="960" height="540"></video>
  <script src="https://players.brightcove.net/1752604059001/UEoNyhSA6_default/index.min.js"></script>

  <script src="https://players.brightcove.net/videojs-overlay/2/videojs-overlay.min.js"></script>
  <script>
    videojs.getPlayer('myPlayerID').on('loadedmetadata', function() {
      var myPlayer = this;
      myPlayer.muted(true);
      myPlayer.play();
      myPlayer.overlay({
        overlays: [{
          content: 'This event-triggered overlay message appears when the video is playing',
          start: 'play',
          end: 'pause',
          align: 'right'
        }]
      });
    });
  </script>
</body>
</html>
<!doctype html> <html> <head> <meta charset="UTF-8"> <title>Untitled Document</title> <style> .video-js { height: 344px; width: 610px; } </style> <link href="https://players.brightcove.net/videojs-overlay/lib/videojs-overlay.css" rel='stylesheet'> </head> <body> <video id="myPlayerID" data-account="3676484087001" data-player="78ef7d78-18d9-4459-a6da-d94e46163076" data-embed="default" controls></video> <script src="https://players.brightcove.net/3676484087001/78ef7d78-18d9-4459-a6da-d94e46163076_default/index.min.js"></script> <script src="https://players.brightcove.net/videojs-overlay/lib/videojs-overlay.js"></script> <script> videojs.getPlayer('myPlayerID').on('loadedmetadata', function () { var myPlayer = this; myPlayer.play(); myPlayer.overlay({ overlays: [{ content: 'This event-triggered overlay message appears when the video is playing', start: 'play', end: 'pause' }] }); }); </script> </body> </html>