Implementing Playlists
Overview
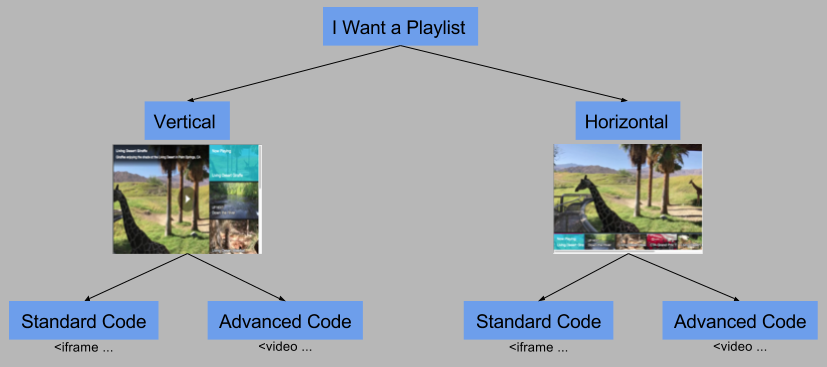
When using playlists the first decision you should make is where do you want the playlist in relation to the player. Normally, when using Brightcove Player you see playlists to the right of the player vertically or below the player horizontally. (As you will see later in this document, you have flexibility to locate the playlist in other places.) Implementations of a vertically and horizontally placed playlist follow.
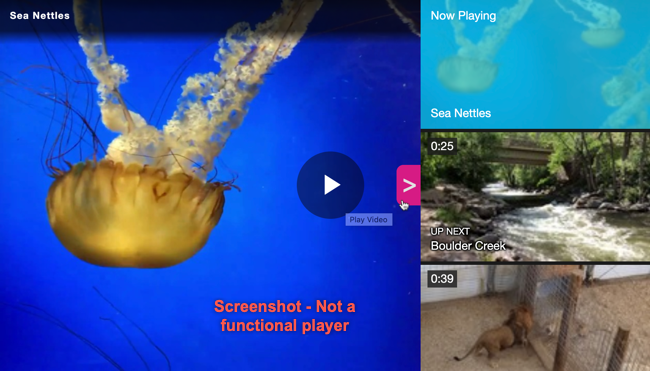
Vertical playlist example
The following shows a vertical playlist:
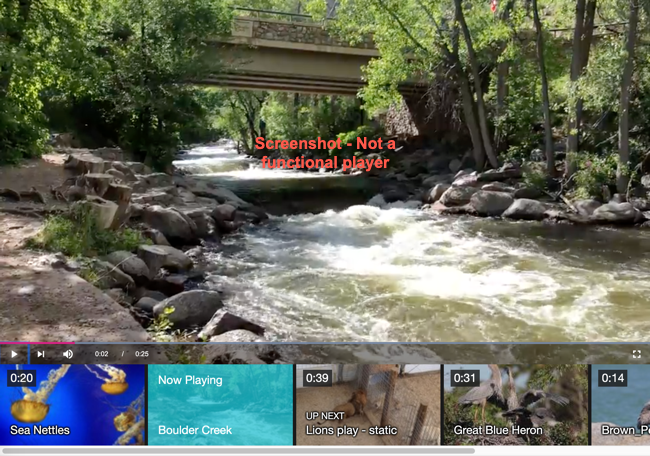
Horizontal playlist example
The following shows a horizontal playlist:
Along with the direction of the playlist, you will also need to determine the HTML code you wish to use for implementation, Standard or Advanced. The following shows the four resulting options you have:
Implementation overview
To use playlists, complete the follow tasks:
- Create a playlist either in Studio or manually using JavaScript.
- Enable your player to use playlists using Studio's player properties Styling option.
- Implement the playlist using either the Standard (iframe) player or the Advanced (in-page embed) implementation.
- If you wish to programmatically control the playlist, use the Playlist API.
Create playlist
The following three documents show how to create playlists. The first two using Video Cloud Studio and the last one using JavaScript.
To create a playlist you need to use the player's playlist() method along with JSON to define the videos in the playlist. The following code shows an example.
  <script type="text/javascript">
  videojs.getPlayer('myPlayerID').ready(function() {
      var myPlayer = this;
      myPlayer.playlist([{
          "sources": [{
              "src": "http://solutions.brightcove.com/bcls/assets/videos/Sea_SeaHorse.mp4", "type": "video/mp4"
          }],
          "name": "Seahorse",
          "thumbnail": "http://solutions.brightcove.com/bcls/assets/images/Sea_Seahorse_poster.png",
          "poster": "http://solutions.brightcove.com/bcls/assets/images/Sea_Seahorse_poster.png"
      }, {
          "sources": [{
              "src": "http://solutions.brightcove.com/bcls/assets/videos/Sea_Anemone.mp4", "type": "video/mp4"
          }],
          "name": "Sea Anemone",
          "thumbnail": "http://solutions.brightcove.com/bcls/assets/images/Sea_Anemone_poster.png",
          "poster": "http://solutions.brightcove.com/bcls/assets/images/Sea_Anemone_poster.png"
      }, {
          "sources": [{
              "src": "http://solutions.brightcove.com/bcls/assets/videos/Tiger.mp4", "type": "video/mp4"
          }],
          "name": "Tiger",
          "thumbnail": "http://solutions.brightcove.com/bcls/assets/images/Tiger_poster.png",
          "poster": "http://solutions.brightcove.com/bcls/assets/images/Tiger_poster.png"
      }, {
          "sources": [{
              "src": "http://solutions.brightcove.com/bcls/assets/videos/Sea_ClownFish.mp4", "type": "video/mp4"
          }],
          "name": "Clownfish",
          "thumbnail": "http://solutions.brightcove.com/bcls/assets/images/Sea_ClownFish_poster.png",
          "poster": "http://solutions.brightcove.com/bcls/assets/images/Sea_ClownFish_poster.png"
      }, {
          "sources": [{
              "src": "http://solutions.brightcove.com/bcls/assets/videos/Sea_LionFish.mp4", "type": "video/mp4"
          }],
          "name": "Lionfish",
          "thumbnail": "http://solutions.brightcove.com/bcls/assets/images/Sea_LionFish_poster.png",
          "poster": "http://solutions.brightcove.com/bcls/assets/images/Sea_LionFish_poster.png"
      }]);
  });
  </script>
Enable player
You can use Studio to enable your player to use playlists. Follow these steps to do so:
- Open the PLAYERS module and either create a new player or locate the player to which you wish to enable for playlists.
- Click the link for the player to open the player's properties.
- In Player Information, for the Player Type click the Playlist radio button.
- Click Save.
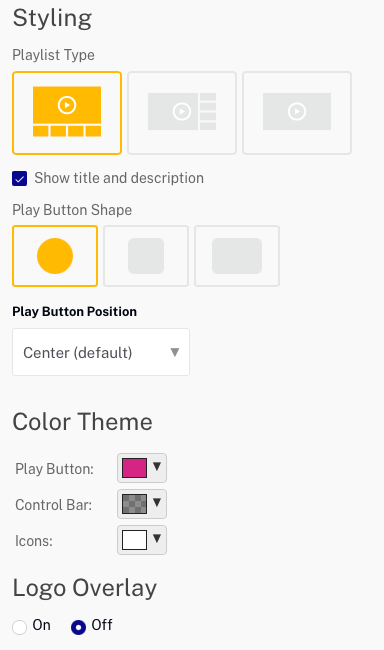
- Click Styling in the left navigation menu.
- Choose your desired Playlist Type:
- Click Playback in the left navigation menu.
- Check the radio buttons for the playlist options you wish to enable:

- To publish the player, click Publish & Embed > Publish Changes.
- To close the open dialog, click Close.
Standard (iframe) player
Once you have a playlist to use, and have enabled your player to use a playlist, you are ready to actually utilize the playlist with a player. As usual you have the Standard and Advanced player implementations available. In this section, instructions for using the playlist with the Standard implementation are shown. When using the Standard/Vertical Playlist implementation, the playlist will appear on the right side of the player, as you have seen in the example at the top of this document.
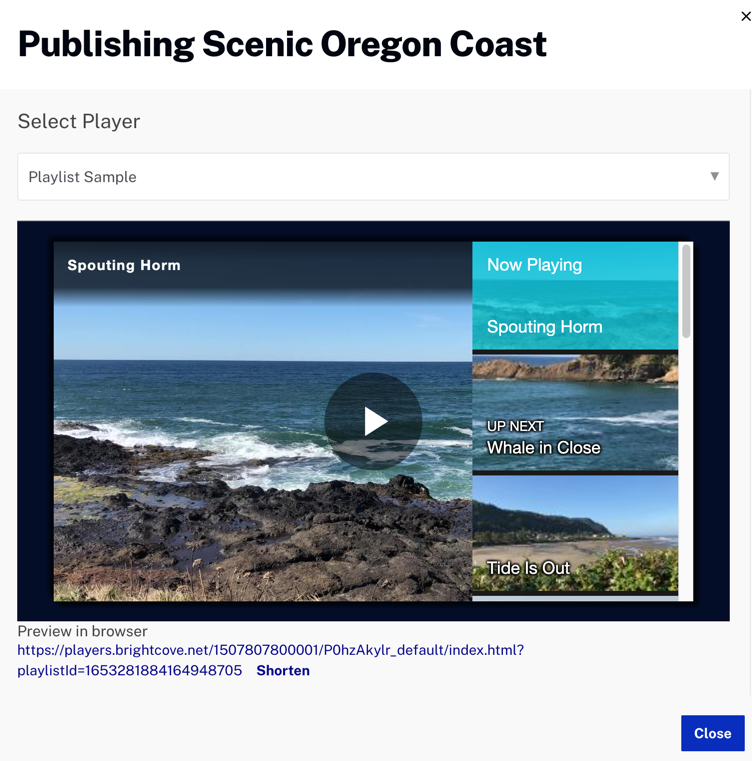
You publish a playlist very similarly as you publish a video. In Studio's MEDIA module, select your playlist then click the Publish Playlist button. Be sure to select the correct player.
Once you have published, you then choose your code. In this section, the Standard (iframe) code is demonstrated. You can select options for the code (highlighted) that deal with player sizing.
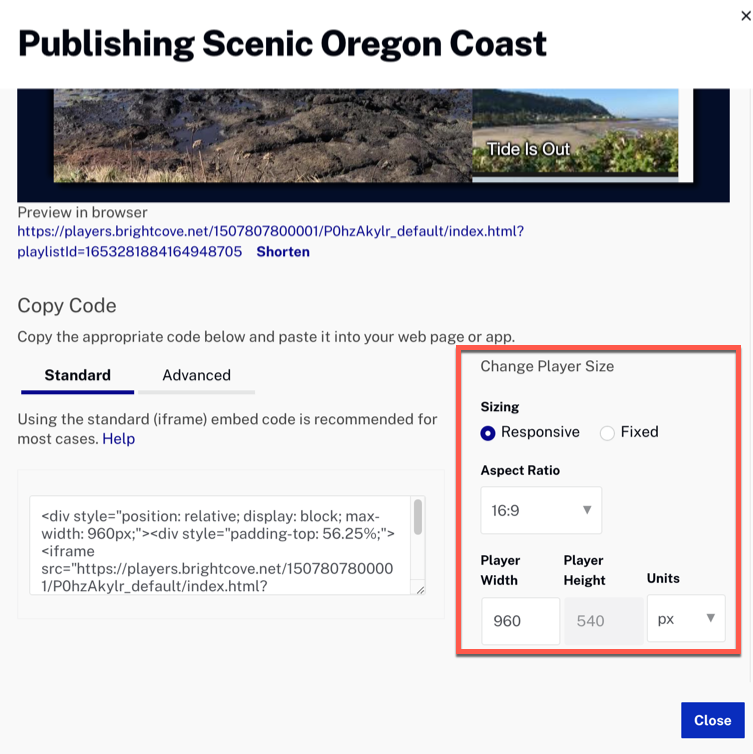
If you wish to have a responsive player, which is an excellent option, the player code appears as shown here:
<div style="position: relative; display: block; max-width: 960px;">
  <div style="padding-top: 56.25%;">
    <iframe src="https://players.brightcove.net/1507807800001/P0hzAkylr_default/index.html?playlistId=1653281884164948705"
     allowfullscreen=""
     allow="encrypted-media"
     style="position: absolute; top: 0px; right: 0px; bottom: 0px; left: 0px; width: 100%; height: 100%;"></iframe>
  </div>
</div>
The two div elements and associated attributes are what make the player responsive.
Adjust padding-top for a horizontal playlist
The code just displayed is for the player ONLY. If you are using a horizontal playlist, you must manually adjust the code a bit to make room for the playlist. Use the following table to correctly change the <div style="padding-top: 56.25%;"> value.
| Aspect Ration | padding-top with player only | padding-top with horizontal playlist |
|---|---|---|
| 4:3 | 75% | 93.75% |
| 16:9 | 56.25% | 70.31% |
This means if you are using a video of 16:9 aspect ration, the padding-top value should appear as follows:
<div style="padding-top: 70.31%;">
Manually changing the playlist
If you wish to change the playlist used with the iframe implementation you simply need to change the src attribute of the iframe. If using an ID:
<iframe src="https://players.brightcove.net/.../index.html?playlistId=1754200320001"
or if you are using a reference ID:
<iframe src="https://players.brightcove.net/.../index.html?playlistId=ref:myrefid001"
Advanced (in-page embed) player
After you have created a playlist in Studio's MEDIA module, and have enabled a playlist player in Studio's PLAYERS module, you are ready to implement the playlist with a player. With the Standard embed code, the plugin creates the playlist container and sizes it to fit the iframe element. With the Advanced In-Page embed code, you must provide the playlist container and use CSS to size the player and playlist appropriately.
Vertical playlist
To provide an iframe-like experience with a collapsable vertical tray, Brightcove has developed a Playlist Player Container for the Advanced in-page embed code.
To use the Playlist Player Container, wrap the Advanced embed code with the following:
<div class="vjs-playlist-player-container">
Fixed, vertical playlist
Follow these steps to create a fixed, vertical playlist:
-
Get the Advanced embed code. After you publish the playlist using your configured player (as detailed in the section above), choose the Advanced code. It should be similar to this:
<video-js data-account="1507807800001"
  data-player="P0hzAkylr"
  data-embed="default"
  controls=""
  data-video-id=""
  data-playlist-id="1653281884164948705"
  data-application-id=""
  width="960" height="540"></video-js>
<script src="https://players.brightcove.net/1507807800001/P0hzAkylr_default/index.min.js"></script>
If you viewed the player with the code above, you will NOT see a playlist. When using the Advanced implementation of the player you MUST wrap the player in the Playlist Player Container.
-
Wrap the advanced embed code with the Playlist Player Container, and add the following:
-
A static CSS
widththat matches the player size
<div class="vjs-playlist-player-container" style="width: 960px;"> <video-js data-account="1507807800001" data-player="P0hzAkylr" data-embed="default" controls="" data-video-id="" data-playlist-id="1653281884164948705" data-application-id="" width="960" height="540"></video-js> </div> <script src="https://players.brightcove.net/1507807800001/P0hzAkylr_default/index.min.js"></script> -
Responsive, vertical playlist
Follow these steps to create a responsive, vertical playlist:
-
Get the Advanced embed code. After you publish the playlist using your configured player (as detailed in the section above), choose the Advanced code. It should be similar to this:
<div style="max-width: 960px;">
	<video-js
		data-account="1752604059001"
		data-player="5dBwlwbNk"
		data-embed="default"
		controls=""
		data-video-id=""
		data-playlist-id="5686354139001"
		data-application-id=""
		class="vjs-fluid">
	</video-js>
</div>
<script src="https://players.brightcove.net/1752604059001/5dBwlwbNk_default/index.min.js"></script>
If you viewed the player with the code above, you will NOT see a playlist. When using the Advanced implementation of the player you MUST wrap the player in the Playlist Player Container.
Notice that the responsive player uses the
max-widthstyle and thevjs-fluidclass. -
To the
<div>wrapper around thevideo-jselement, add thevjs-playlist-player-containerclass.<div class="vjs-playlist-player-container" style="max-width: 960px;"> <video-js data-account="1752604059001" data-player="5dBwlwbNk" data-embed="default" controls="" data-video-id="" data-playlist-id="5686354139001" data-application-id="" class="vjs-fluid"> </video-js> </div> <script src="https://players.brightcove.net/1752604059001/5dBwlwbNk_default/index.min.js"></script>
Horizontal playlist
To provide an iframe-like experience with a horizontal playlist, Brightcove has developed a Playlist Player Container for the Advanced in-page embed code.
To use the Playlist Player Container, wrap the Advanced embed code with the following:
<div class="vjs-playlist-player-container">
Fixed, horizontal playlist
Follow these steps to create a fixed, horizontal playlist:
-
Get the Advanced embed code. After you publish the playlist using your configured player (as detailed in the section above), choose the Advanced code. It should be similar to this:
<video-js
  data-account="1752604059001"
  data-player="5dBwlwbNk"
  data-embed="default"
  controls=""
  data-video-id=""
  data-playlist-id="5686354139001"
  data-application-id=""
  width="960" height="540">
</video-js>
<script src="https://players.brightcove.net/1752604059001/5dBwlwbNk_default/index.min.js"></script>
If you viewed the player with the code above, you will NOT see a playlist. When using the Advanced implementation of the player you MUST wrap the player in the Playlist Player Container.
-
Wrap the advanced embed code with the Playlist Player Container, and add the following:
- A static CSS
widththat matches the player size -
A static CSS
heightequal to the player's height divided by 0.8. Because the horizontal playlist occupies 20% of the available space, you need to set the player height to occupy 80% of the available space. (e.g. 540px / .8 = 675px)
<div class="vjs-playlist-player-container" style="width: 960px; height: 675px;"> <video-js data-account="1752604059001" data-player="5dBwlwbNk" data-embed="default" controls="" data-video-id="" data-playlist-id="5686354139001" data-application-id="" width="960" height="540"> </video-js> </div> <script src="https://players.brightcove.net/1752604059001/5dBwlwbNk_default/index.min.js"></script> - A static CSS
Responsive, horizontal playlist
This is the most complex customization because both the player and playlist need to be respsonsive with respect to width and height.
-
Get the Advanced embed code. After you publish the playlist using your configured player (as detailed in the section above), choose the Advanced code. It should be similar to this:
<div style="max-width: 960px;">
	<video-js
	  data-account="1752604059001"
	  data-player="5dBwlwbNk"
	  data-embed="default"
	  controls=""
	  data-video-id=""
	  data-playlist-id="5686354139001"
	  data-application-id=""
	  class="vjs-fluid">
	</video-js>
</div>
<script src="https://players.brightcove.net/1752604059001/5dBwlwbNk_default/index.min.js"></script>
If you viewed the player with the code above, you will NOT see a playlist. When using the Advanced implementation of the player you MUST wrap the player in the Playlist Player Container.
Notice that the responsive player uses the
max-widthstyle and thevjs-fluidclass. -
In the
video-jselement, remove thevjs-fluidclass and replace it withvjs-fill.class="vjs-fill" -
Wrap the
video-jselement with adivelement as follows:<div class="vjs-playlist-player-container" style="position: absolute; top: 0px; right: 0px; bottom: 0px; left: 0px; width: 100%; height: 100%;"> -
Wrap the previous container in a
divelement with CSSpadding-topequal to:aspectRatioHeight / aspectRatioWidth / 0.8 * 100.<div style="padding-top: 70.3125%;">Because the horizontal playlist occupies 20% of the available space, we need the height of the player to occupy 80% of the available space. This is how we figured the math:
aspectRatioHeight / aspectRatioWidthgives you the aspect ratio as a percentage (e.g. 9 / 16 = 0.5625)- This percentage divided by 0.8 gives us an adjusted percentage.
-
Multiplying by 100 gives us a number from 0 to 100 that will work as a
padding-topvalue.
Here are common aspect ratios and their pre-calculated percentages:
16:9yields70.3125%16:10yields78.125%4:3yields93.75%
-
Wrap the previous container with a
divelement as follows:<div style="position: relative; display: block; max-width: 960px;"> -
The complete code should look similar to this:
<div style="position: relative; display: block; max-width: 960px;">
        <div style="padding-top: 70.3125%;">
        <div class="vjs-playlist-player-container" style="position: absolute; top: 0px; right: 0px; bottom: 0px; left: 0px; width: 100%; height: 100%;">
			<video-js
			  data-account="1752604059001"
			  data-player="5dBwlwbNk"
			  data-embed="default"
			  controls=""
			  data-video-id=""
			  data-playlist-id="5686354139001"
			  data-application-id=""
			  class="vjs-fill">
			</video-js>
		</div>
	</div>
</div>
<script src="https://players.brightcove.net/1752604059001/5dBwlwbNk_default/index.min.js"></script>
Set the initial video
By default, the first video in the playlist is initially loaded into the player. If you wish to load another video in the playlist first, there are four possibilities:
- If you are using the Advanced (in-page embed) player you can add the
data-playlist-video-idas an attribute to set the initial video to play from the playlist, as shown here:<video-js data-playlist-id="5455901760001" data-playlist-video-id="5357926703001" data-account="1507807800001" data-player="BJQXwfiuG" data-embed="default" data-application-id controls=""></video-js> <script src="https://players.brightcove.net/1507807800001/BJQXwfiuG_default/index.min.js"></script>This is built in Brightcove Player functionality.
- If you are using the Advanced (in-page embed) player on a page. You can add the following URL parameter to the page request:
The player will automatically play the desired video from the playlist. This is built in Brightcove Player functionality.?playlistVideoId=5510487311001 - If you are using a Standard (iframe) player on a page. You can add a URL parameter to the iframe's
srcattribute:
The player will automatically play the desired video from the playlist. This is built in Brightcove Player functionality. A sample of this technique is shown here (You will need to scroll the code far to the right to see the use of the parameter):<iframe src=".../index.html?playlistId=5531423971001&playlistVideoId=5510487311001" ...<div style="position: relative; display: block; max-width: 640px;"> <div style="padding-top: 56.25%;"> <iframe src="https://players.brightcove.net/1507807800001/P0hzAkylr_default/index.html?playlistId=1653281884164948705" allowfullscreen="" allow="encrypted-media" style="position: absolute; top: 0px; right: 0px; bottom: 0px; left: 0px; width: 100%; height: 100%;"></iframe> </div> </div> - You are using an iframe player and wish to pass the desired video's ID on the URL page request. This differs from #3 as you do not want to have to edit the iframe's code on the actual page, but use the URL from the page request. This is NOT built in Brightcove Player functionality, but can be done with custom code on the HTML page. A sample of this technique is shown next.
Sample: Sending the video ID for the iframe on the page request
At the highest level the logic behind the following code is a query parameter is read that contains the video ID for the video that should play first, then the iframe player is dynamically generated using that ID. In more detail, the logic behind this application is:
- An insertion point is designated by creating an HTML
divelement. - The query parameter named playlistVideoId is read from the page request URL with assistance of a helper function.
- An
iframeelement is dynamically built that includes asrcattribute that contains the query parameter. - The dynamically created iframe is inserted into the page.
    <!doctype html>
    <html>

    <head>
      <meta charset="UTF-8">
      <title>Untitled Document</title>
    </head>

    <body>

      <div id="place_player_here"></div>

      <script type="text/javascript">
        var theParamValue,
          iframe = document.createElement('iframe'),
          insertionPoint = document.getElementById("place_player_here");

        // Use the helper function below to get the value of the parameter
        theParamVideoID = getURLparam("playlistVideoId");

        // Dynamically build the iframe
        iframe.setAttribute('allowfullscreen', 'allowfullscreen');
        iframe.setAttribute('allow', 'encrypted-media');
        iframe.setAttribute('style', "width: 610px;height: 344px");
        iframe.src = 'https://players.brightcove.net/1752604059001/H1HpIEcCb_default/index.html?playlistId=4450721964001&playlistVideoId=' + theParamVideoID;
        // Insert the iframe into the page
        insertionPoint.appendChild(iframe);

        // Helper function to get value for a specific URL parameter
        function getURLparam(name) {
          var regex, results;
          name = name.replace(/[\[]/, "\\[").replace(/[\]]/, "\\]");
          regex = new RegExp("[\\?&]" + name + "=([^&#]*)");
          results = regex.exec(location.search);
          return results === null ?
            "" :
            decodeURIComponent(results[1].replace(/\+/g, " "));
        }
      </script>

    </body>

    </html>
Below is a working sample where the video loaded in the player is not the first one in the playlist, but the second.
Playlist API
The Playlist API gives you programmatic control over the usage of playlists, for instance next(), previous() and autoadvance() methods. The Guide: Playlist API document provides full details.
Implement using code
If you choose, you can implement playlists entirely in code and avoid Studio. The basic steps are:
- Load the CSS and JavaScript for the Playlist UI Plugin.
- Configure an
optionsobject to reflect your playlist setup. - Call the
bcPlaylistUi()method, passing the configuration object as a parameter.
An example implementation follows:
  <!doctype html>
  <html>

  <head>
    <meta charset="UTF-8">
    <title>Untitled Document</title>
    <style type="text/css">
      .vjs-playlist {
        width: 625px;
      }
    </style>
    <link href="https://players.brightcove.net/videojs-bc-playlist-ui/3/videojs-bc-playlist-ui.css" rel="stylesheet">
  </head>

  <body>

    <video-js id="myPlayerID"
      data-playlist-id="4450721964001"
      data-account="1752604059001"
      data-player="default"
      data-embed="default"
      data-application-id
      controls=""
      autoplay
      width="960" height="540"></video-js>
    <script src="https://players.brightcove.net/1752604059001/default_default/index.min.js"></script>

    <!-- Location of the playlist -->
    <div class="vjs-playlist"></div>

    <script src="https://players.brightcove.net/videojs-bc-playlist-ui/3/videojs-bc-playlist-ui.min.js"></script>

    <script type="text/javascript">
      videojs.getPlayer('myPlayerID').ready(function() {
        // Get a reference to the player
        var myPlayer = this,
          // Create an object in which you will place options
          options = {};
        // Set options
        options.horizontal = true;
        options.autoadvance = 3;
        // Call plugins method passing in options object
        myPlayer.bcPlaylistUi(options);
      });
    </script>

  </body>

  </html>