Overview
Pinning mode allows users to multitask. Once video playback has started, as the user scrolls down the page, Pinning mode will reposition and pin the player to a corner of the web page.
Why it is called Pinning
The behavior this plugin enables is also commonly referred to as "floating" or "pinned" behavior. Brightcove uses the term "Pinning" because:
- Adoption of this verbiage by Apple and Google for their native browsers.
- W3C standards also reference "Pinning".
Brightcove plugin vs. native functionality
Most modern browsers now include Pinning functionality. In this section you will see the differences between the Pinning plugin and the native functionality. This will be followed by reasons why you would want to turn off native functionality and add the plugin to your player.
Native browser functionality
The following details how the native browser Pinning functions:
- You do not have to do anything to enable the functionality, the icon for Pinning will be in the controlbar.
- The icon button works as a toggle, viewers toggle the functionality on and off.
- The native Pinning functionality opens a browser player in an entirely new browser/OS window, which can be controlled independent of the web page that launched it. Hence, the Pinning player is NOT bounded by the browser. The Pinning player will appear in the bottom right of your screen, no matter how your browser is sized.
- The video in the Brightcove Player is "grayed out" when the native Pinning functionality is toggled on.
- The native Pinning button does not display when ads are enabled.
See how it works
Watch this video to see the native implementation in use:
Turn off functionality
If you want to turn off the native browser functionality, place the following line of JSON code in the player configuration using Video Cloud Studio's JSON Editor:
"picture_in_picture_control": false,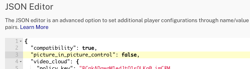
Brightcove plugin
The following details how the Brightcove Player Pinning plugin functions:
- Once the plugin is installed the viewer does NOT need to take any action to start the Pinning player, other than scroll the Brightcove Player mostly out of view. There is no button to click to turn on Pinning.
- When the viewer scrolls the Brightcove Player back into view, the Pinning player will automatically disappear.
- The Pinning player is displayed (be default) in the bottom-right corner of the browser. Unlike the native functionality, the plugin is bounded by the browser.
See how it works
Watch this video to see the Brightcove Player plugin implementation in use:
Why use the Brightcove Player plugin?
With the native functionality built in, and you don't have to do anything, why would you want to turn off the native functionality and install the Brightcove Player plugin? The following are some of the reasons:
- The native player does not play client-side ads. It will play SSAI ads, but will not provide the UI customizations that Brightcove Player does and will not prevent the user from seeking through/over those ads.
- You want the Pinning functionality to be bounded by the browser. You do not want the Pinning player to be placed outside the browser's real estate.
- You want the functionality to be in effect without any user interaction.
- The plugin provides more, and easier to implement, customization. Options, methods and events you can use with the plugin are listed near the end of this document.
Player example
Start video playback. (You can then stop it). Scroll down the page to see the Pinning player in the right-hand corner of the web page. You can close the Pinning player or scroll back up to the full-size player.
See the Pen Pinning Plugin by Brightcove Learning Services (@bcls1969) on CodePen.
Implement using Players module
To implement the Pinning Plugin using the Players module, follow these steps:
- Open the PLAYERS module and either create a new player or locate the player to which you wish to add the plugin.
- Select the link for the player to open the player's properties.
- Expand the Plugins section on the Overview tab.
-
Next, select the Add Plugin button, and then select Brightcove Plugin.
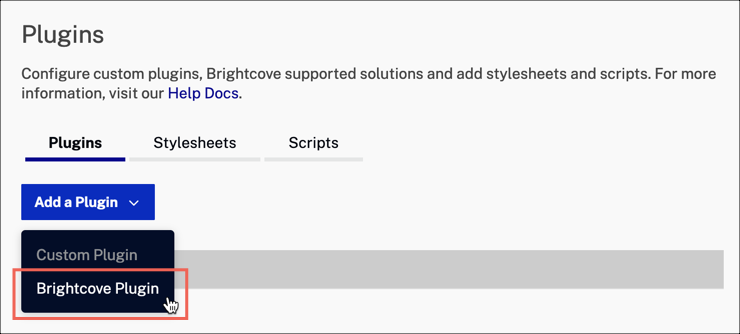
Add Plugin button -
Expand the Brightcove Plugin dropdown and select Pinning.
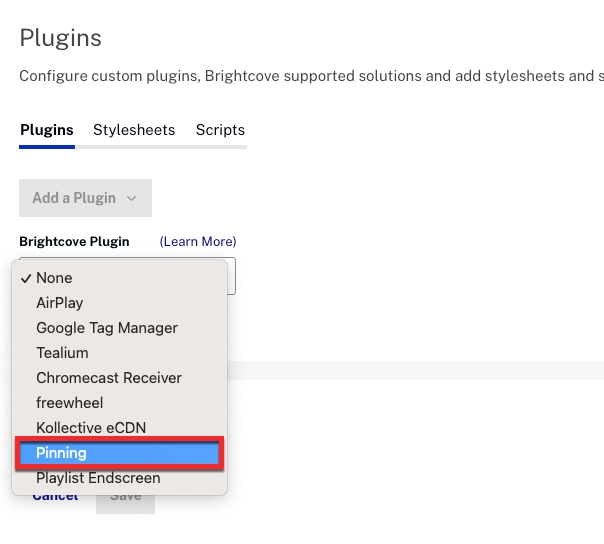
Pinning -
Optional: Enter the configuration options in the Options(JSON) text box. An example for setting the horizontal alignment of the player when it is in Pinning mode is shown here:

Plugin options See the options section for more details.
- Select the Add button.
-
You will now see the Pinning plugin added to the list of plugins for your player.
- To publish the player, select Publish Changes.
- To close the open dialog, select Close.
-
Return to the MEDIA module and publish your video using the player you just updated for Pinning.
- In an editor, copy the player embed code into your web page.
-
The Pinning plugin requires that your player is wrapped by a container element with the class set to
vjs-pinning-container. Your code should look similar to this:<div class="vjs-pinning-container"> <video-js id="myPlayerID" data-video-id="5701202551001" data-account="1752604059001" data-player="default" data-embed="default" width="640" height="360" controls=""></video-js> <script src="https://players.brightcove.net/1752604059001/default_default/index.min.js"></script> </div>If the
<div>element above is not found as the parent of the player, the plugin will fail to initialize and you will get the following log warning:VIDEOJS: WARN: expected player to be a child of a "vjs-pinning-container" element, cannot continue with Pinning plugin - When the video has starts playing, scroll down to see the Pinning player Pinning to the bottom of the page.
Implement with JSON Editor
For players 7.21.0 and newer, you can also follow these steps to add the plugin using the JSON editor:
In the Players module, navigate to the player you want to configure and click the JSON Editor accordion on the Overview tab.
Modify the "plugins" array to add the Pinning plugin.
    "plugins": [
    {
      "name": "pinning",
      "is_packaged": true,
      "options": {
        ...
      }
    }
  ]
Options
You may pass in an options object to the plugin upon initialization. This object may contain any of the following options:
allowOnMobile
allowOnMobile:- Type:
boolean - Default:
false -
By default, Pinning mode will not work on Android or iOS mobile devices. The reason for this is because these CSS fixed positioning does not work on zoomable devices with multiple viewports in the same way it does on desktop devices.
If you want to enable Pinning on supported mobile devices, you can do so with this option. There are some cases where you might want to enable support:
- The integrator is willing to take on the responsibility of managing positioning for Pinning player mode.
- The website using the player is unlikely to be zoomed.
- Zooming has been disabled using a
user-scalable=nodirective. Using this directive will makeposition: fixedbehave as it does on desktops, but it is not specifically recommended because it can be an accessibility concern.<meta name="viewport" content="width=device-width, user-scalable=no">
-
Example:
// Allow mobile (iOS and Android) devices to enter PIP mode.
player.pinning({allowOnMobile: true});
- Type:
closeable
closeable:- Type:
boolean - Default:
true - By default, Pinning mode can be disabled by the user by clicking the X button in the top, right corner of the player. This feature can be disabled by passing
falsefor this option. -
Example:
// Do not allow the user to close the PIP mode player.
player.pinning({closeable: false});
- Type:
scale
scale:- Type:
number - Default:
2 / 3 - The scaling factor applied to the player when it is in Pinning mode. This value must be a number greater than zero and less than or equal to 1.
-
Example:
// Detach the player, but do not change its size. player.pinning({scale: 1}); -
Example 2:
// Detach the player, and change its size to 1/2.
player.pinning({scale: 0.5});
- Type:
height and width
heightandwidth:- Type:
number - Default:
null -
By default, the plugin will scale down the player's dimensions by a factor determined by the
scaleoption. However, providing aheight(orwidth) will override the default scaling and set the size of the scaled-down player explicitly.If only one dimension is provided, the other will be scaled down to maintain the aspect ratio. If both dimensions are provided, the player will be set to the exact, specified size - allowing a change in aspect ratio.
-
Example:
// Detach the player and set its width to 300 pixels. Scale its height to
// maintain its current aspect ratio.
player.pinning({width: 300});
- Type:
posX
posX:- Type:
string - Default:
"right" -
The horizontal alignment of the player when it is in Pinning mode - either "right" or "left".
-
Example:
// When the player is in PIP mode, align it to the left side of the viewport.
player.pinning({posX: 'left'});
- Type:
posY
posY:- Type:
string - Default:
"bottom" -
The vertical alignment of the player when it is in Pinning mode - either "top" or "bottom".
-
Example:
// When the player is in PIP mode, align it to the top of the viewport.
player.pinning({posY: 'top'});
- Type:
viewable
viewable:- Type:
number - Default:
0.8 -
The threshold at which the player is considered viewable. In other words, when this percentage of the total player area (height and width) is visible in the browser's viewport, it is considered viewable.
For example, with the default of 0.8, the player is not considered viewable unless 80% of it is visible in the viewport. The
viewablevalue must be a number greater than or equal to 0 and less than or equal to 1. -
Example:
// If more than half the player is outside of the viewport, activate PIP mode.
player.pinning({viewable: 0.5});
- Type:
manualContainerSize
manualContainerSize:- Type:
boolean - Default:
false -
By default, a player with this plugin enabled will keep the physical dimensions of the special container element in sync with the player's dimensions. However, this behavior may not work for all use-cases, so it can be disabled by setting this option to
true.When doing so, the container element will behave like a normal block element. This means that users of the plugin will need to manage its size on their own.
This option can also be set in the embed code via the boolean
data-manual-container-sizeattribute on the container. Its presence will set this option to true. Note that any value passed to the plugin will take precedence over any value defined in the embed code. -
Example:
// Implementation will handle sizing the container. player.pinning({manualContainerSize: true}); -
Example using the
data-manual-container-sizeattribute on the container:<div class="vjs-pinning-container" data-manual-container-size> <video-js class="video-js vjs-default-skin"> </video-js> </div>
- Type:
Using the options
You have two ways you can utilize the option:
- In Studio's PLAYERS > PLUGINS section.
- Using JavaScript with the player.
Using Studio
In Studio, edit the player and return to the Plugins section. Click on Pinning in the name list. Using proper JSON format, list the option (in quotation marks), followed by the appropriate value. If the values are string, they must be in quotes. If they are numeric or boolean, quotes cannot be included.
Using JavaScript
To implement the options in code, you create an object, assign desired options their respective values, then pass the options object when calling the plugin:
videojs.getPlayer('myPlayerID').ready(function() {
  // When the player is ready, get a reference to it
  var myPlayer = this,
      options = {};

  options.scale = 0.5;
  options.posX = "left";
  // Initialize the pinning plugin
  myPlayer.pinning(options);
});
Methods
The following methods let you interact with the Pinning plugin:
| Method | Description |
|---|---|
myPlayer.pinning().enable() |
Enable automatic pinning behavior |
myPlayer.pinning().disable() |
Disable automatic pinning behavior |
myPlayer.pinning().toggle() |
Manually activate or deactivate pinning mode based on the current state |
myPlayer.pinning().pin() |
Manually put the player into pinning mode |
myPlayer.pinning().unpin() |
Manually take the player out of pinning mode |
Events
The following events are fired from the Pinning plugin:
| Event | Description |
|---|---|
beforepin |
Fires before pinning mode is activated |
pin |
Fires after pinning mode is activated |
beforeunpin |
Fires before pinning mode is deactivated |
unpin |
Fires after pinning mode is deactivated |
beforepinenabled |
Fires before the pinning plugin is enabled |
pinenabled |
Fires after the pinning plugin is enabled |
beforepindisabled |
Fires before the pinning plugin is disabled |
pindisabled |
Fires after the pinning plugin is disabled |
beforepinclose |
Fires before the pinning close button is clicked |
pinclose |
Fires after the pinning close button is clicked |
Changelog
For historical release notes and changelog up to v2.0.0, see the Pinning Plugin Releases.
Notable changes made after version v2.0.0 will be included in the Brightcove Player Release Notes.