Using the Player Reference
Overview
This page is intended for prospective and current customers to perform testing. The following are a few of the options you can test:
- HTML Mode vs. Flash Mode
- Different video format types
The Player Reference page is located at http://players.brightcove.net/3303963094001/player-reference-app/index.html.
Video demonstration
A great way to learn about the player reference page is to watch this 4 1/2 minute video:
Supplying a video source
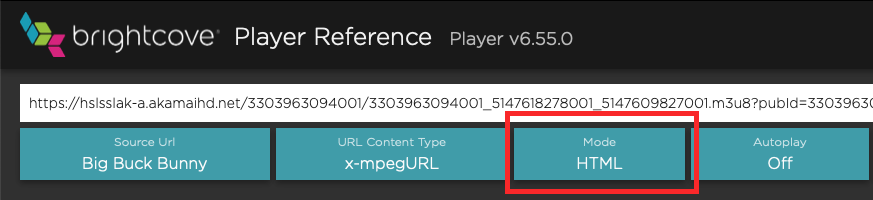
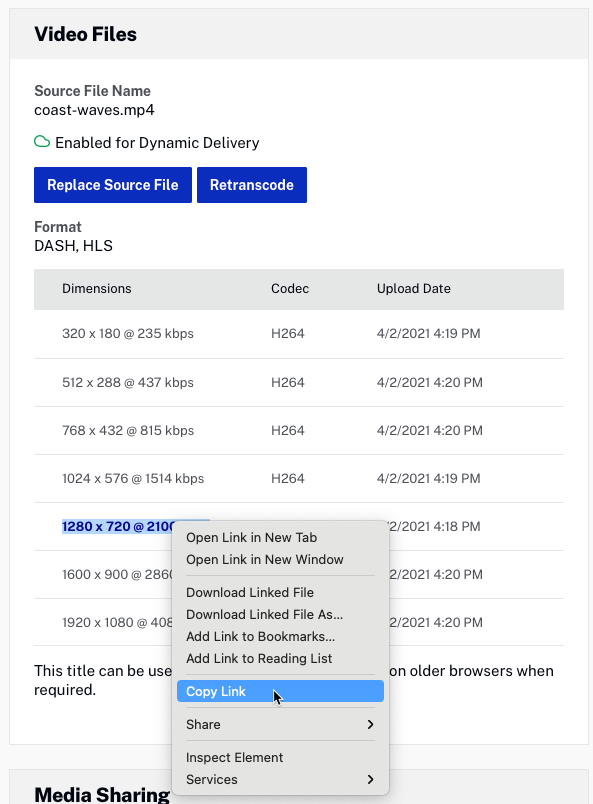
The first thing you will need to do is supply a video source for the player, or use one of the default videos provided. You paste in the URL, then click the options in the Configuration Buttonbar with which you wish to test. You must pre-select the options then click Load.
If you wish, you can use a Video Cloud source for testing. Simply go to the MEDIA module in Studio, click on a video, then in the Video Files section right-click an entry, then choose Copy Link. You can then paste the copied link into the URL entry area.
Supplying player options
One option on the Configuration Buttonbar that needs some explanation is the Player Options button.

This button gives you a way to pass certain configuration options to the player using valid JSON formatted data. For instance, the following would provide a new poster and have the video loop on completion:
{ "poster": "http://solutions.brightcove.com/fish_poster.png", "loop": true }
The Available Options for the Advanced (in-page) Embed Code document provides options you can use. Note that width and height options will not function correctly as player options as they are overridden by the page's configuration.
Viewing displayed data
The reported data on the page is mostly easily interpreted, two areas will be explained a bit more here, those being the Bitrate Switching and Event Timeline sections.
Bitrate Switching
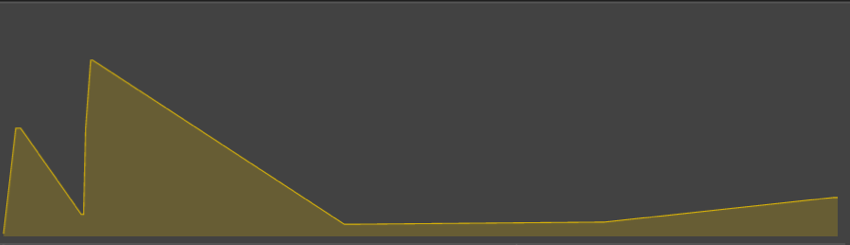
First, if you are viewing an MP4 video source you will not see any information in this section. For an MP4 the video source is sent and there is no further negotiation. For HLS, segments are periodically requested, so depending on bandwidth lower quality or higher quality segments can be requested. A line trending uphill (positive slope) in the graph would mean the available bitrate is increasing and better quality segments will be requested. Conversely, a line trending downhill (negative slope) in the graph would mean the available bitrate is decreasing and poorer quality segments will be requested.
The lines in the graph correspond to what renditions are available for the video. When the plotted graph moves above a line the player will be requesting higher quality segments. The opposite is true when the plotted graph moves below a line. Note that you most likely would not see an immediate change in video quality when the plotter graph crosses a line. The requested segments would have to be sent based on the request, and when received appended to the segments currently in the buffer.

Sharp spikes in the plotted graph, as show below, would most likely trigger rendition changes.
Event Timeline
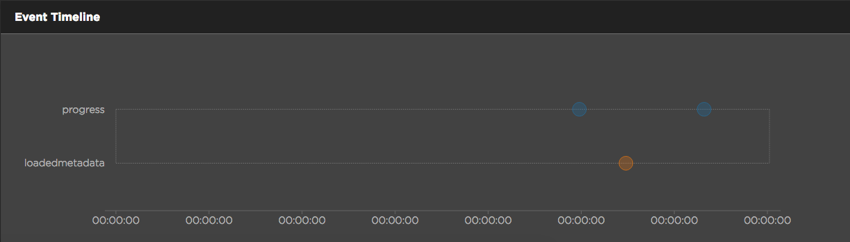
The event timeline will only display the events that have been dispatched. This screenshot shows an HLS video before it has started to play, and only the progress and loadedmetadata events have been dispatched.
The following screenshot shows the same video after the video has begun playing, it has been paused and restarted, as well as a seek performed.
