Overview
In this sample, there are three call to action links displayed in the HTML page:
-
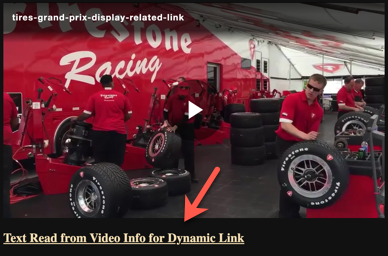
One link displays below the player.
-
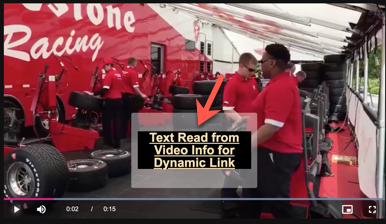
One link displays on player pause.
-
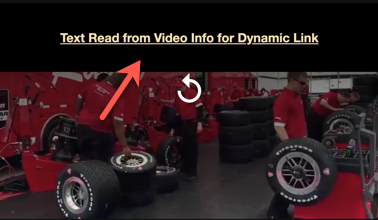
One link displays on a custom endscreen.
Player example
You will be able to see all three call to action display techniques with this player.
- Look below the player and you see the call to action in the HTML page.
- Start then pause the video. You will see the call to action every time the video is paused.
- At the end of the video the custom endscreen will appear containing the call to action.
See the Pen 18151-dynamic-call-action by Brightcove Learning Services (@rcrooks1969) on CodePen.
Source code
View the complete solution on GitHub.
Using the CodePen
Here are some tips to effectively use the above CodePen:
- Toggle the actual display of the player by clicking the Result button.
- Click the HTML/CSS/JS buttons to display ONE of the code types.
- Later in this document the logic, flow and styling used in the application will be discussed in the Player/HTML configuration, Application flow and Application styling sections. The best way to follow along with the information in those sections is to:
- Click the EDIT ON CODEPEN button in the CodePen and have the code available in one browser/browser tab.
- In CodePen, adjust what code you want displayed. You can change the width of different code sections within CodePen.
- View the Player/HTML configuration, Application flow and/or Application styling sections in another browser/browser tab. You will now be able to follow the code explanations and at the same time view the code.
Development sequence
Here is the recommended development sequence:
- Use the In-Page embed player implementation to test the functionality of your player, plugin and CSS (if CSS is needed)
- Put the plugin's JavaScript and CSS into separate files for local testing
- Deploy the plugin code and CSS to your server once you have worked out any errors
- Use Studio to add the plugin and CSS to your player
- Replace the In-Page embed player implementation if you determine that the iframe implementation is a better fit (detailed in next section)
For details about these steps, review the Step-by-Step: Plugin Development guide.
iframe or In-Page embed
When developing enhancements for the Brightcove Player you will need to decide if the code is a best fit for the iframe or In-Page embed implementation. The best practice recommendation is to build a plugin for use with an iframe implementation. The advantages of using the iframe player are:
- No collisions with existing JavaScript and/or CSS
- Automatically responsive
- The iframe eases use in social media apps (or whenever the video will need to "travel" into other apps)
Although integrating the In-Page embed player can be more complex, there are times when you will plan your code around that implementation. To generalize, this approach is best when the containing page needs to communicate to the player. Specifically, here are some examples:
- Code in the containing page needs to listen for and act on player events
- The player uses styles from the containing page
- The iframe will cause app logic to fail, like a redirect from the containing page
Even if your final implementation does not use the iframe code, you can still use the In-Page embed code with a plugin for your JavaScript and a separate file for your CSS. This encapsulates your logic so that you can easily use it in multiple players.
API/Plugin resources used
| API Methods | API Events | API Properties | Brightcove Player Plugins |
|---|---|---|---|
| on | loadstart | mediainfo | Display Overlay |
| ended | Custom Endscreen |
Player/HTML configuration
This section details any special configuration needed during player creation. In addition, other HTML elements that must be added to the page, beyond the in-page embed player implementation code, are described.
Player configuration
For the player you are using, in the PLUGINS section, use the Add a Plugin button four time to add the JavaScript and CSS for both the Overlay and Custom Endscreen plugins.
https://players.brightcove.net/videojs-overlay/2/videojs-overlay.min.js
https://players.brightcove.net/videojs-overlay/2/videojs-overlay.css
https://players.brightcove.net/videojs-custom-endscreen/2/videojs-custom-endscreen.min.js
https://players.brightcove.net/videojs-custom-endscreen/2/videojs-custom-endscreen.css
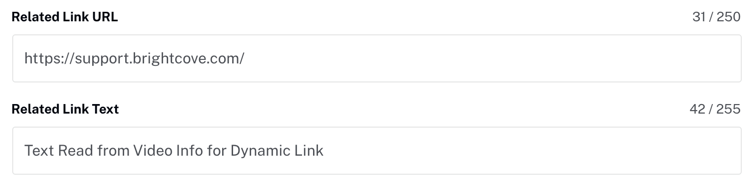
The videos published in the player need to have the Related Link URL and the Related Link Text set. Edit the VIDEO INFORMATION for videos you wish to use with this player and set the values:
Other HTML
If you wish to have the CTA appear in your HTML page, you need to enter a paragraph element to be the target for the injected, dynamically built CTA.
<p id="cta" style='color:red; font-weight: bold; font-size: 20px'></p>
Application flow
The basic logic behind this application is:
- Wait for
loadstartevent to be dispatched, the dynamically assemble an anchor tag. - Use the anchor tag to display a CTA in the HTML page.
- Use the anchor tag to configure the overlay.
- Use the anchor tag to configure the custom endscreen.
Build an anchor tag with information from the mediainfo object
Find the code which is labeled:
// ### Build dynamic anchor tag ###
Once the loadstart event has fired, which you must wait for to have access to the mediainfo data, extract the link and associated text and dynamically build an anchor tag.
Inject the dynamically build anchor tag into the HTML page
Find the code which is labeled:
// ### Inject dynamic HTML into p element ###
Get a reference to the HTML paragraph element, then assign its innerHTML the dynamically built anchor tag.
Configure the overlay
Find the code which is labeled:
// ### Configure dynamic overlay ###
Use the dynamically built anchor tag as the content, and set the rest of the values so the overlay will display on video pause.
Configure the custom endscreen
Find the code which is labeled:
// ### Configure dynamic endscreen ###
Use the dynamically built anchor tag as the content for the custom endscreen
Hide the overlay when video ends
Find the code which is labeled:
// ### Remove overlay after video has ended ###
The overlay will display on the customer endscreen by default, so hide it on video end.
Application styling
The only CSS sets the size of the player.
Plugin code
Normally when converting the JavaScript into a Brightcove Player plugin nominal changes are needed. One required change is to replace the standard use of the ready() method with the code that defines a plugin.
Here is the very commonly used start to JavaScript code that will work with the player:
videojs.getPlayer('myPlayerID').ready(function() {
  var myPlayer = this;
  ...
});
You will change the first line to use the standard syntax to start a Brightcove Player plugin:
videojs.registerPlugin('pluginName', function(options) {
  var myPlayer = this;
  ...
});
As mentioned earlier, you can see the plugin's JavaScript code in this document's corresponding GitHub repo: dynamic-cta.js.
Using the plugin with a player
Once you have the plugin's CSS and JavaScript files stored in an Internet accessible location, you can use the plugin with a player. In Studio's PLAYERS module you can choose a player, then in the PLUGINS section add the URLs to the CSS and JavaScript files, and also add the Name and Options, if options are needed.